Ancient in internet years and mostly forgotten by consumers, File Transfer Protocol (FTP) is still widely used in business environments. For instance, system managers rely on FTP to move files for Electronic Data Interchange (EDI) or website integrations. By using To-Increase Connectivity Studio you can easily connect with FTP and take advantage of this technology. In today’s post, I’ll show you how.
FTP Basics
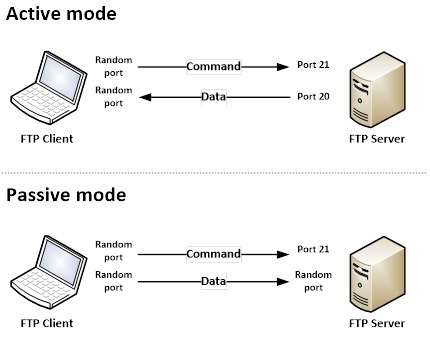
FTP is a standard network protocol to transfer files over the internet. FTP uses two channels between the client and the server: The command channel and the data channel. These channels are in fact separate TCP connections. You can run FTP in active or passive mode, which determines how the command and data connections are established.
In active mode, the FTP client establishes the command channel and the FTP server establishes the data channel. However, there is a chance that the port on the FTP client will be blocked by the firewall and no connection can be established. Passive mode solves this by establishing both channels from the FTP client. In that case, the FTP client tells the server which port should be used for the data channel. In other words, in passive mode the FTP client is more secure and the FTP server is less secure. The image below summarizes the differences between active and passive FTP modes. The passive mode is commonly used. However, Connectivity Studio supports both modes out-of-the-box.
How to Perform FTP Configuration in Connectivity Studio
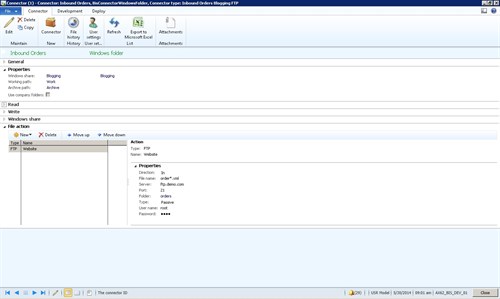
In Connectivity Studio you can transfer files with FTP by using the FTP file action on the Windows folder connector.
TIP: Before you configure an FTP file action, verify that you can access the FTP server from the Application Object Server (AOS).
Follow these steps to configure a FTP file action in Connectivity Studio:
- Open Business Integration Solutions and connectivity Studio Connectors.
- Click Connector in the New group to create a new connector.
- Click Header view in the Show group.
- In the File action FastTab click New and choose FTP. This will add a FTP file action.
- Select In for incoming files and Out for outgoing files in the Direction field.
- Enter a File name in the File name field. — TIP: You can use matching patterns, for example order*.xml.
- Enter an FTP address or IP address in the Server field.
- Enter 21 in the Port field. — NOTE: Port 21 is just a convention for FTP. You can specify other port numbers as well.
- Enter or select a Folder in the Folder field.
- Select Passive or Active mode in the Type field.
- Enter User name and Password.
The inbound file action copies the files to the work folder and removes the file from the FTP server to avoid duplicates.
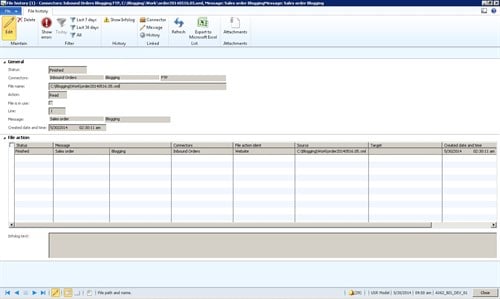
Reviewing History
After running a message you can find and verify the FTP file action in the Connectivity Studio history.
Watch this blog for more practical how-to ideas to help you in your work. If you have questions or would like to know more about Connectivity Studio, please contact us.