
Learn how you can use Connectivity Studio to start a message from an active record in the ERP system by using a menu item
Sometimes you want to start a message from an active record in Microsoft Dynamics AX, using a menu item. In today’s brief tutorial, you learn how you can use To-Increase Connectivity Studio for Microsoft Dynamics AX to accomplish this. Connectivity Studio dynamically adds this active record as a range to the source document and starts the message.
To keep this tutorial simple, we just add a Menu Item on the CustGroup form. This Menu Item uses the active CustGroup record to start the message.
Before you get started, two things:
- You need to have Microsoft Dynamics AX 2012 with Connectivity Studio installed.
- Download and import the Business Integration Solutions project with the required tutorial message.
Create a Menu Item
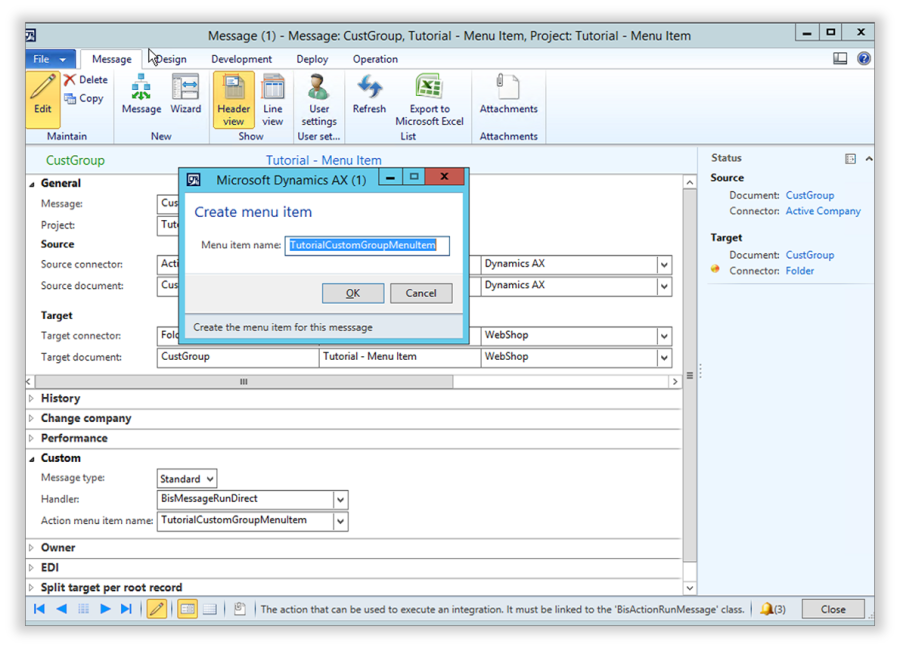
You can select a Menu Item on your Message to 'link' the Menu Item with the desired Message. If the Menu Item does not exist, Connectivity Studio automatically generates it for you.
- Open the Microsoft Dynamics AX 2012 Workspace.
- Navigate to Business integration solutions > Common > Connectivity > Messages.
- Select 'CustGroup' Message in the table.
- In the Message tab in the Action Pane, click Header view in the Show group.
- In the Custom FastTab enter 'TutorialCustGroupMenuItem' in the Action menu item name field.
- As soon as you leave the field you'll get a Create menu item form. Click OK to let Connectivity Studio generate a Menu Item in the AOT.
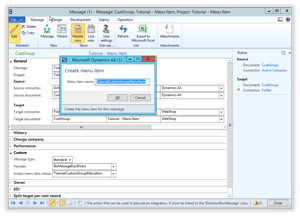
- Click Close or Save.
Add Menu Item to CustGroup form
- Open the Microsoft Dynamics AX 2012 Development Workspace.
- Navigate to the node Forms > CustGroup > Designs > Design > ActionPane:ActionPane.
- Right-click on ActionPane:ActionPane node and select New Control > ButtonGroup.
- Right-click on the just created ButtonGroup node and select New Control > MenuItemButton.
- Select the just created MenuItemButton node and open the Properties.
- Select (in the properties window) 'Yes' in the NeedsRecord property, 'Action' in the MenuItemType property, and 'TutorialCustomGroupMenuItem' in the MenuItemName property.
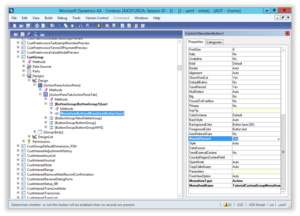
- Save your changes: Right-click the CustGroup node and select Save.

Try it out
Before you try to start the Message using the Menu Item, make sure that you can run the 'CustGroup' Message in your environment.
- Open the Microsoft Dynamics AX 2012 Development Workspace
- Navigate to Account receivable > Setup > Customers > Customer groups
- Select the desired line in the table and click Run message 'CustGroup'.
- Check the result in your Work folder.
Thanks for following along! I hope you will find this tutorial useful. If you need more information about the Business Integration Solutions, please get in touch.


