
While you might have browsed our solution pages and downloaded our factsheet for our Master Data Management suite, it sometimes helps to see the features of solutions, in action before you schedule a demo. So, to better understand the capabilities of our Data Entry Workflow, Master Data Management Studio, and Data Quality Studio solutions for Microsoft Dynamics 365 Finance and Supply Chain Management, we have worked on a happy flow for our customers to demonstrate the key highlights of the suite.
If you have recently learned about us, To-Increase is an Independent Solution Provider (ISV) developing solutions for Microsoft-based ERPs for the last 18+ years. We have served over 2200 customers and have solutions ranging from integration to security. We are passionate about building solutions that solve customer challenges and simplify day-to-day tasks.
Over the last few years, we have heard our customer challenges related to data governance and have built the Master Data Management suite for Microsoft Dynamics 365 Finance & Supply Chain Management. Therefore, in this blog, we will explain the entire process for a product record from the creation of the master record to the distribution. However, this is just one example, our solution can help you update and share several master records including customers and vendors and you can configure our solutions to suit your business requirements and use cases.
How do our solutions work in practice demonstrated through a product flow
Our tools are flexible to work with any flow simply by configuration and not development.
Step 1: Product record creation
In the first step, we are going to demonstrate how you can use our Data Entry Workflow solution for product creation and then using Master Data Management Studio, release the product from the master company to the local company.
Using Data Entry Workflow, we will demonstrate how you can work on record creation in a controlled way, including a few steps during the process, assigned to different users in different departments. Also, you can also apply some data quality checks using our Data Quality Studio solution that will make data entry consistent.
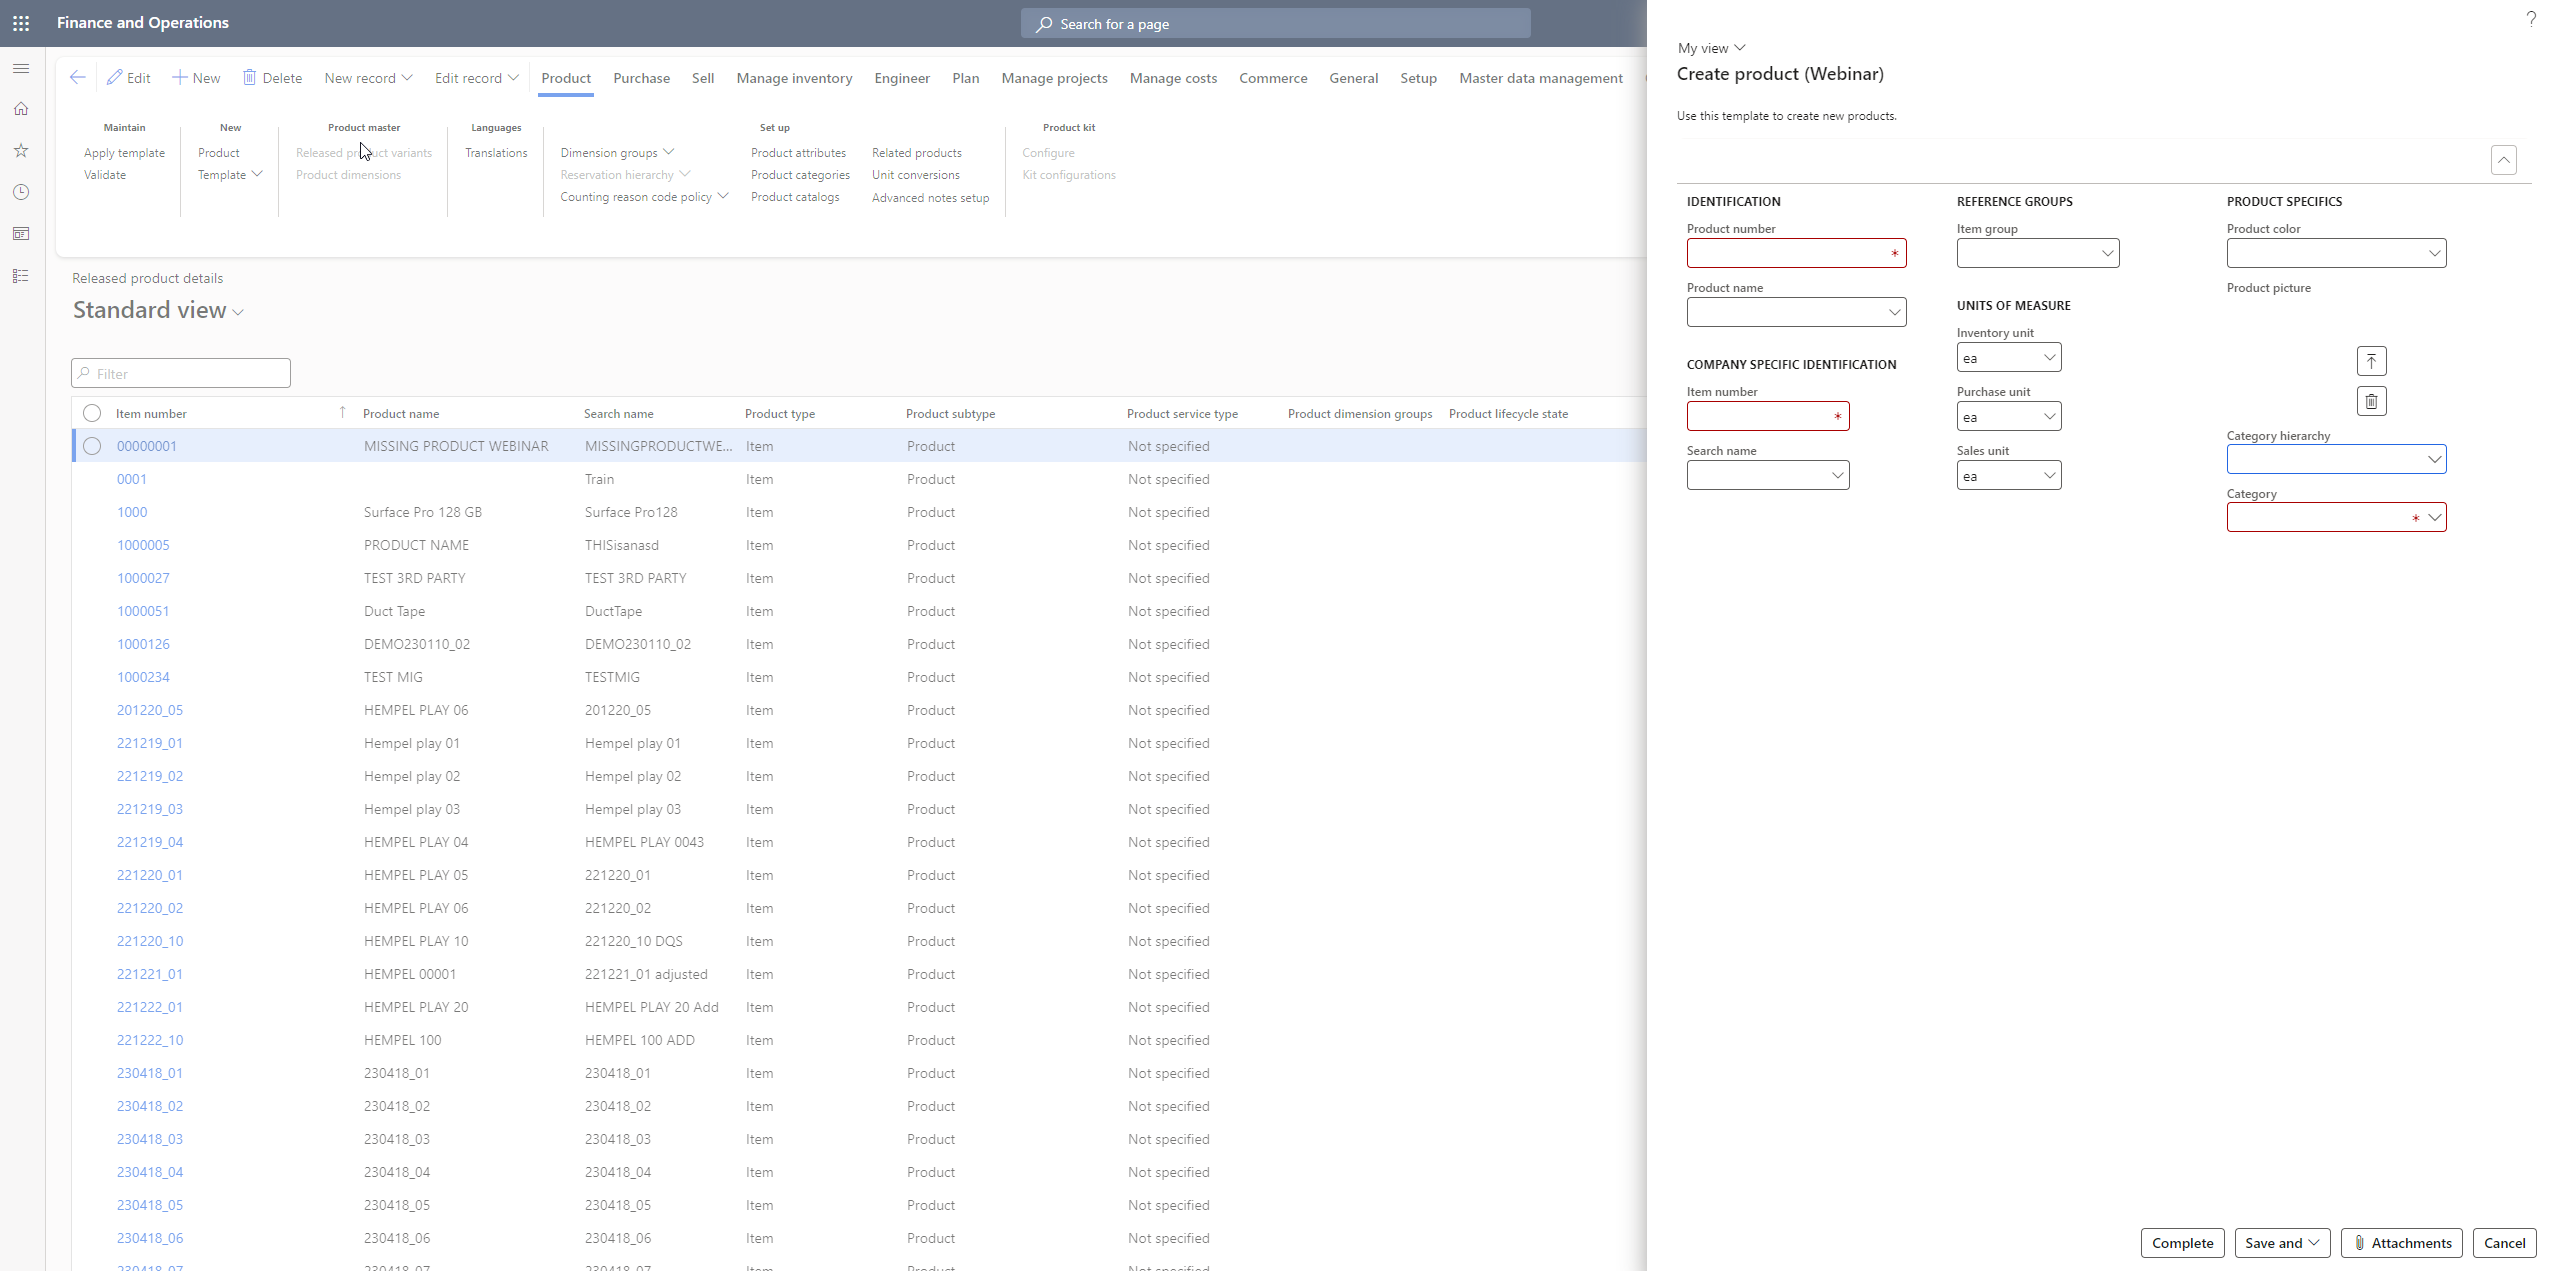
To create a product using a configured Data Entry Workflow template, you first go to Released products and click on New Record and select the template and then click OK.

Next, the system will open a form with the first step with just the assigned fields which also has data quality rules activated. The data quality rule has been applied to the Product name field to give an error with the condition that the product name should be in upper case and shouldn’t exceed 40 characters. You can customize this rule based on your organization’s requirements.
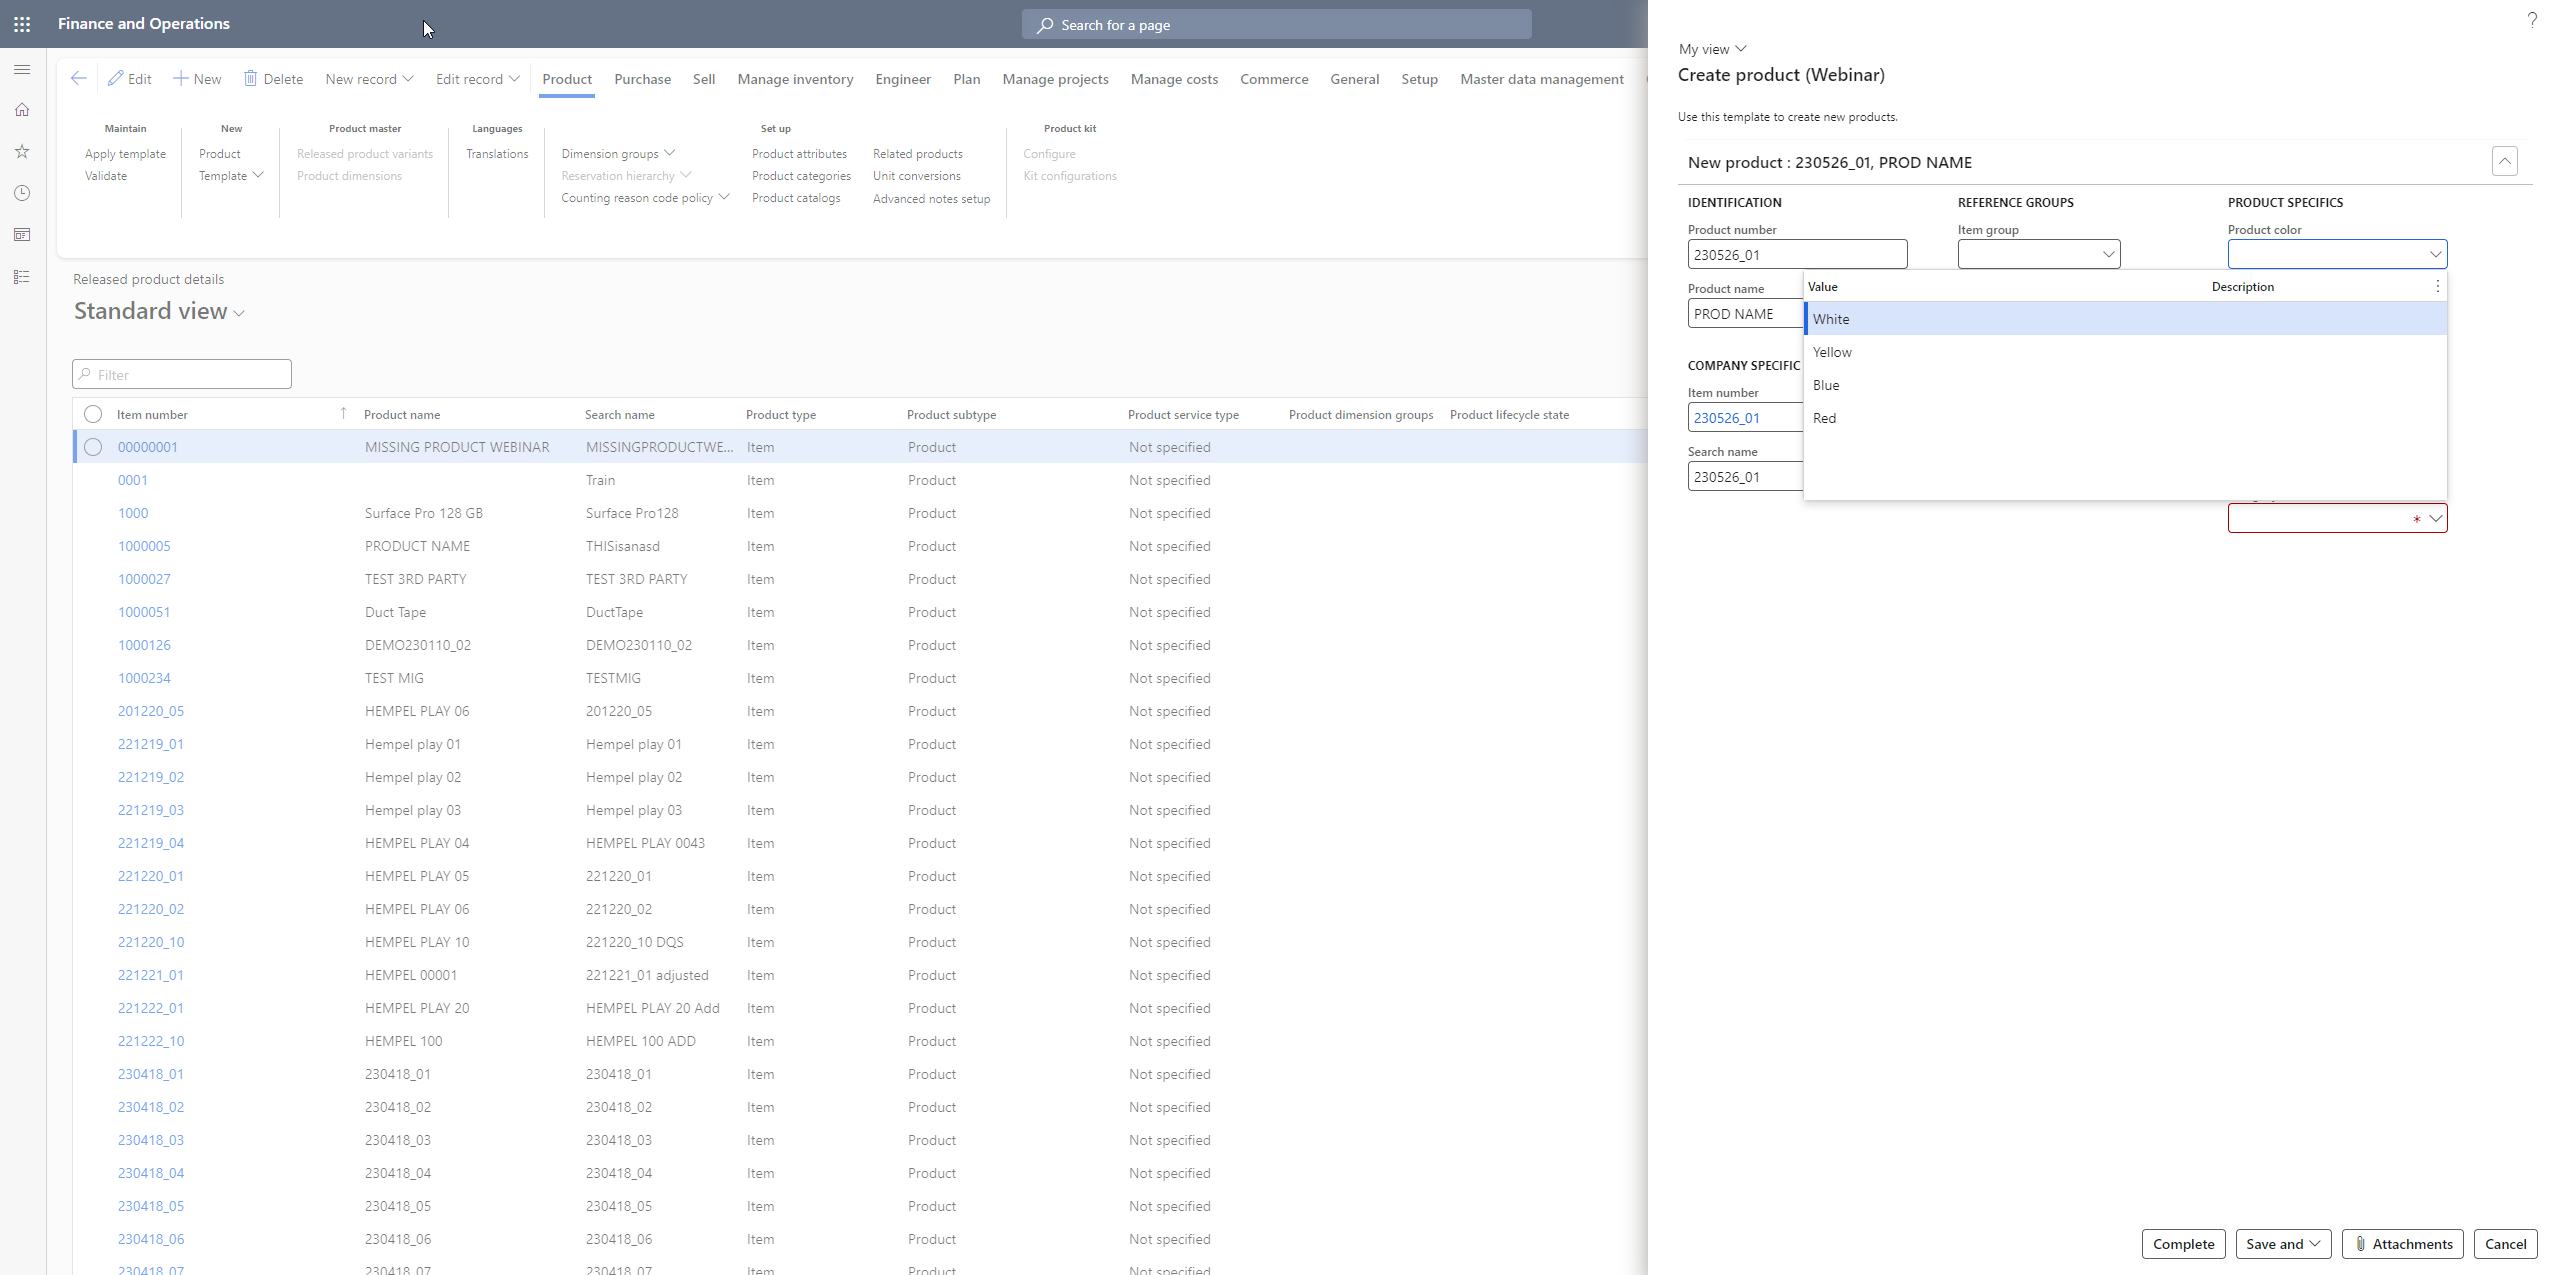
You can fill in a field using pre-defined drop-down values that have been configured using a new feature called configurable lookup which is part of Data Quality Studio and supported by the data entry wizard form as well. So, we fill in the product color with one of the displayed values that has been pre-configured with this feature.
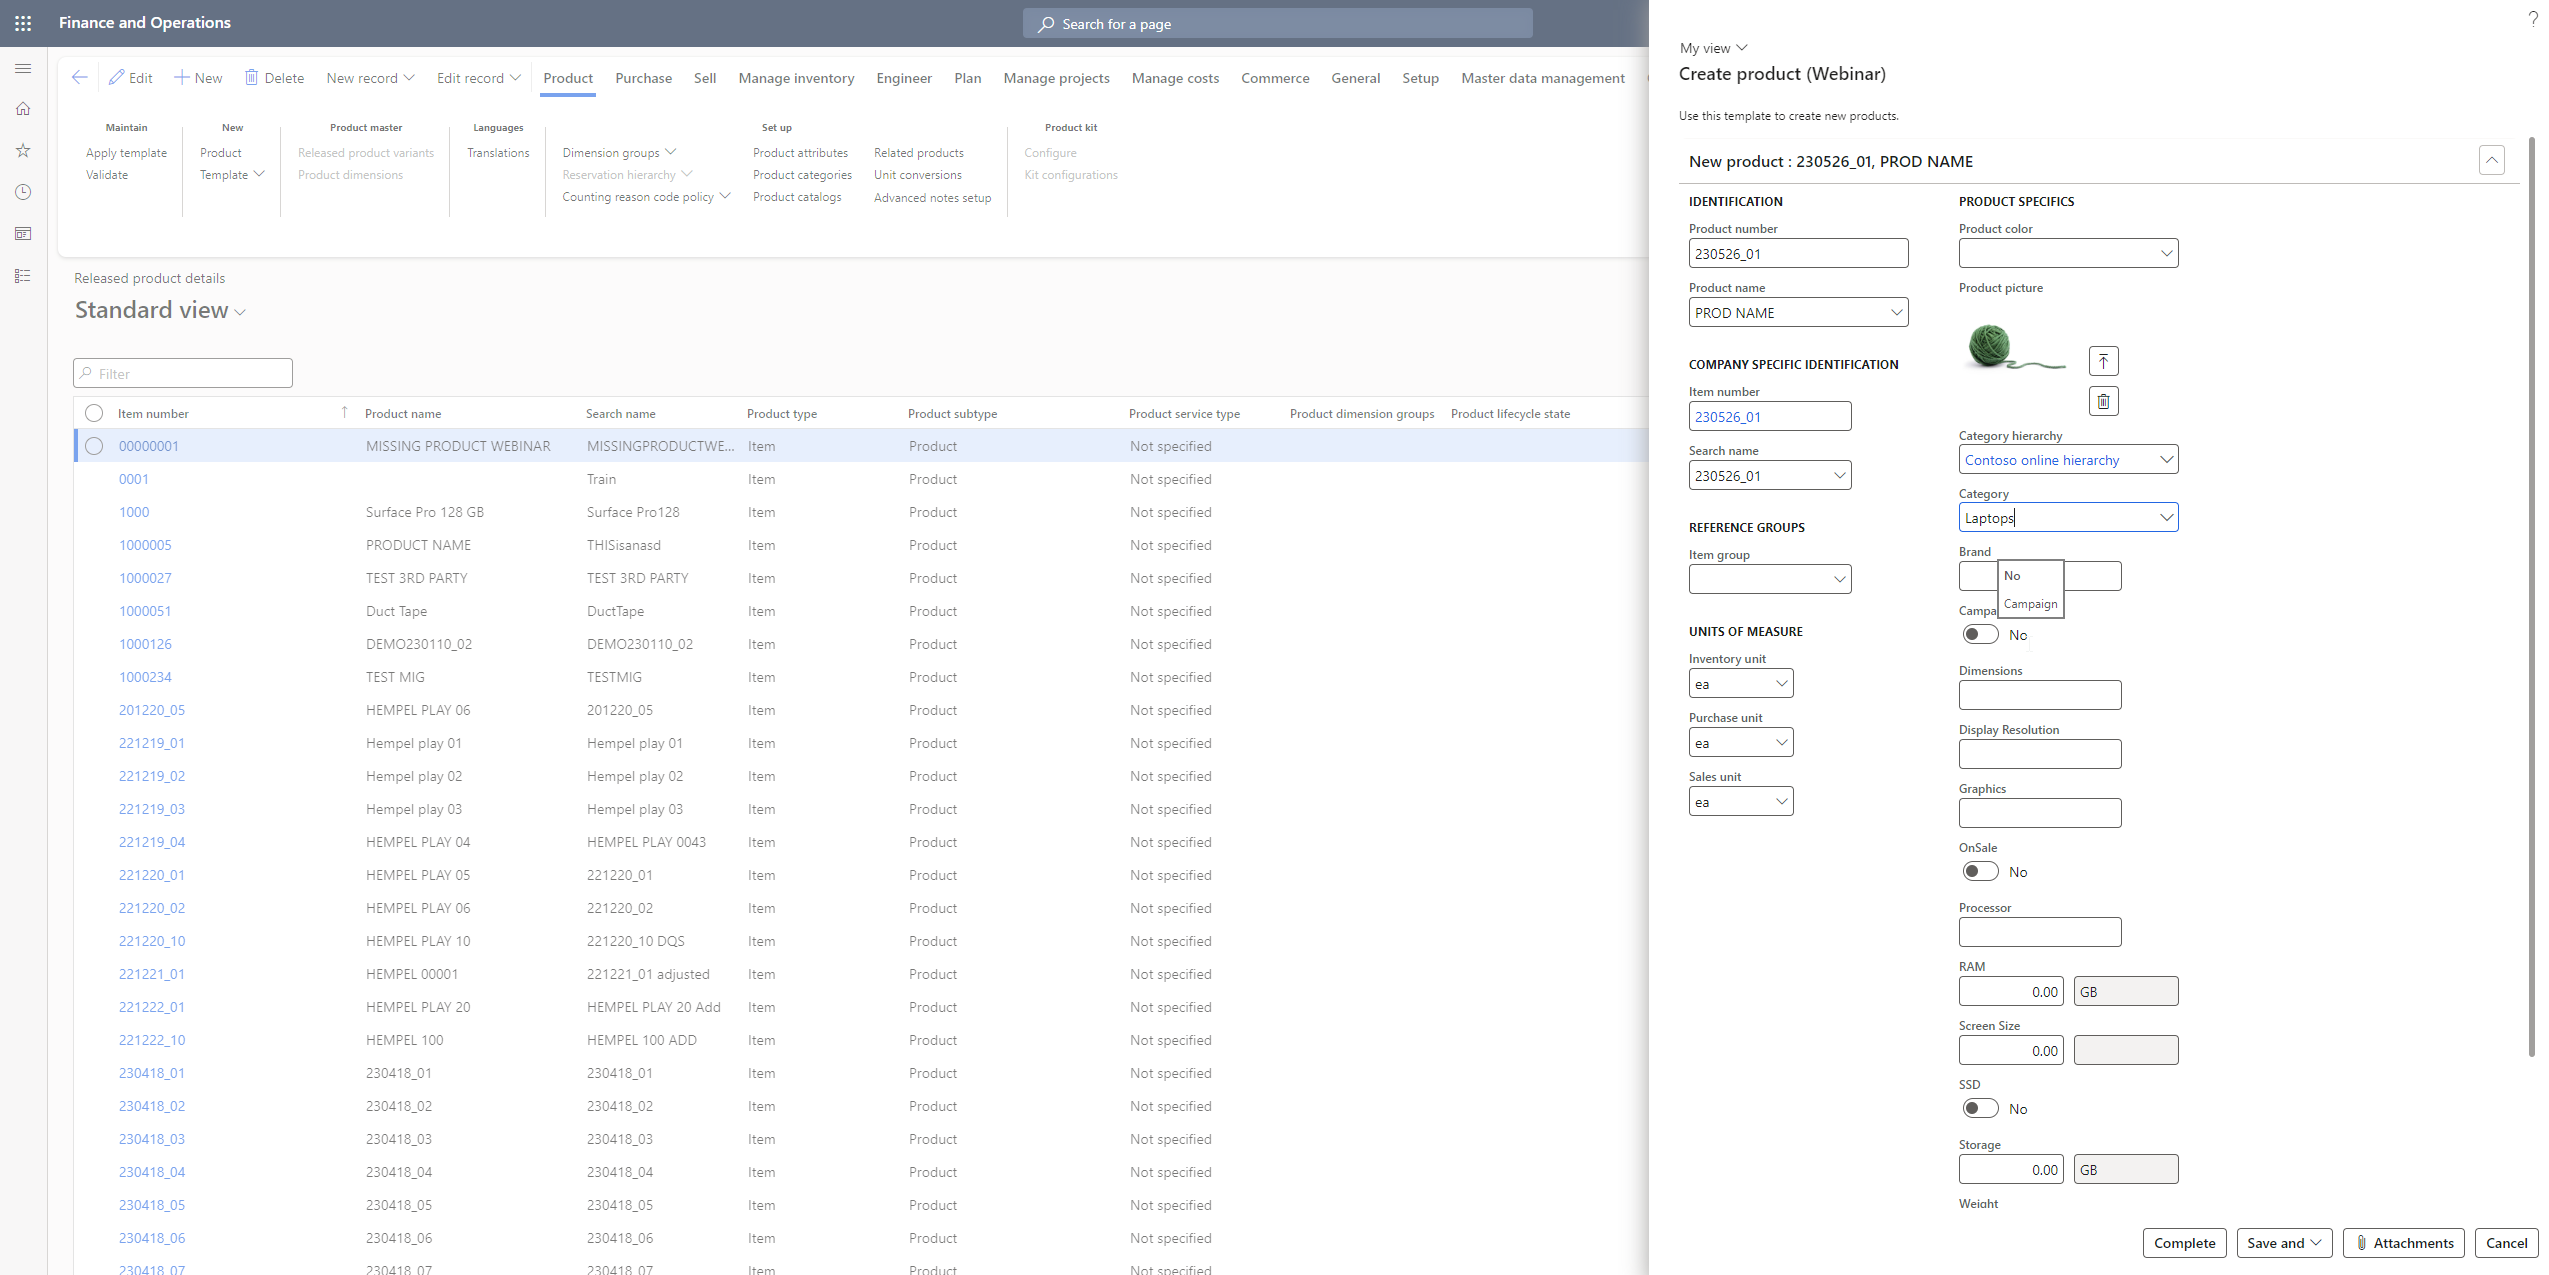
Also, it is possible to add a picture of the product, you click on the upload button, it opens a window that allows you to browse and select a file from your PC, and we select a picture and click on OK.
This way you can transfer the picture in our released products records.
It is possible to define the product attributes defined into the system categories. So, you first select the category hierarchy and next the category/sub-category and the system will auto-populate the related attribute fields that you will need to fill based on that information. This has been configured using Data Entry Workflow solution.
Since we selected computers as the category, you will see the product attributes for computers but if you were to fill in tablets instead as the category, for example, the related attributes for tablets will be displayed.
Step 2: Approval
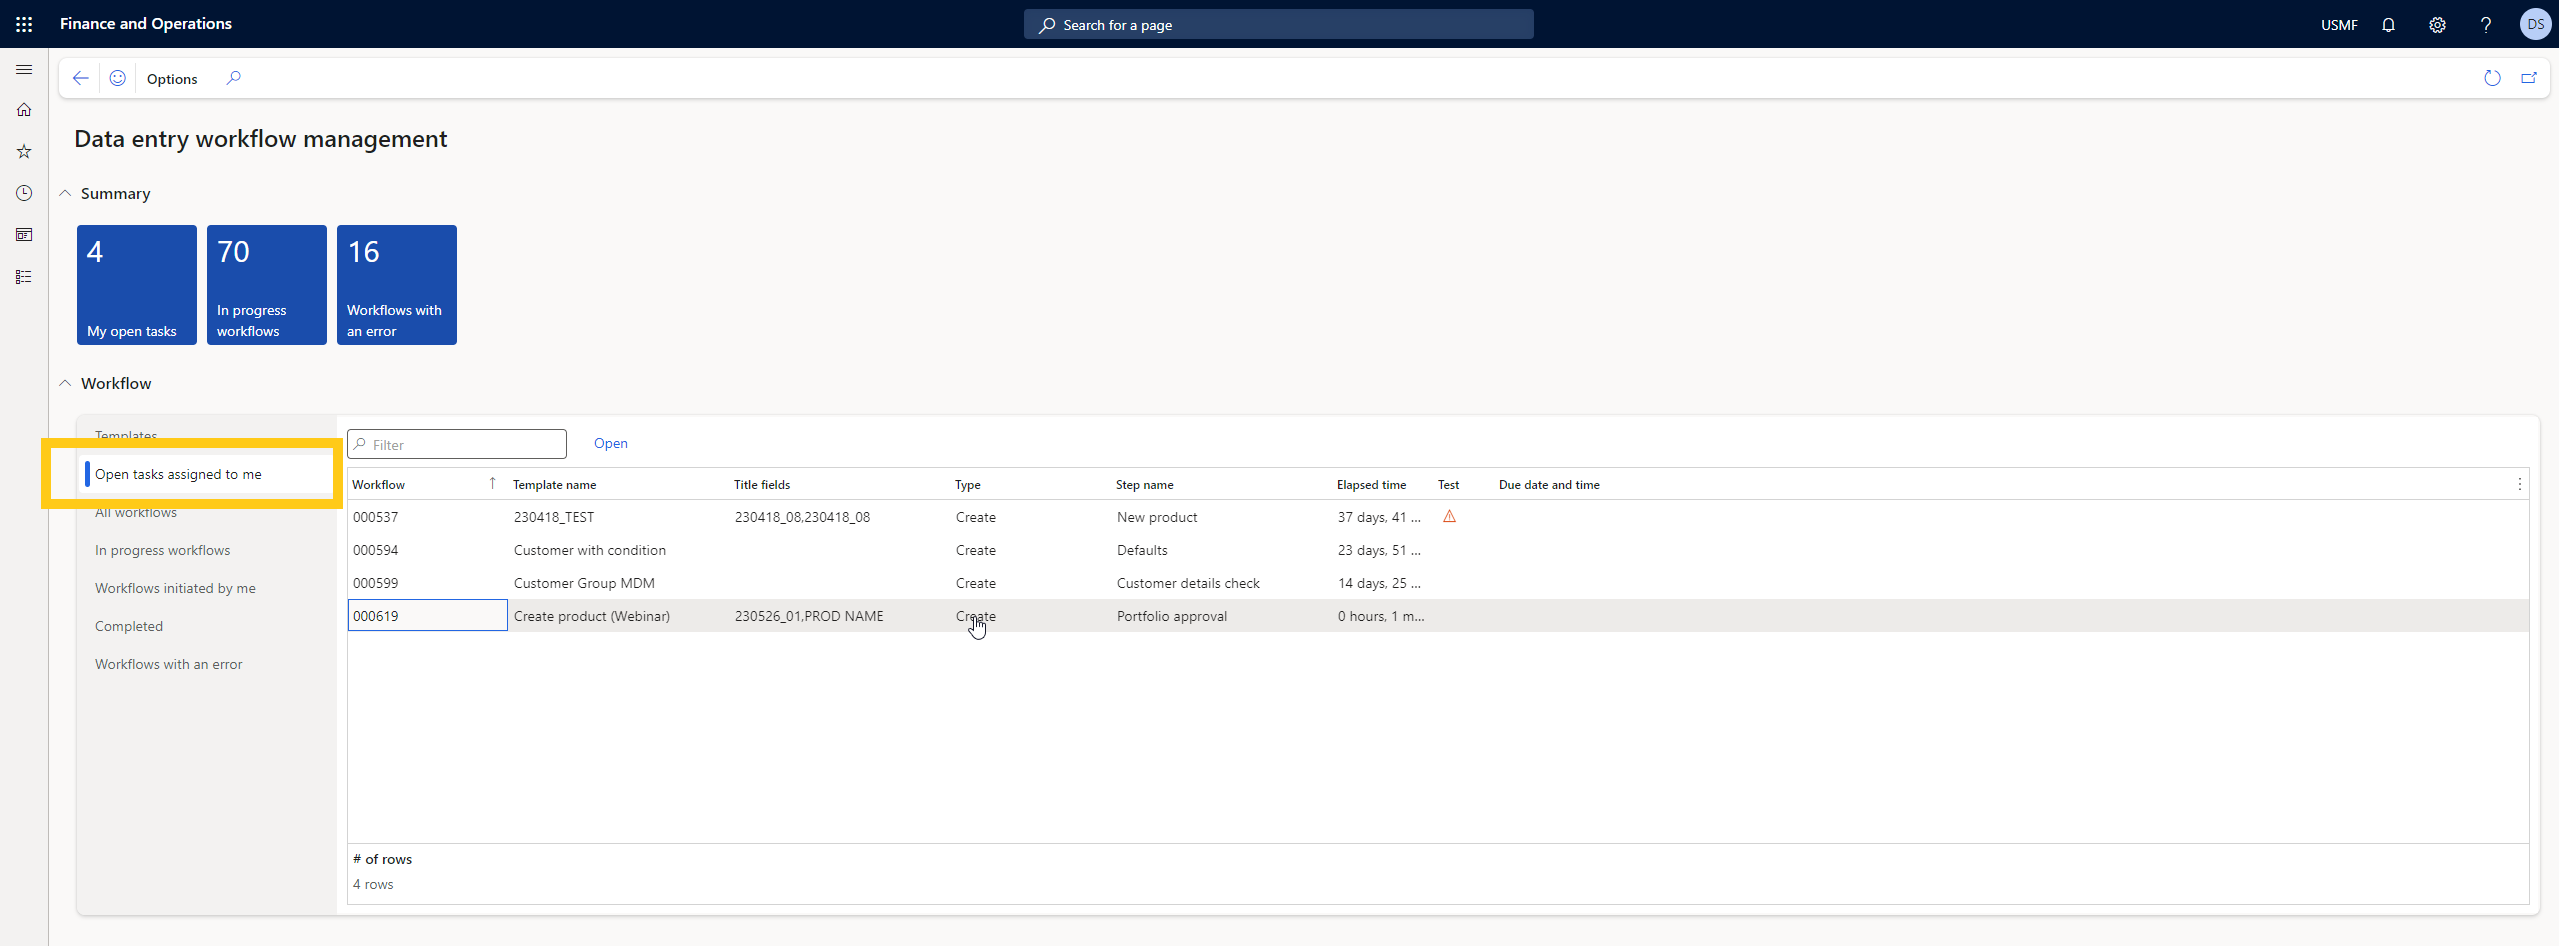
The next step of this process is the approval step. Once you click on Complete, the workflow is directed to the next step. So, you can navigate to the workspace and click on Data entry workflow management.
Next you click on the Open tasks assigned to me, in this case it will be the manager/ team member with approval authority performing this step. You click on the form you need to approve and click on open.
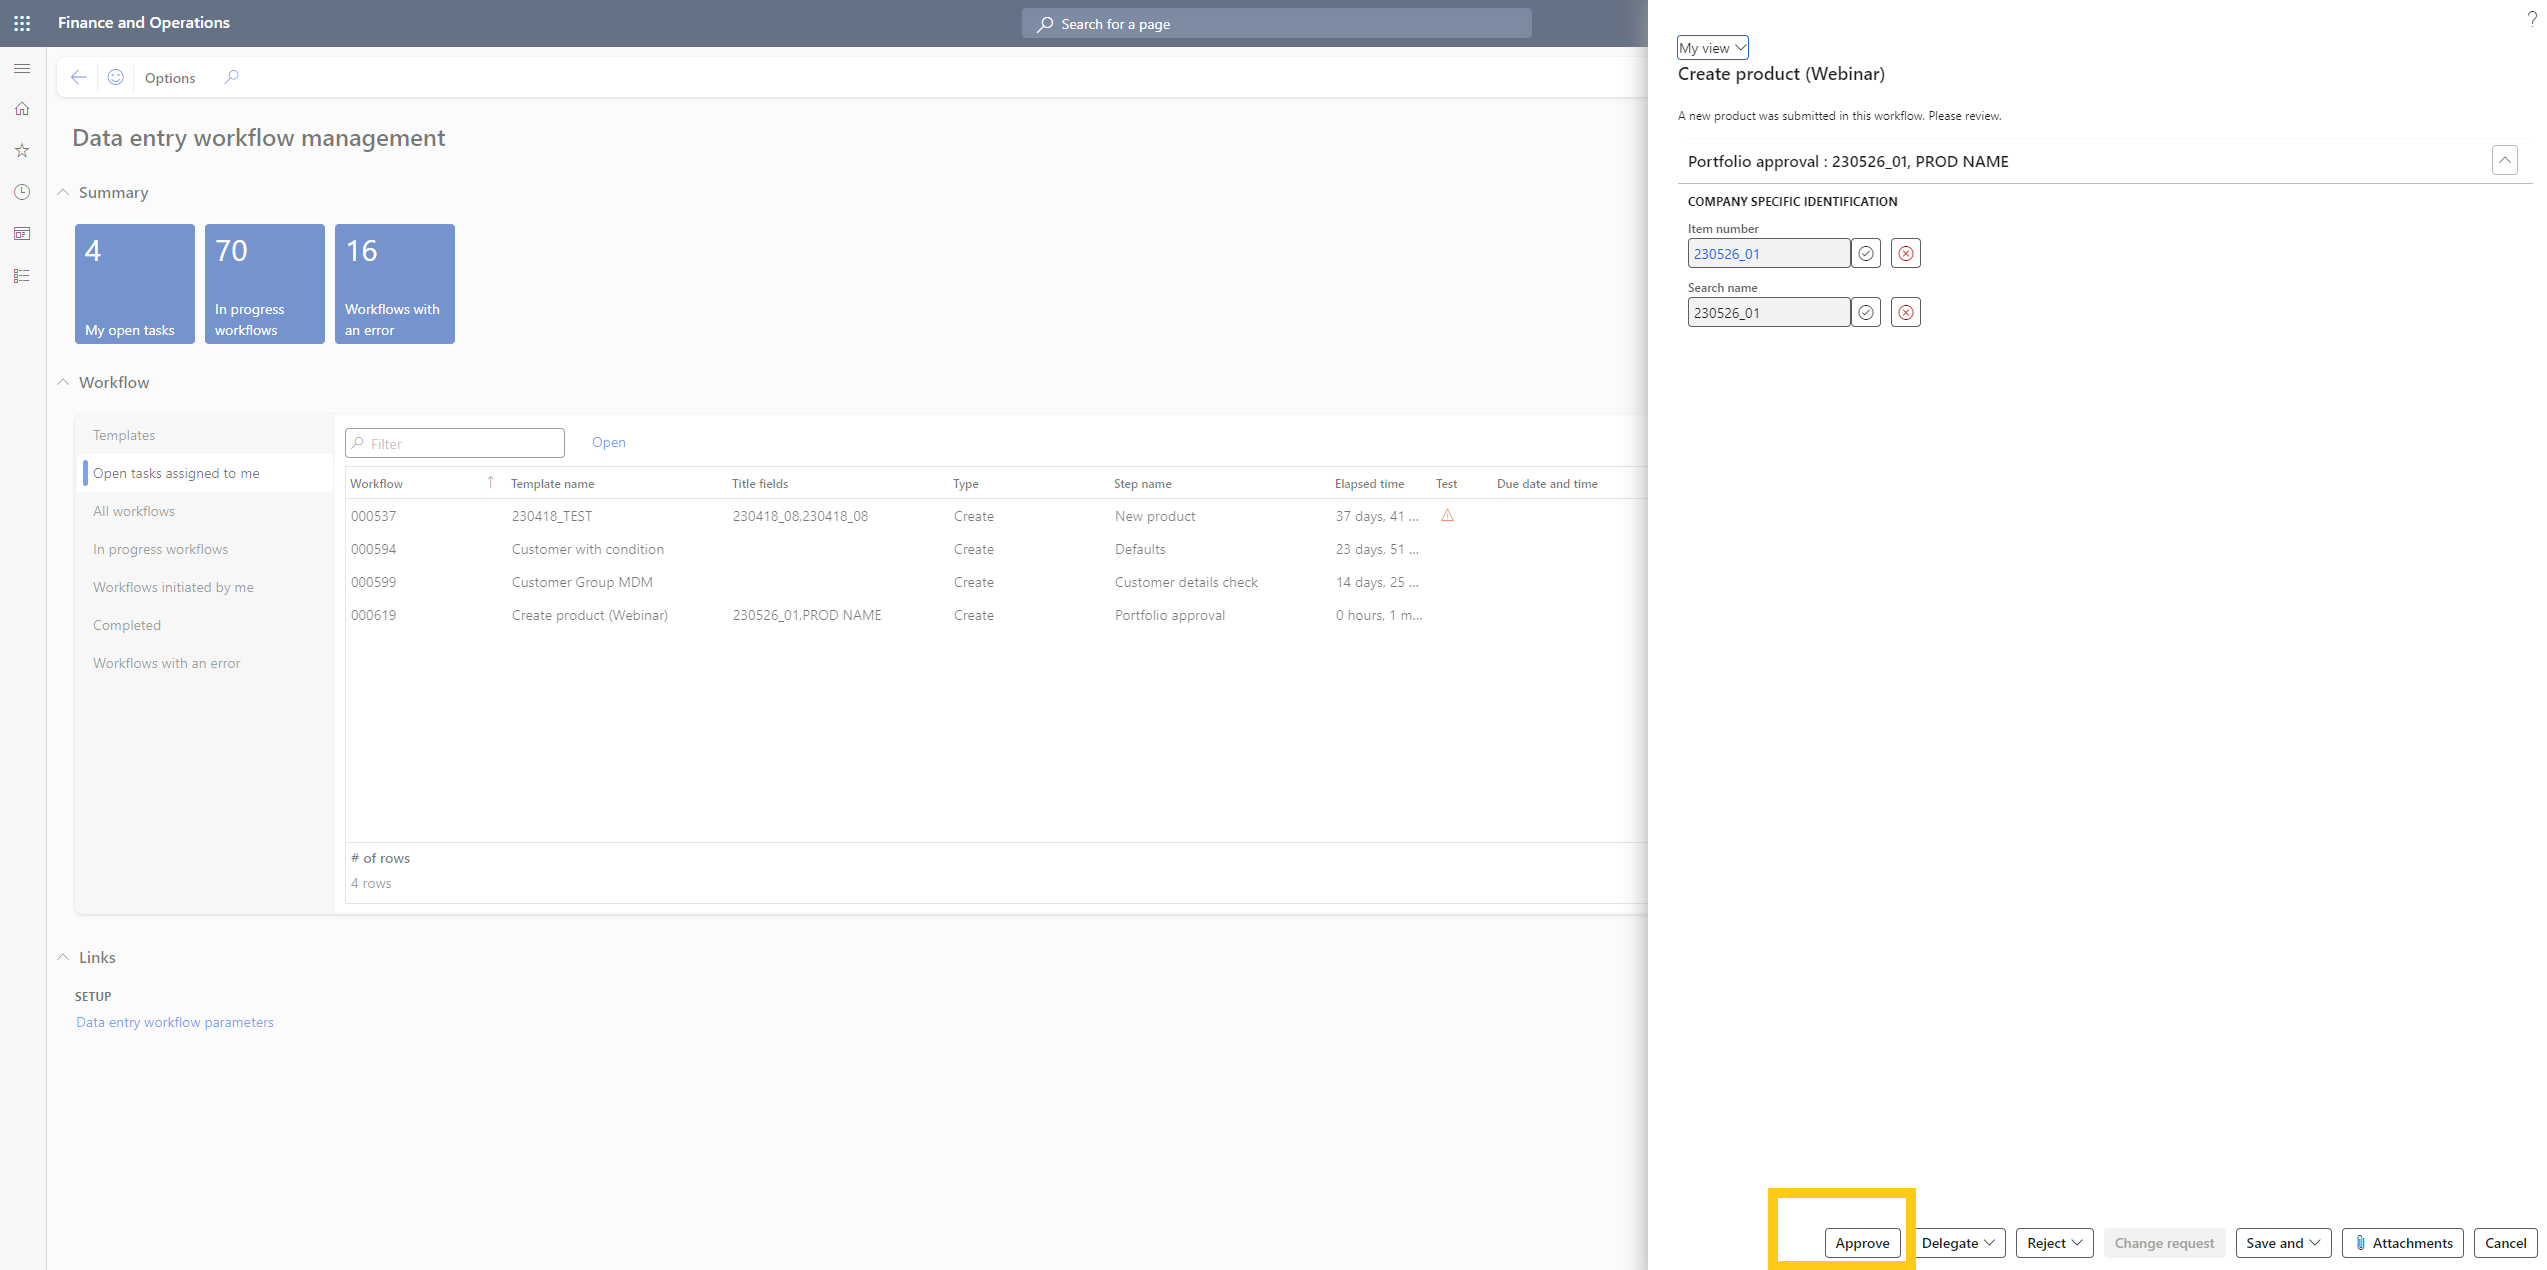
Once the form opens up, you can either approve or reject each field or do it at once. So, we click on the approve button at the bottom and then the workflow automatically goes to the next step.
Step 3: Parallel steps
After the approval step, we have configured two parallel steps. There are two parallel steps initiated at once for the warehousing department and the purchasing department and you will see those tasks in the system assigned to the team members.
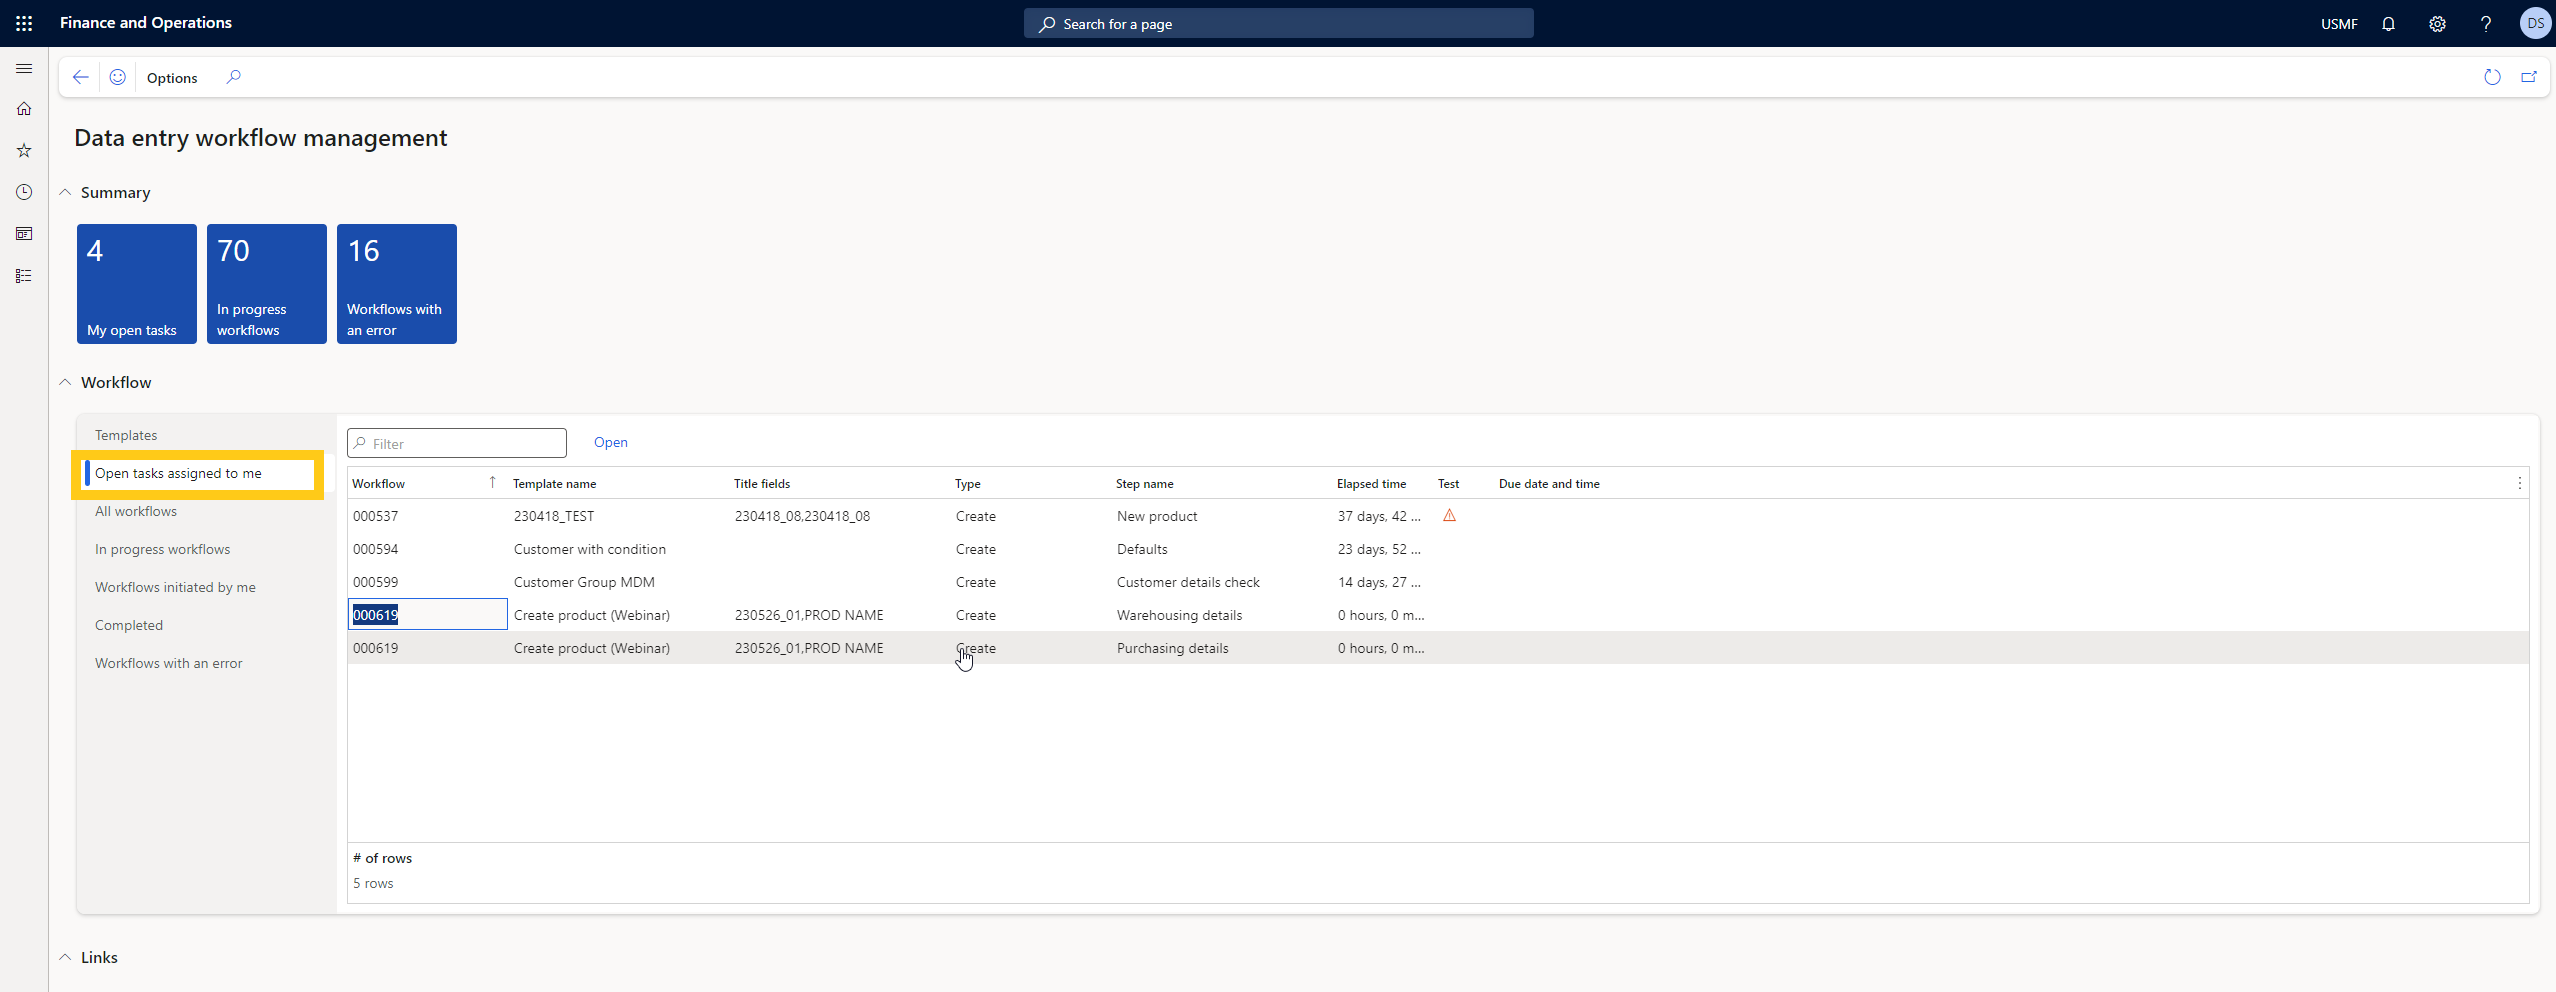
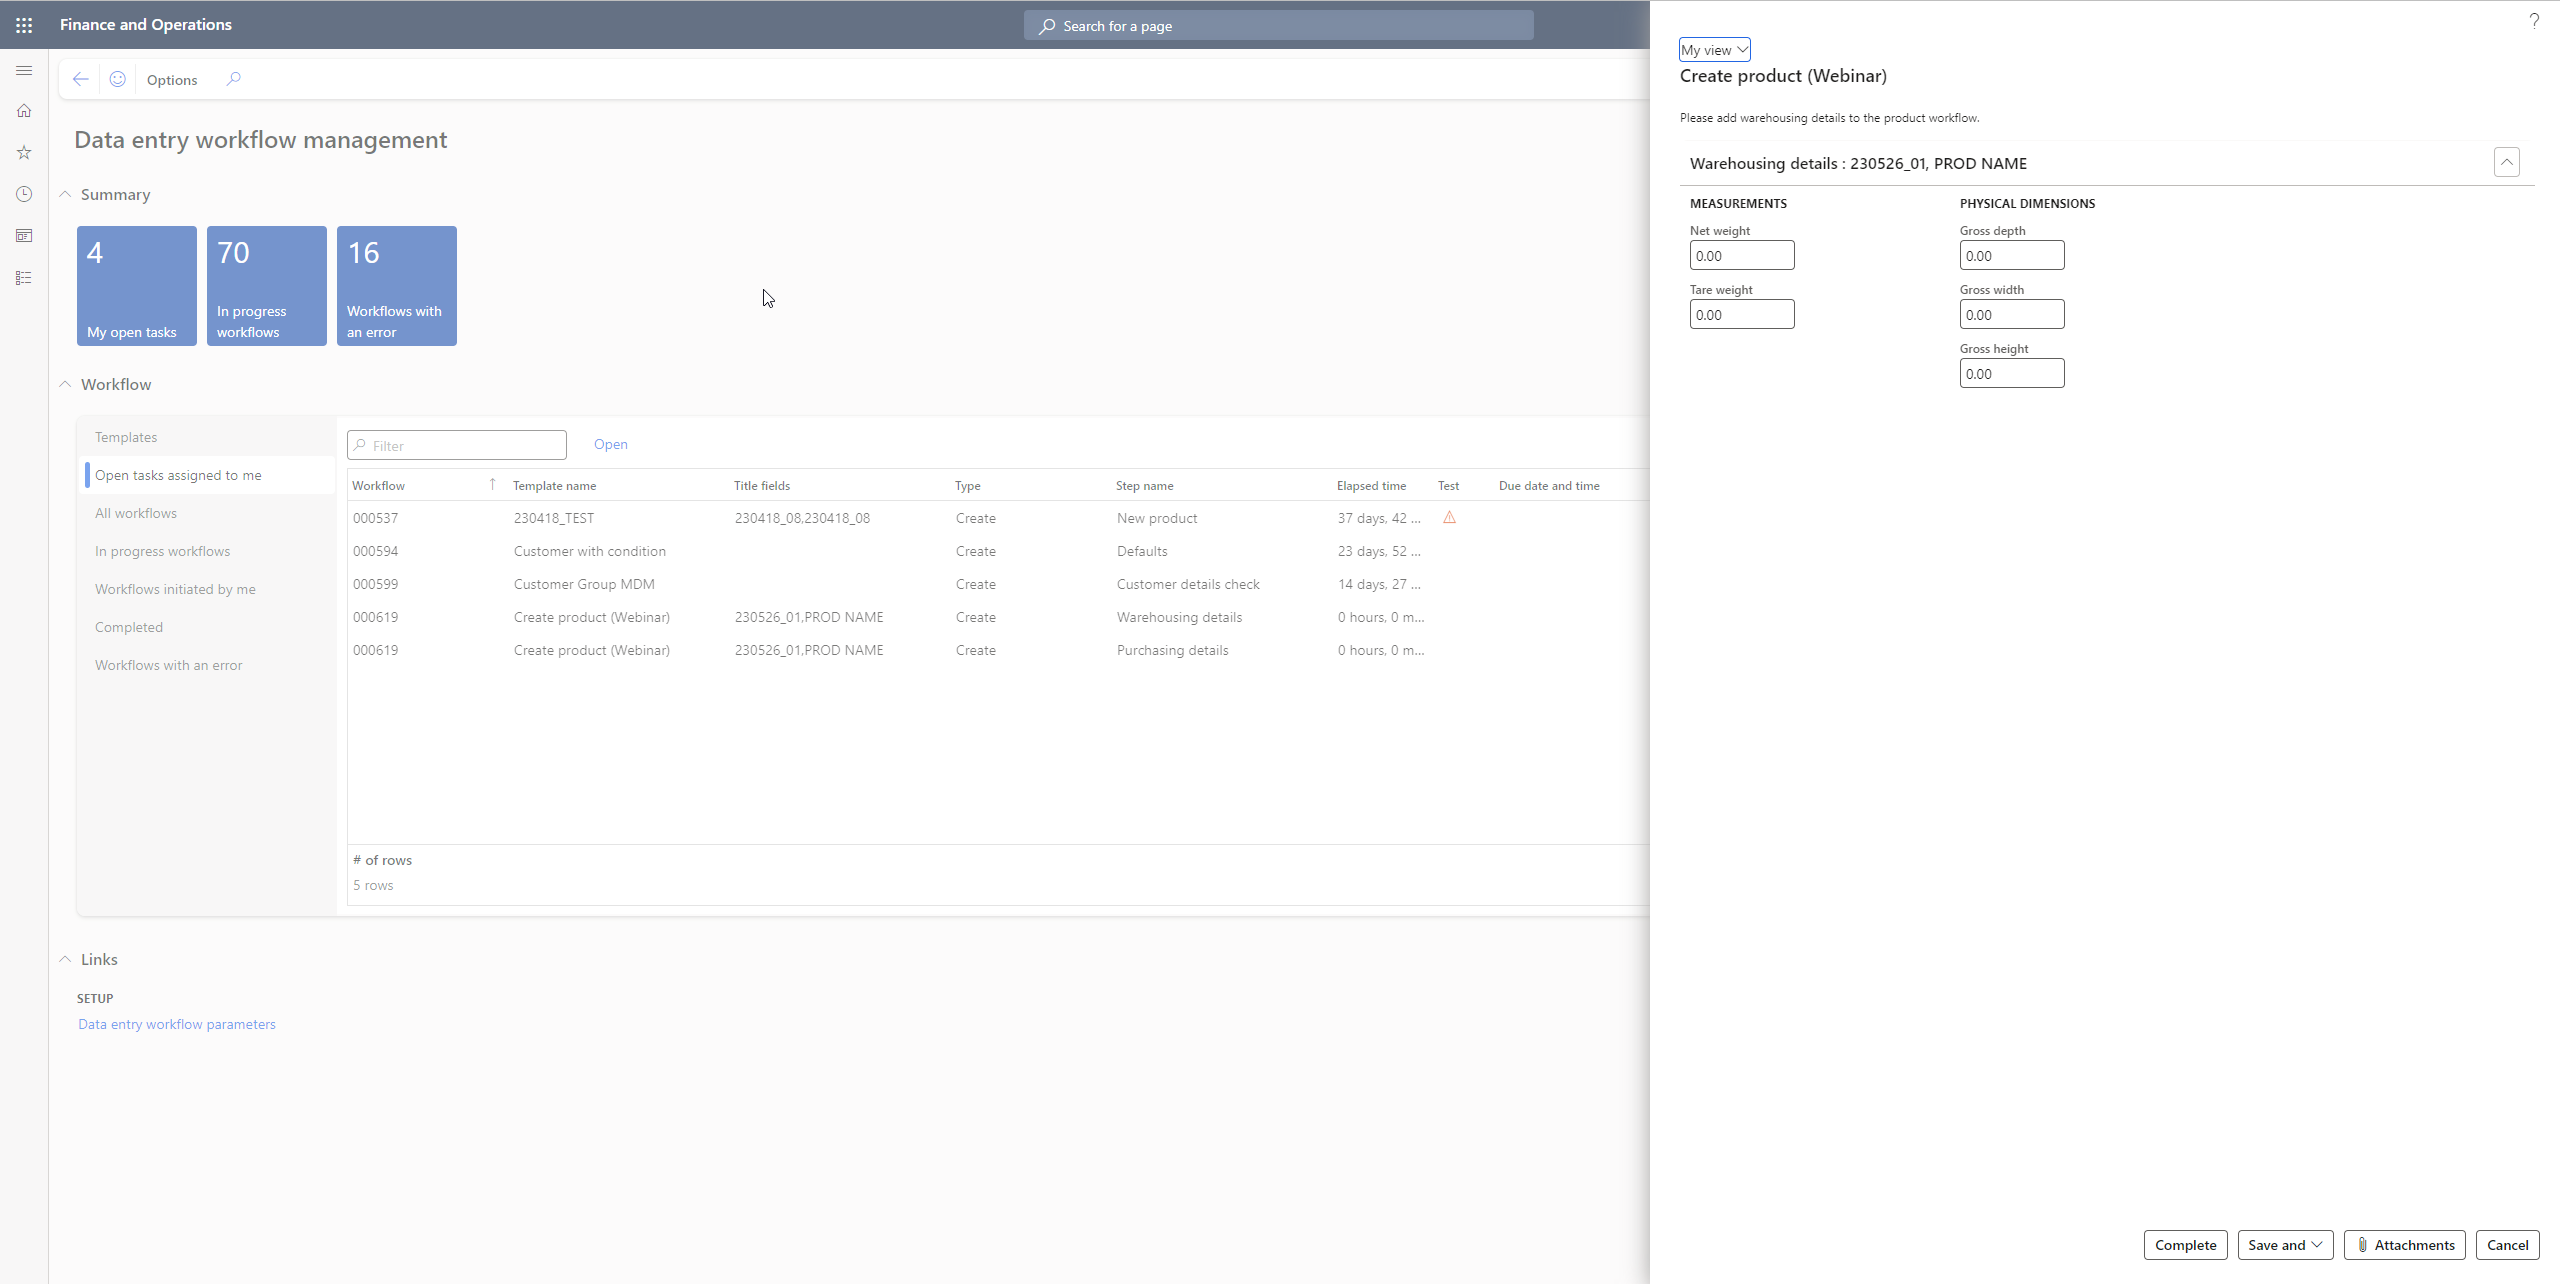
Now the warehouse manager and the purchasing manager will be given access to the respective fields that have been assigned in the step. So, the warehouse manager will click on the step and click open and the fields can be filled in. And simultaneously, the purchasing manager can fill the fields assigned to their team/role. Once the details are entered in the assigned fields, each of them needs to click on complete and the workflow will only then move to the next step which is the financial details.
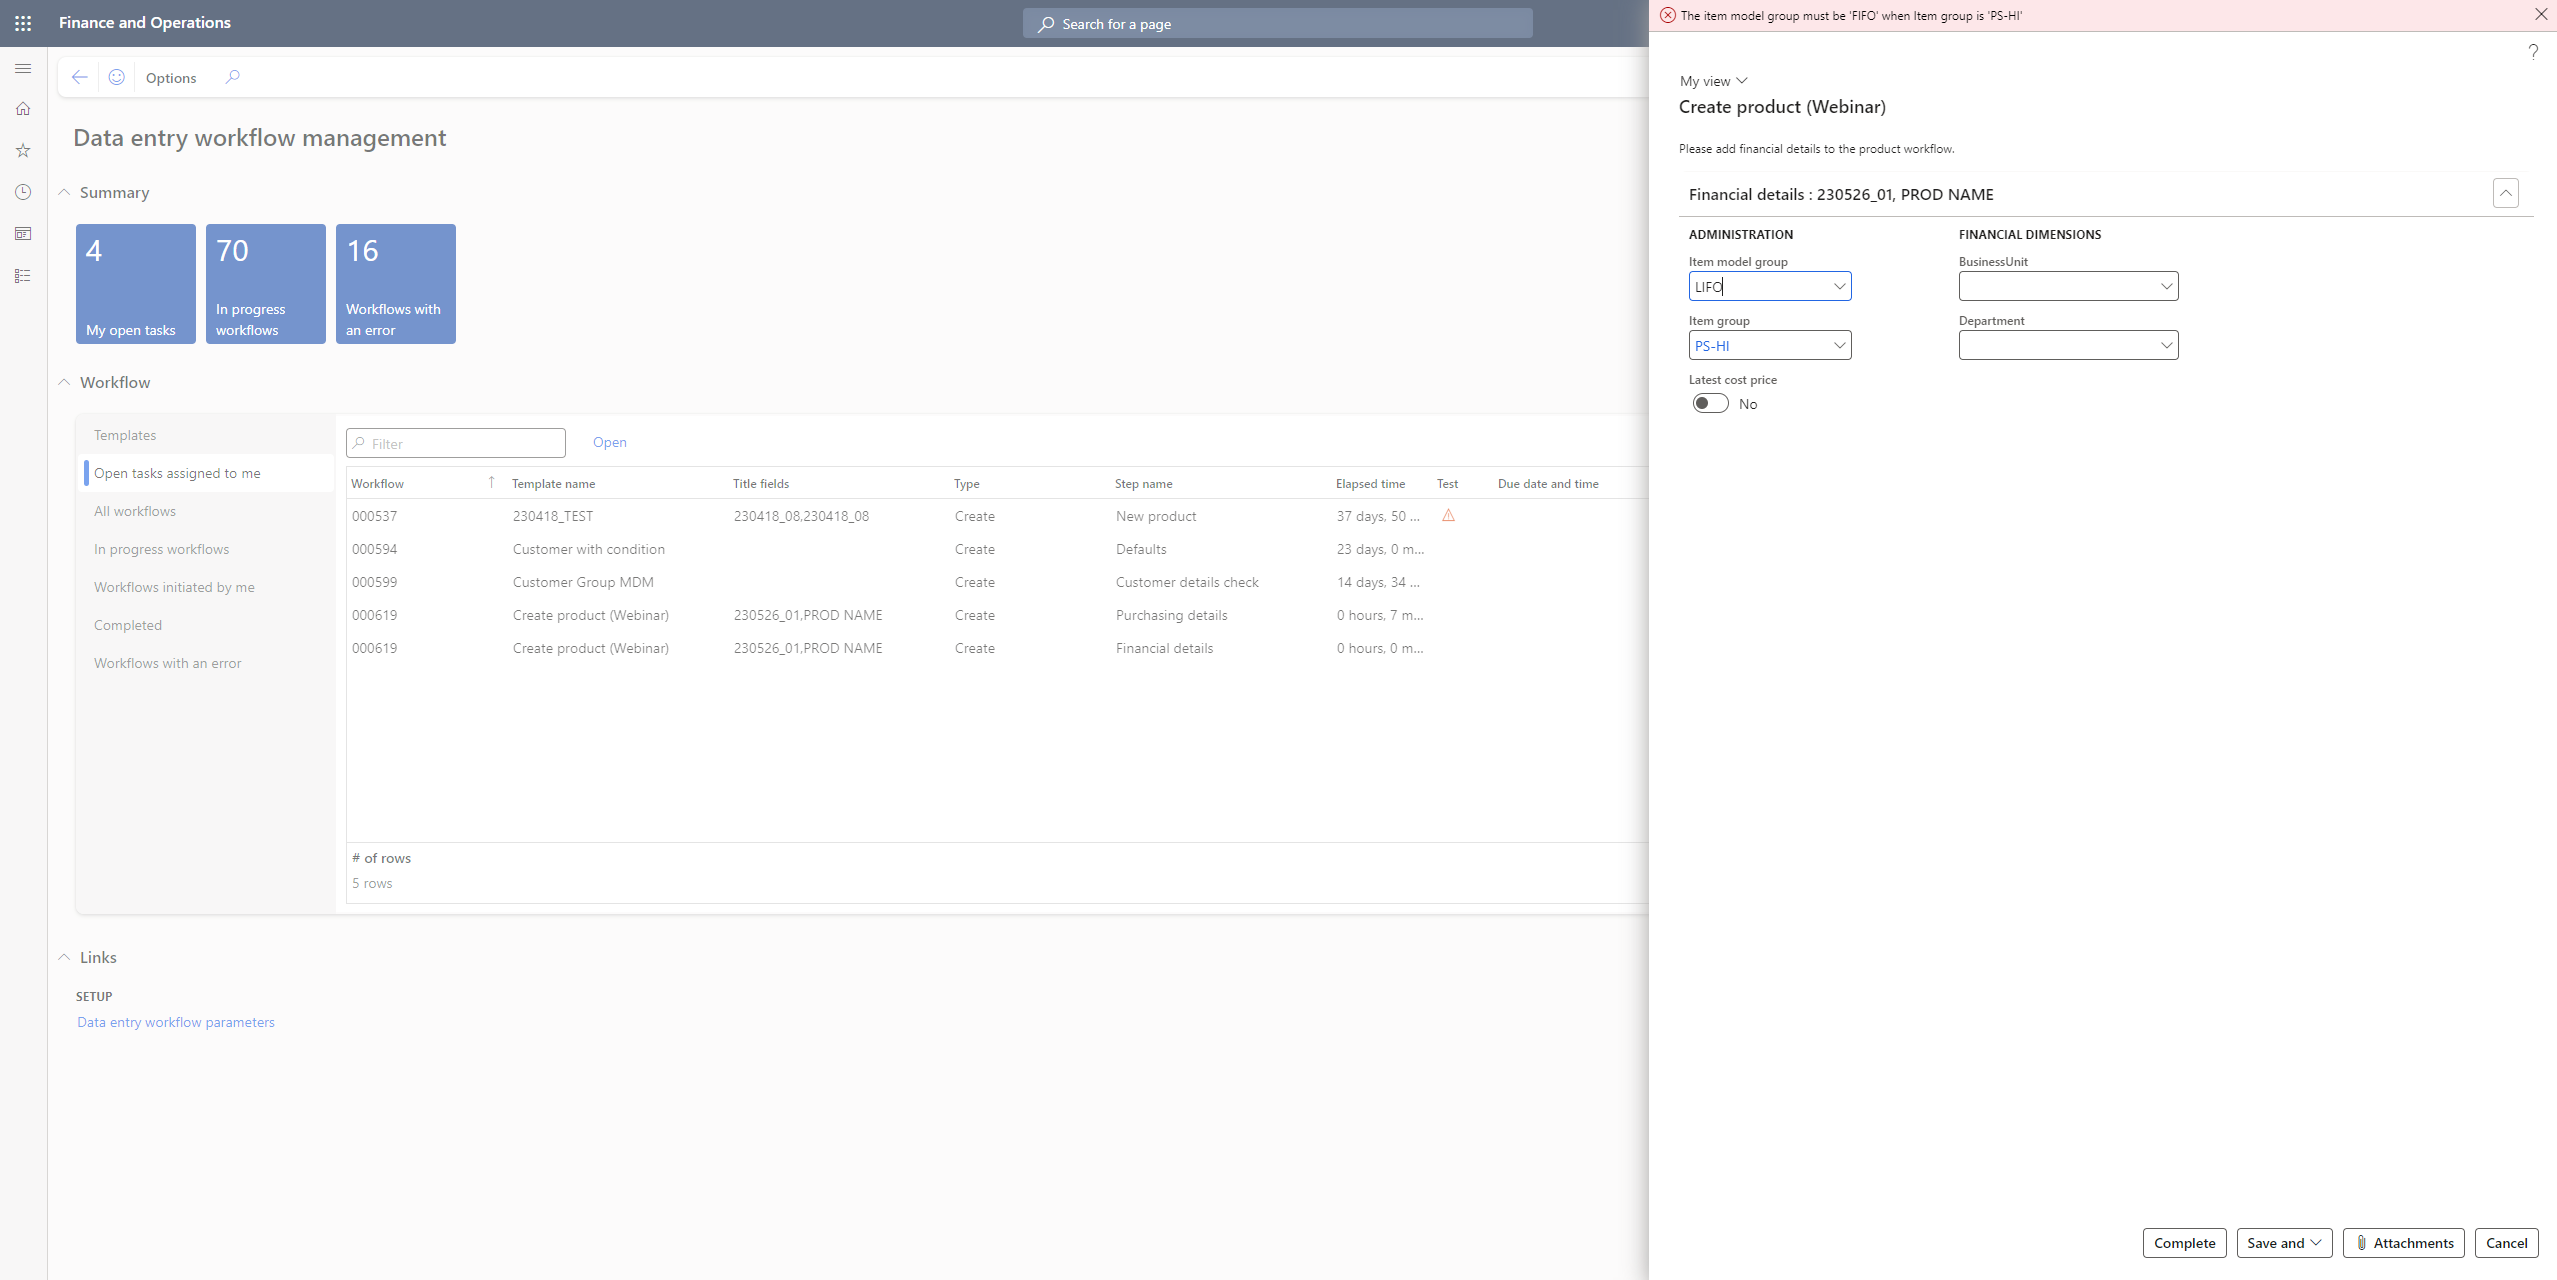
The next step contains financial information such as financial dimensions, item model, and so on.
So, the finance department user can then fill in the details. The item model group has a data quality rule assigned to the field, based on the item group. Based on the condition, if the item group is PS-HI, the item model group has to be FIFO. So, if you add any other value, the system will generate an error as shown below. Once we correct that and fill in the necessary details, we can click on complete.
Step 4: Approval
Next, the workflow has an approval step. So, the Manager will see it in the ‘Open tasks assigned to me’ tab. So, once you click on the task and click on open you will see the form below.
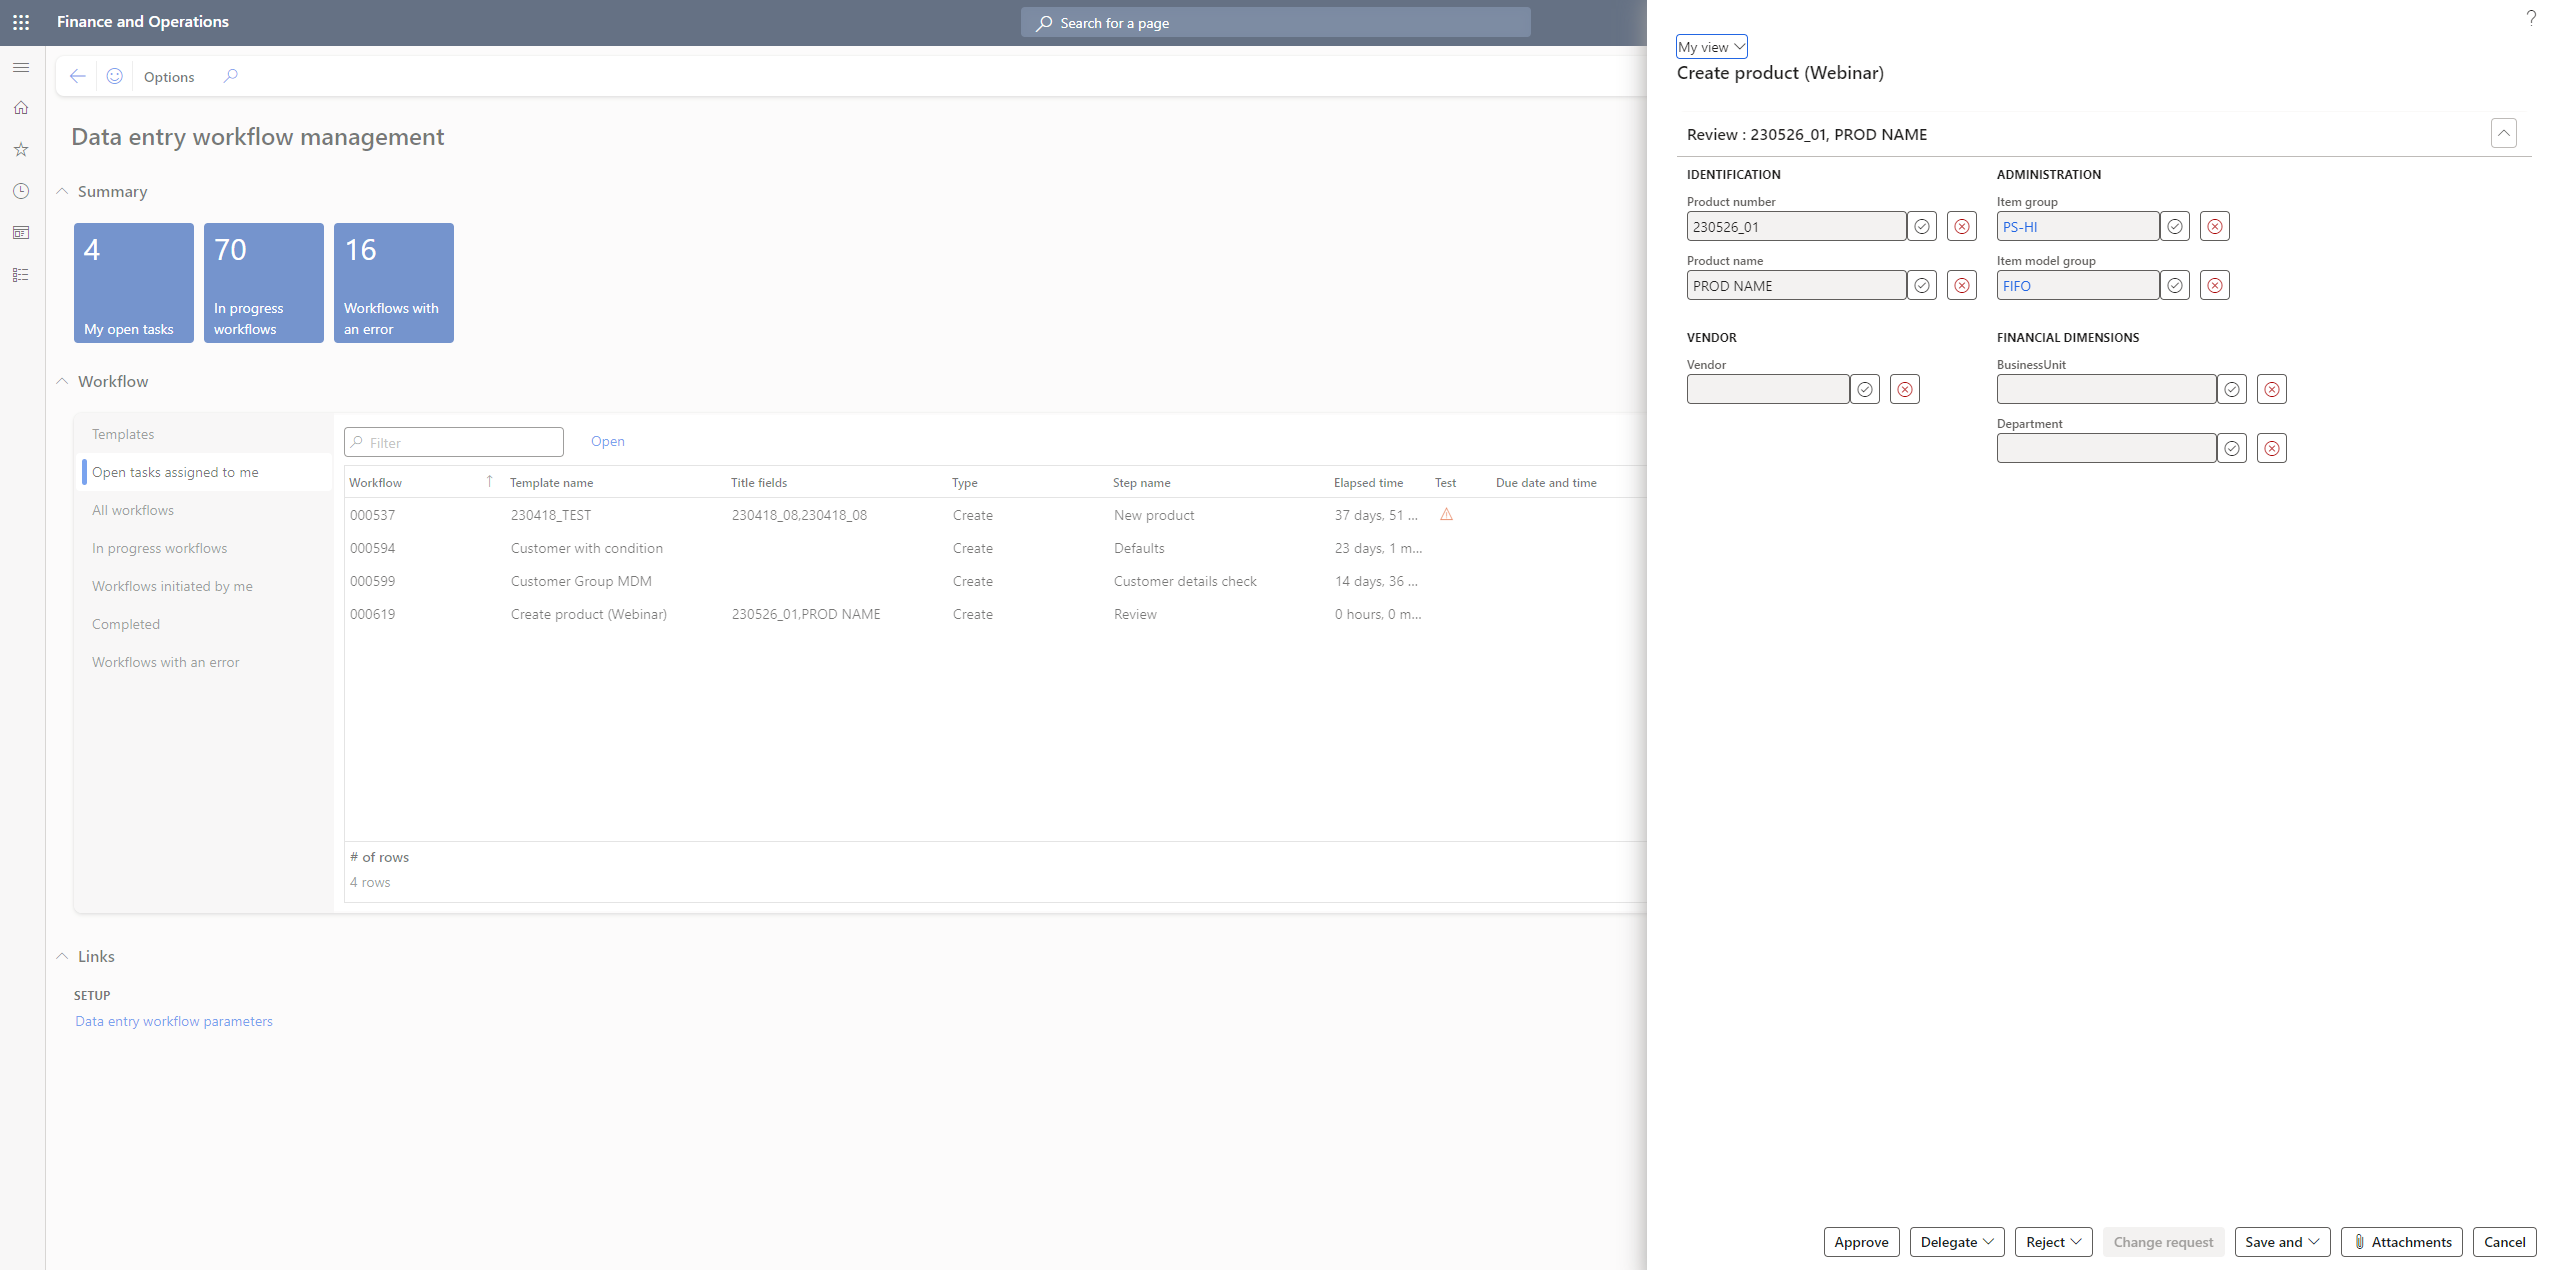
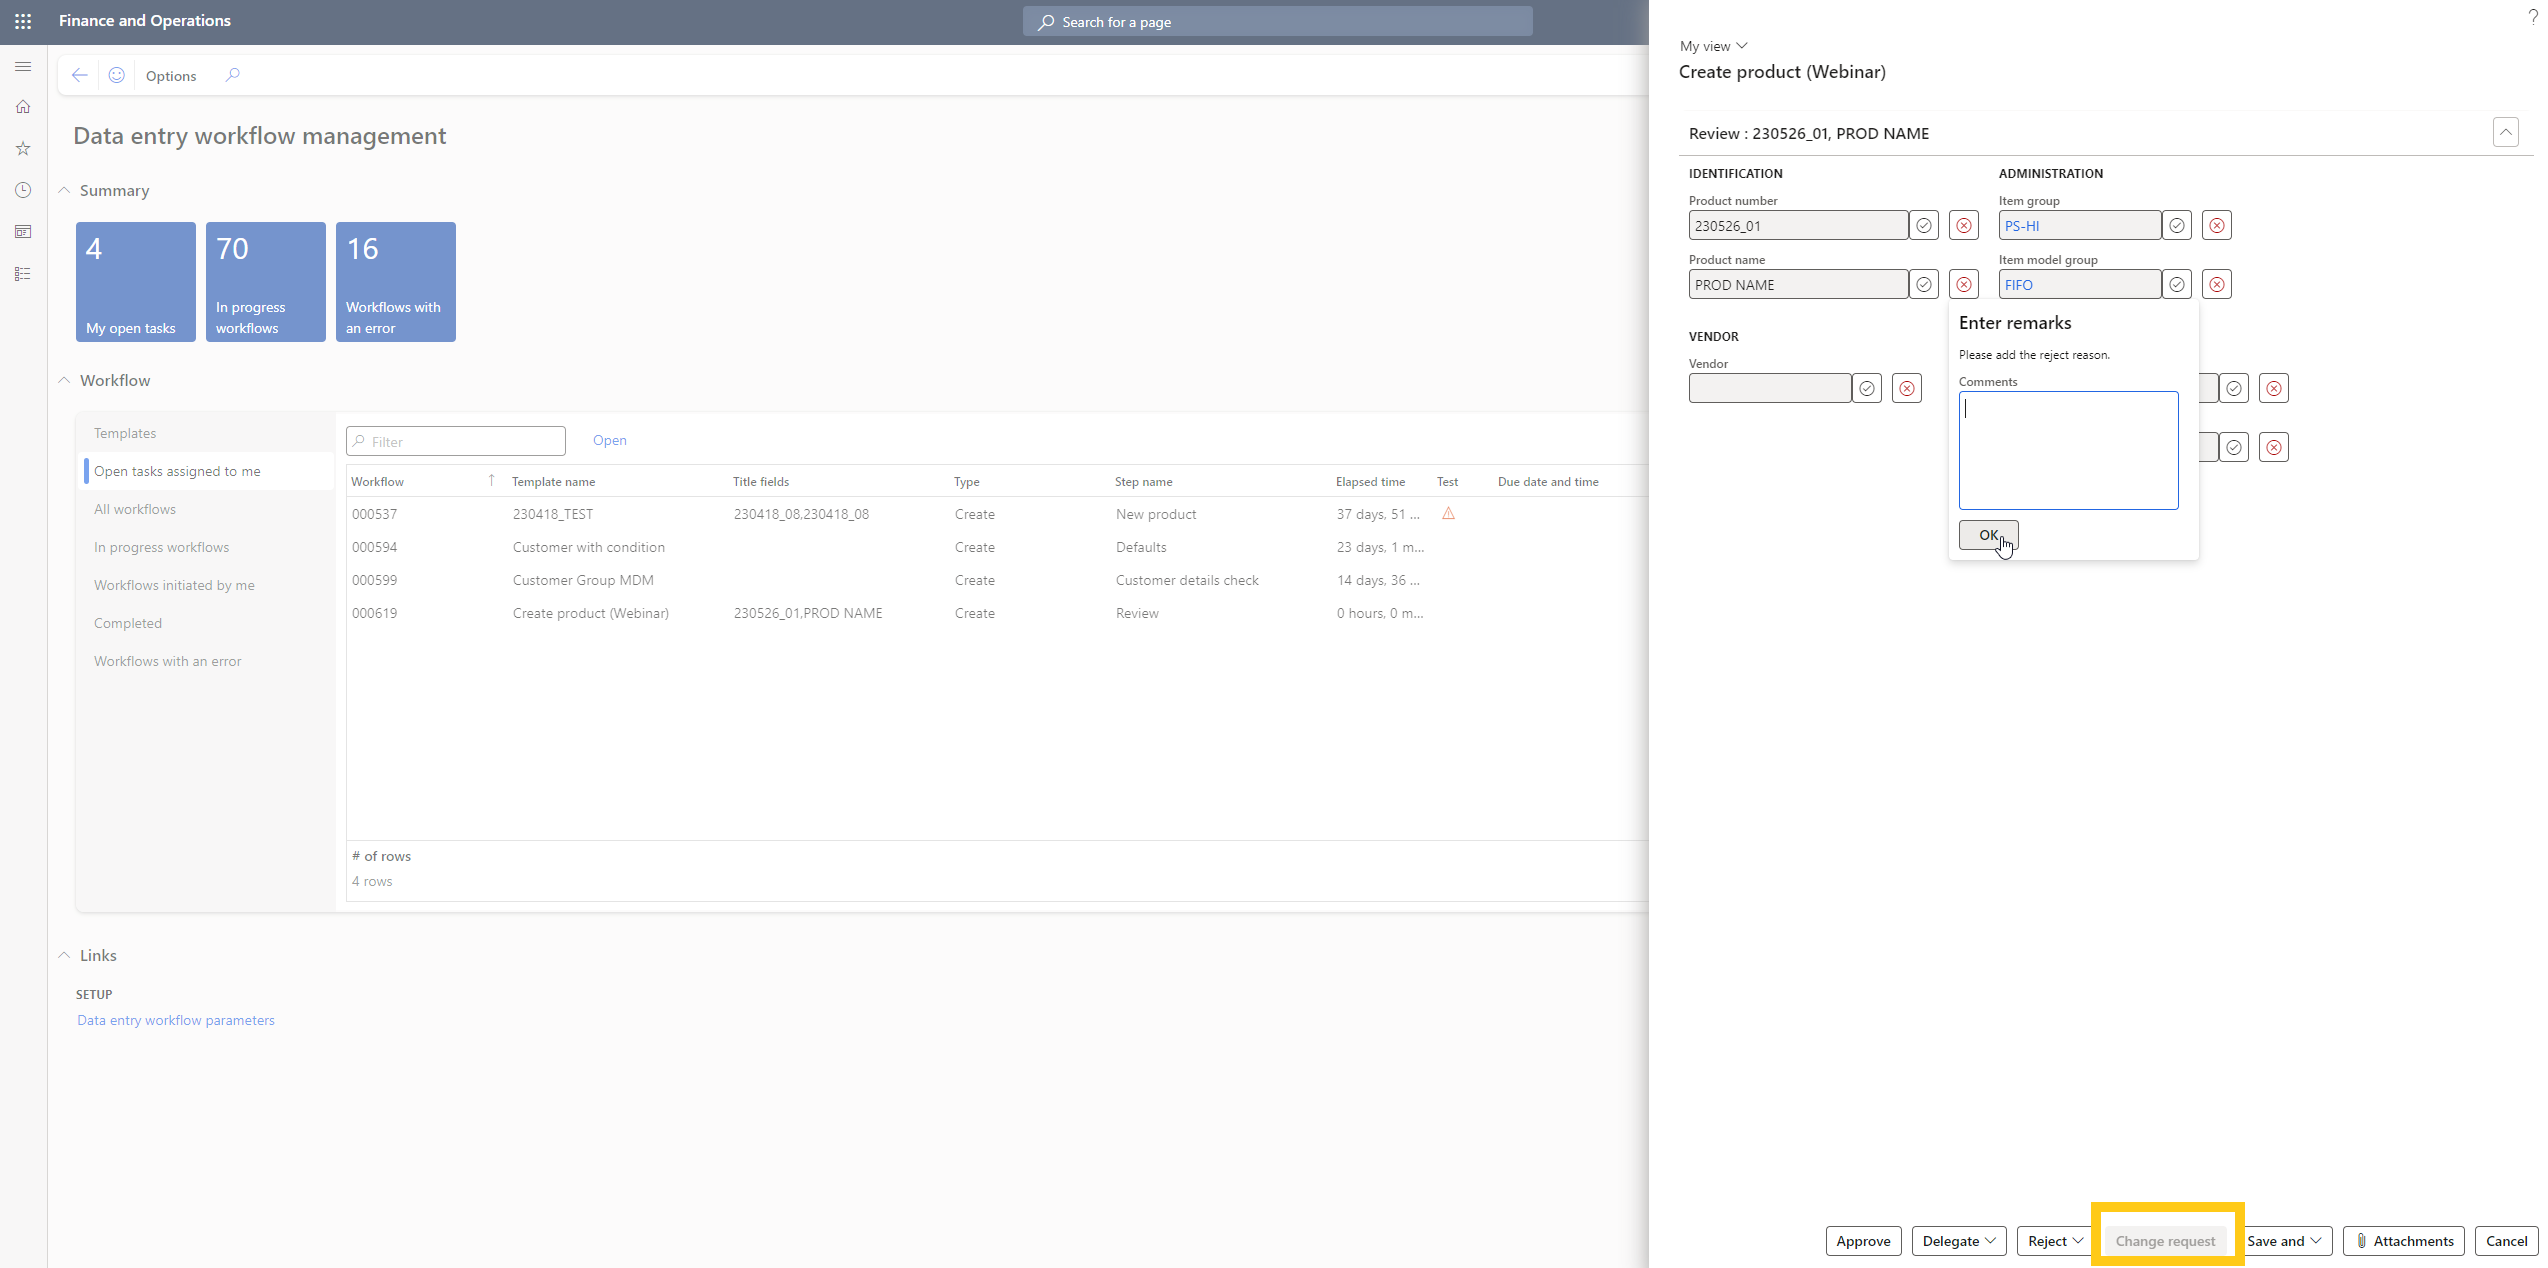
If you think something needs to be changed, you can click on the reject button on the field and add a comment and then click on OK. You can then click on the Change Request button at the bottom so that the workflow can be corrected. This will trigger the workflow to go back to the assigned person that entered that information and will now need to update it.
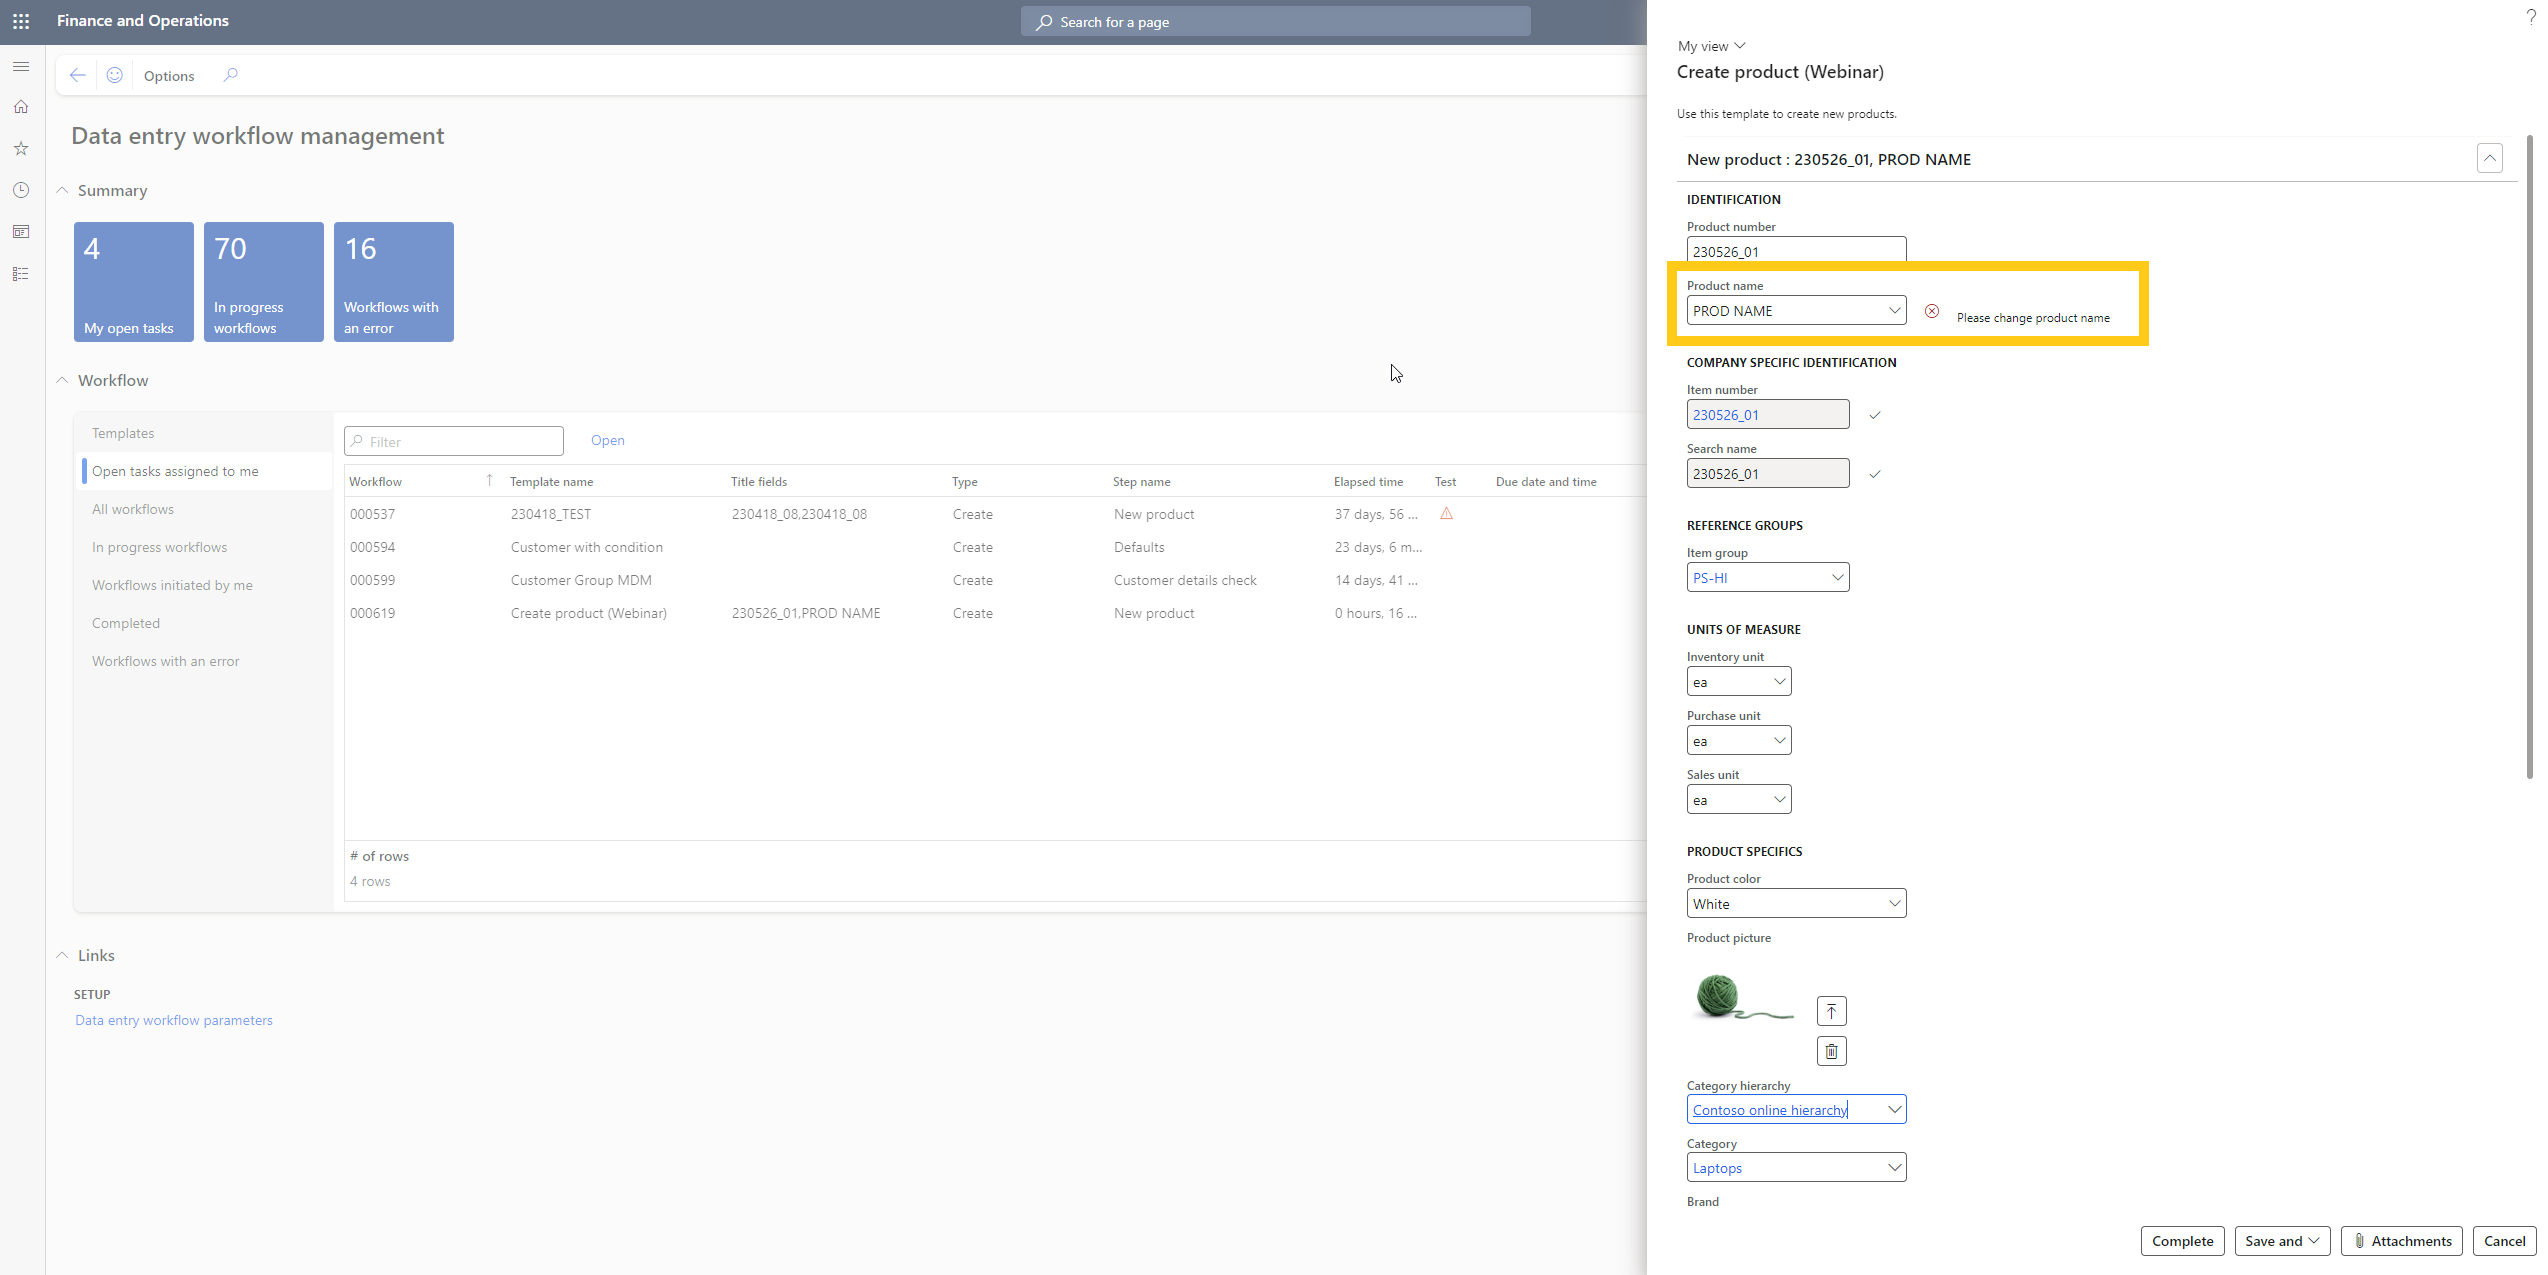
Step 5: Change request
The Product Manager will then see this change request under open tasks assigned to me as ‘Create’ and that then needs to be selected and opened. Once opened, you can see the error next to the field with the comment, so that will have to be updated and then you can click on Complete once done. And this form will go back for review to the assigned Manager.
The assigned approver will see the form in the Open tasks assigned to me tab as ‘Approve’. Only after the form has been approved the product will be released from staging to the system. So, you will see it in the master data company if you search for the record. Also, once you approve the product to be created in the application, it will automatically be released to local or operational companies thus the product record would be synchronized with the local company.
Step 6: Distribution of master data record
If you go to the local company you will see the record has been synchronized from the master company. This is an automated release of master data that has been set up with some conditions. 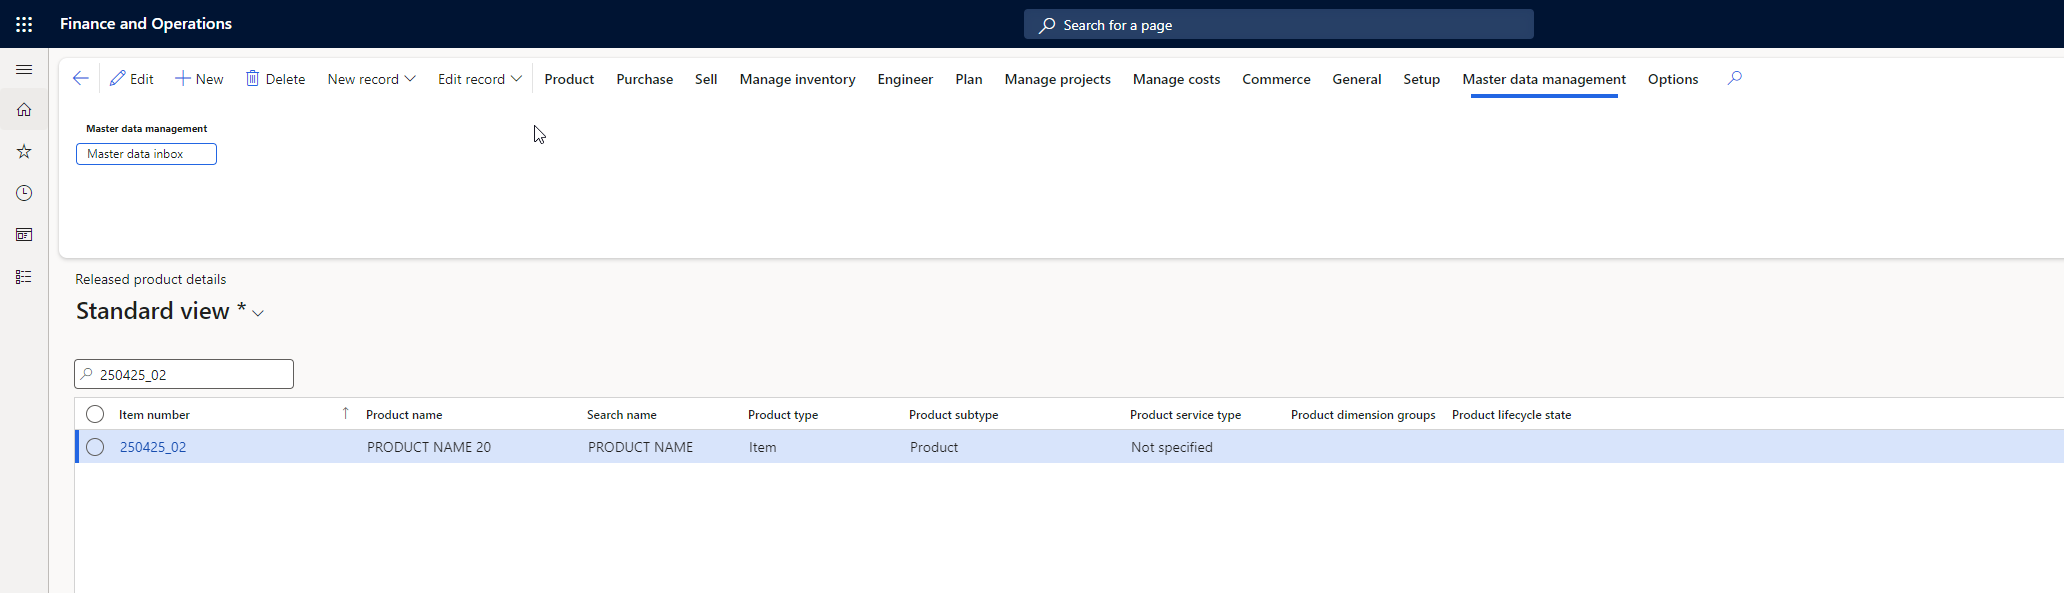
Step 7: Check fields
Using Master Data Management Studio, you can ensure some fields are editable in the master company but not in the local company. Below is a screenshot of the record in the master company after clicking on edit. You can set a condition for the fields that need to be editable only in the master company. This makes the information secure and helps you control and manage data quality. 
Step 8: Pull data from master company
It is possible there might be some master data records not available in the local company that are in the master company. Using the Master Data Management suite, you can also initiate a pull request from the master company.
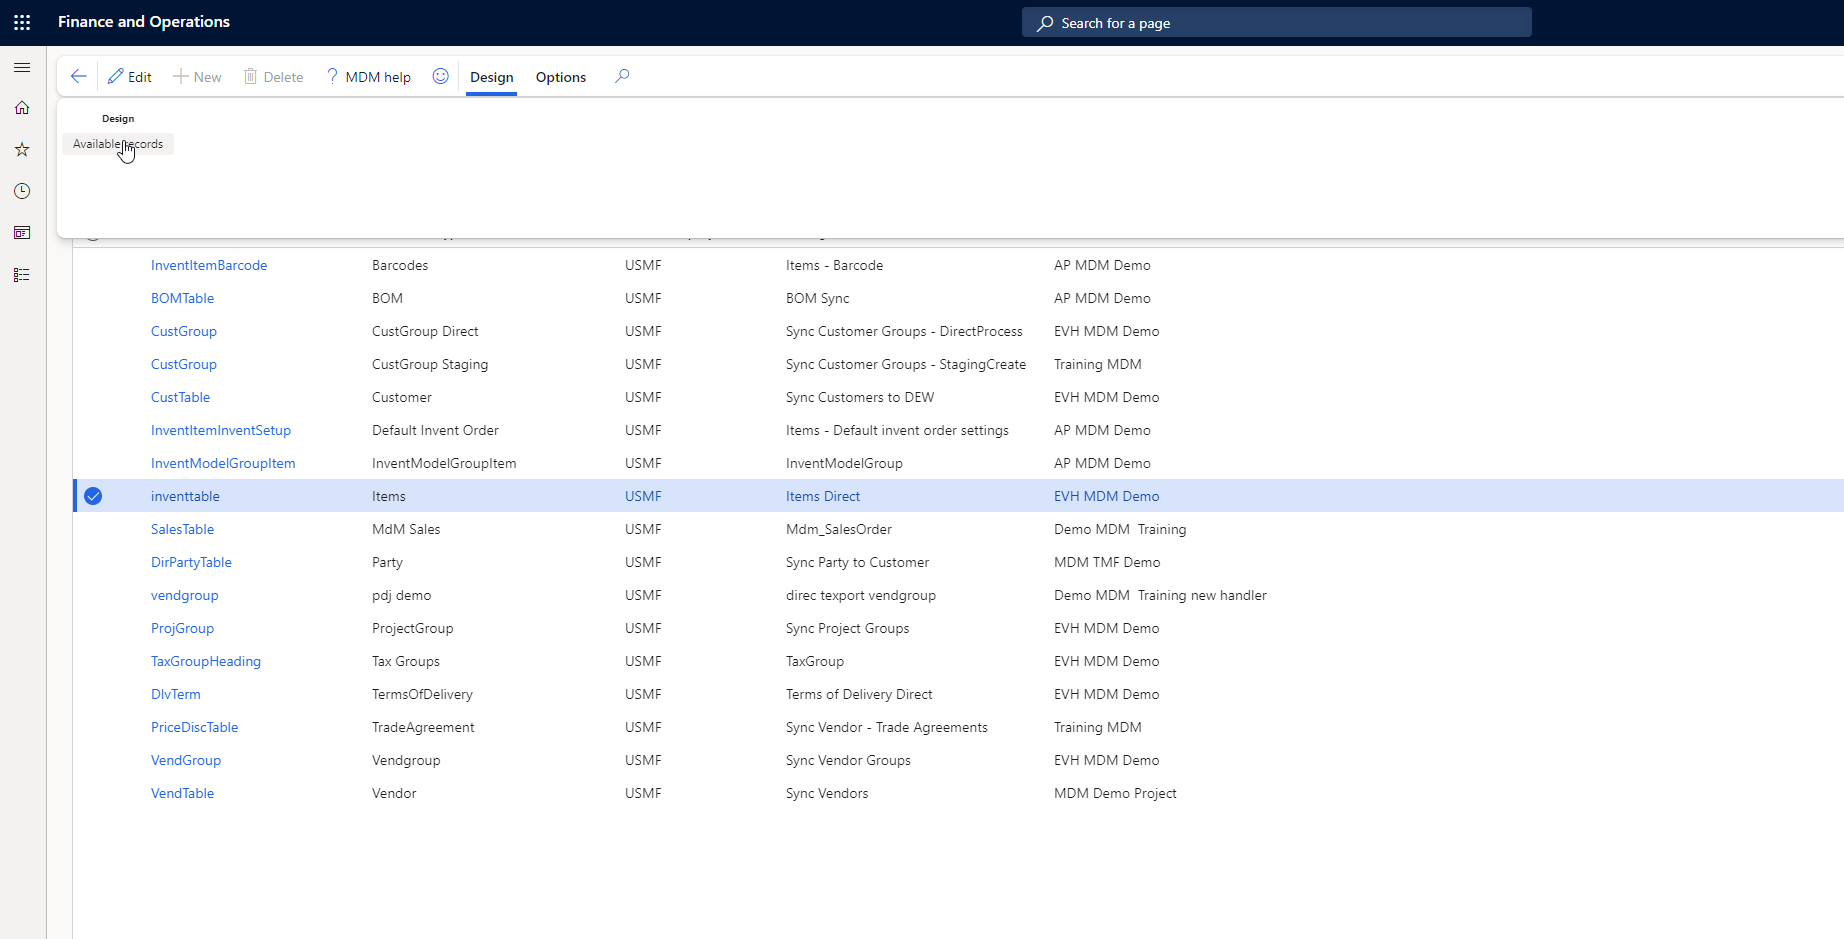
To do this you need to navigate to the master data management module in your local company and click on Pull entry under Inquiries which allows you to request data from the master data company.

Once you do that, you will see a list of master records. You can click on the record and then click on Design in the top navigation bar and then click on Available records as shown below.
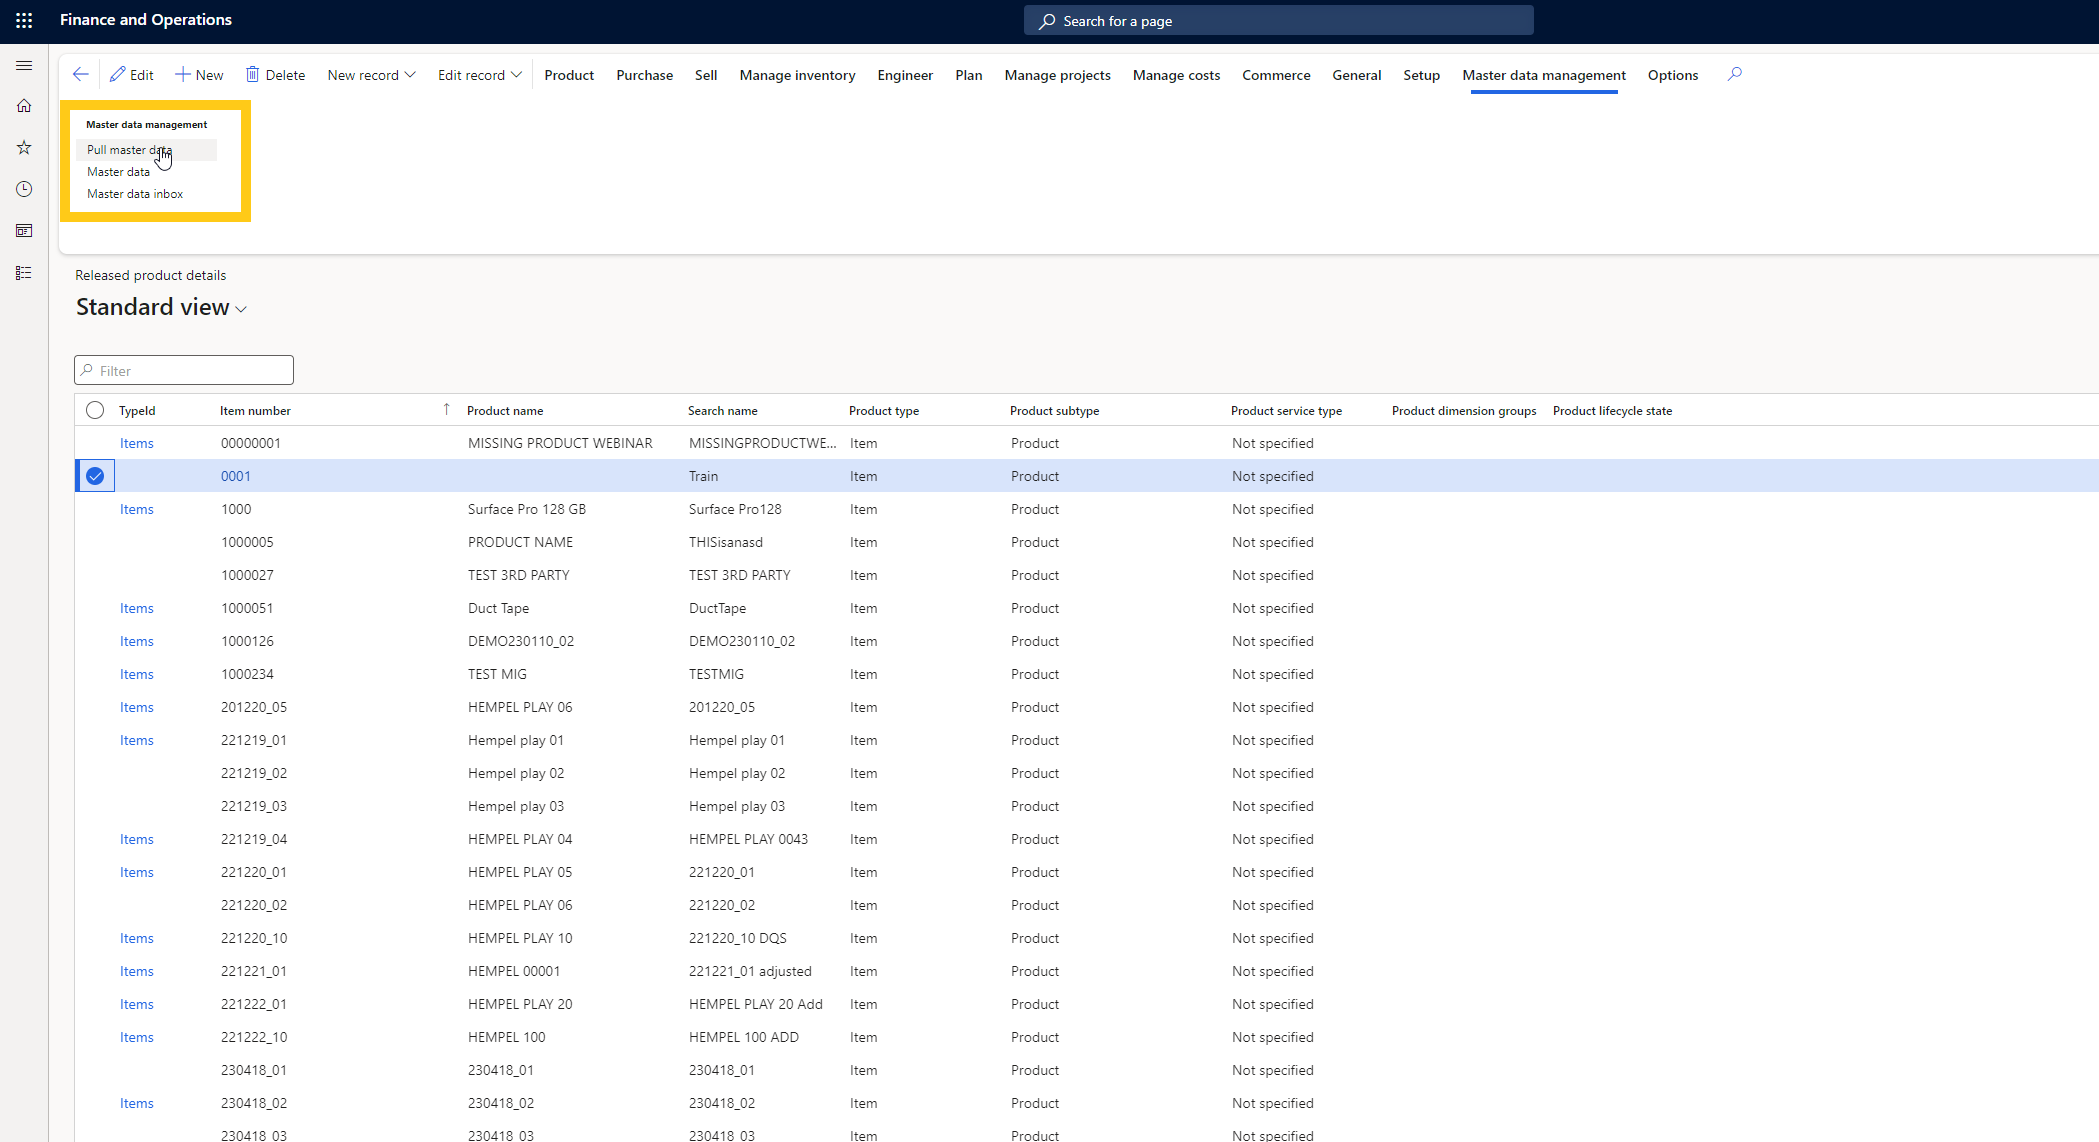
We are going to initiate a request for a missing product record from the master company. So, to do that, you click on the product and then click on Pull master data under the Master data management tab.
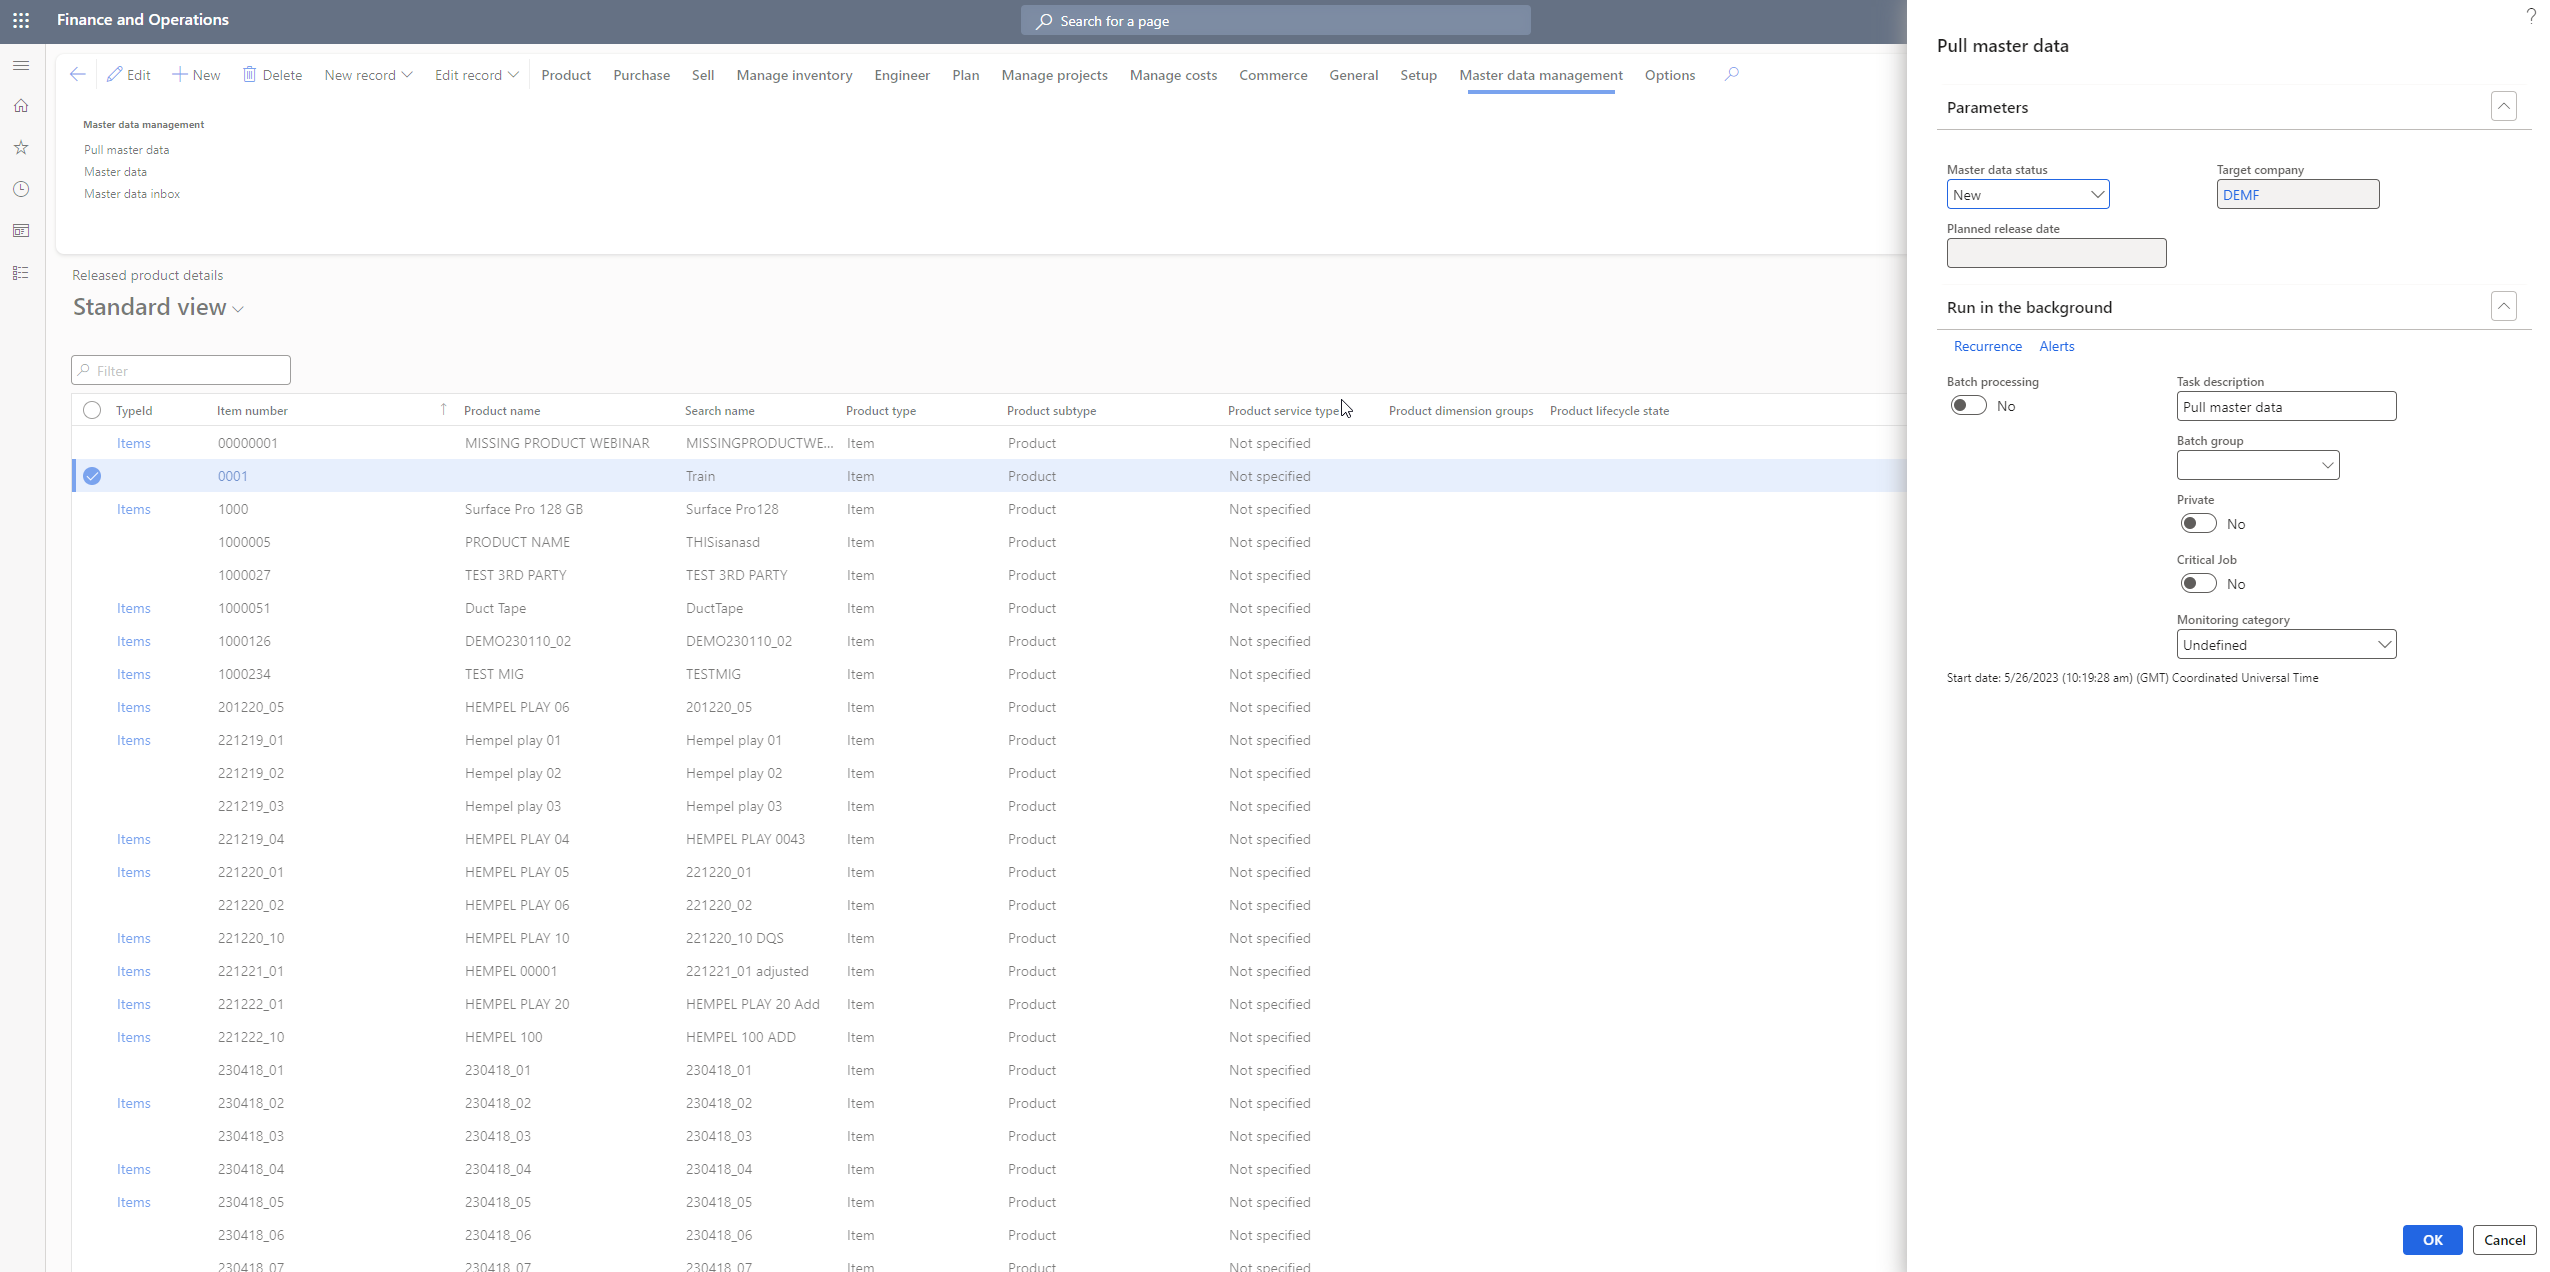
It will open up a form that shows the detail of the kind of pull request, so you can click on OK after checking it.
Step 9: Approve pull entry request
The master company will then get a notification to approve the request. So, the data steward can check this by going to the modules on the left-hand side navigation, selecting master data management, then selecting master data under Common.
You need to then click on the kind of record on the dashboard, since we requested for an item, we click on item and proceed. That action will then open up a list of records under item as shown below. You will see New listed under the Status column as that record hasn’t been released to the local company.
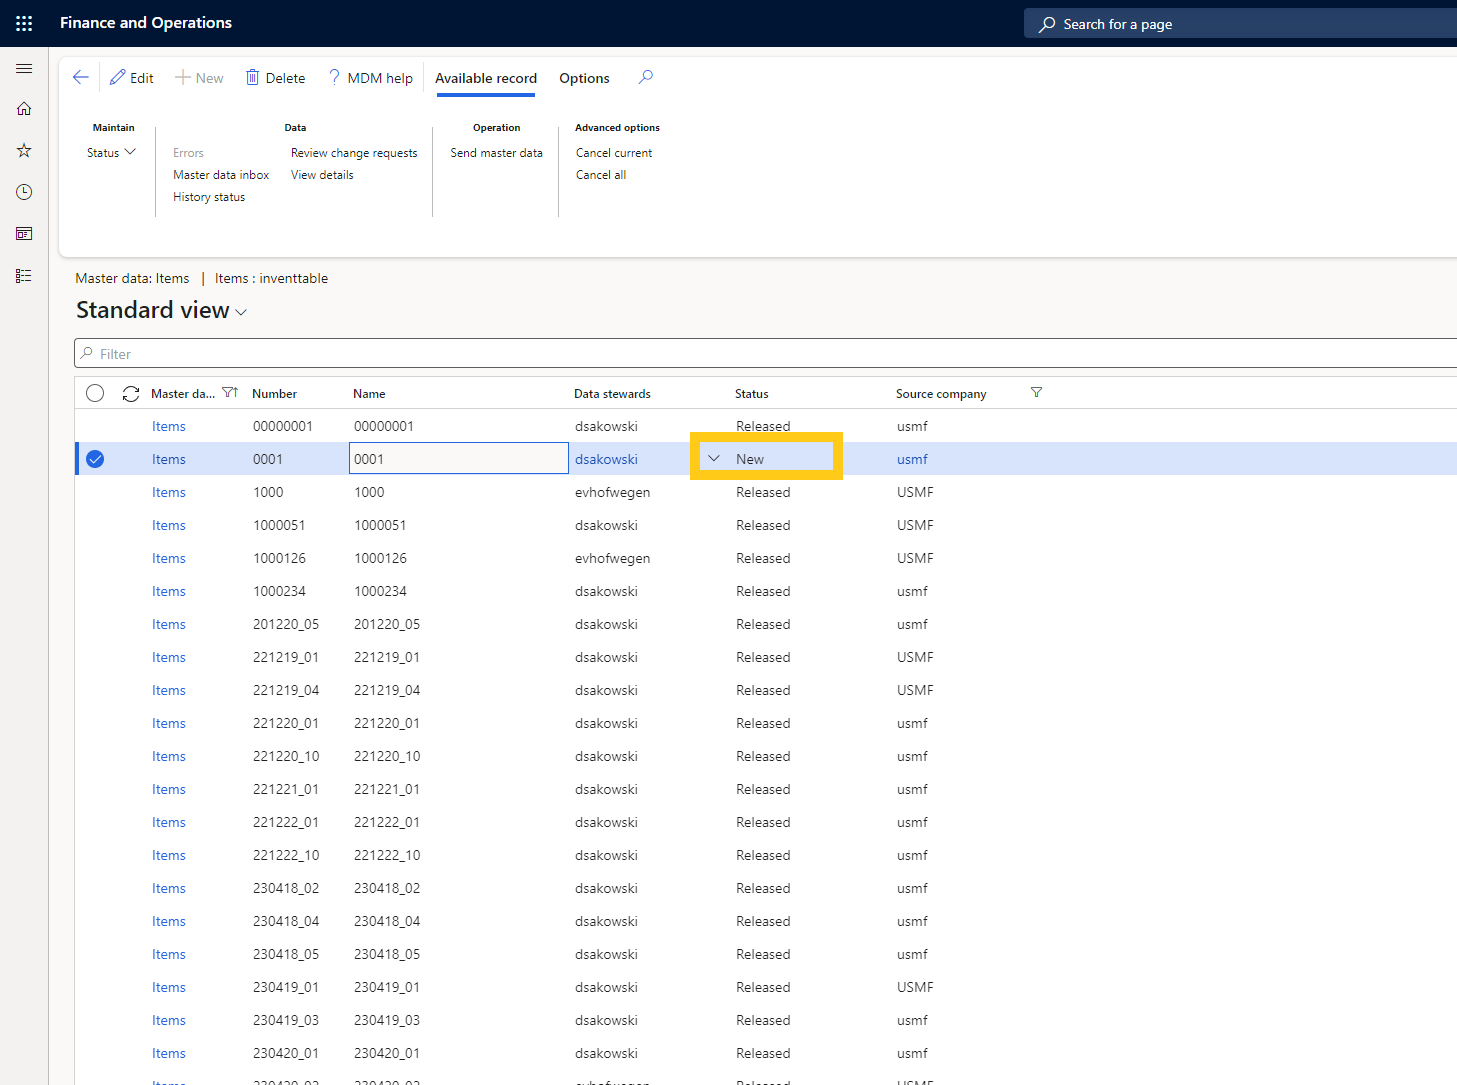
Once you click on that record, you can click on Status under the Maintain tab. You can either cancel or approve the request from the dropdown. After that, from the same dropdown under Status, you will see a release option that you need to click on. This will then allow you to schedule a release date, and then click on OK.
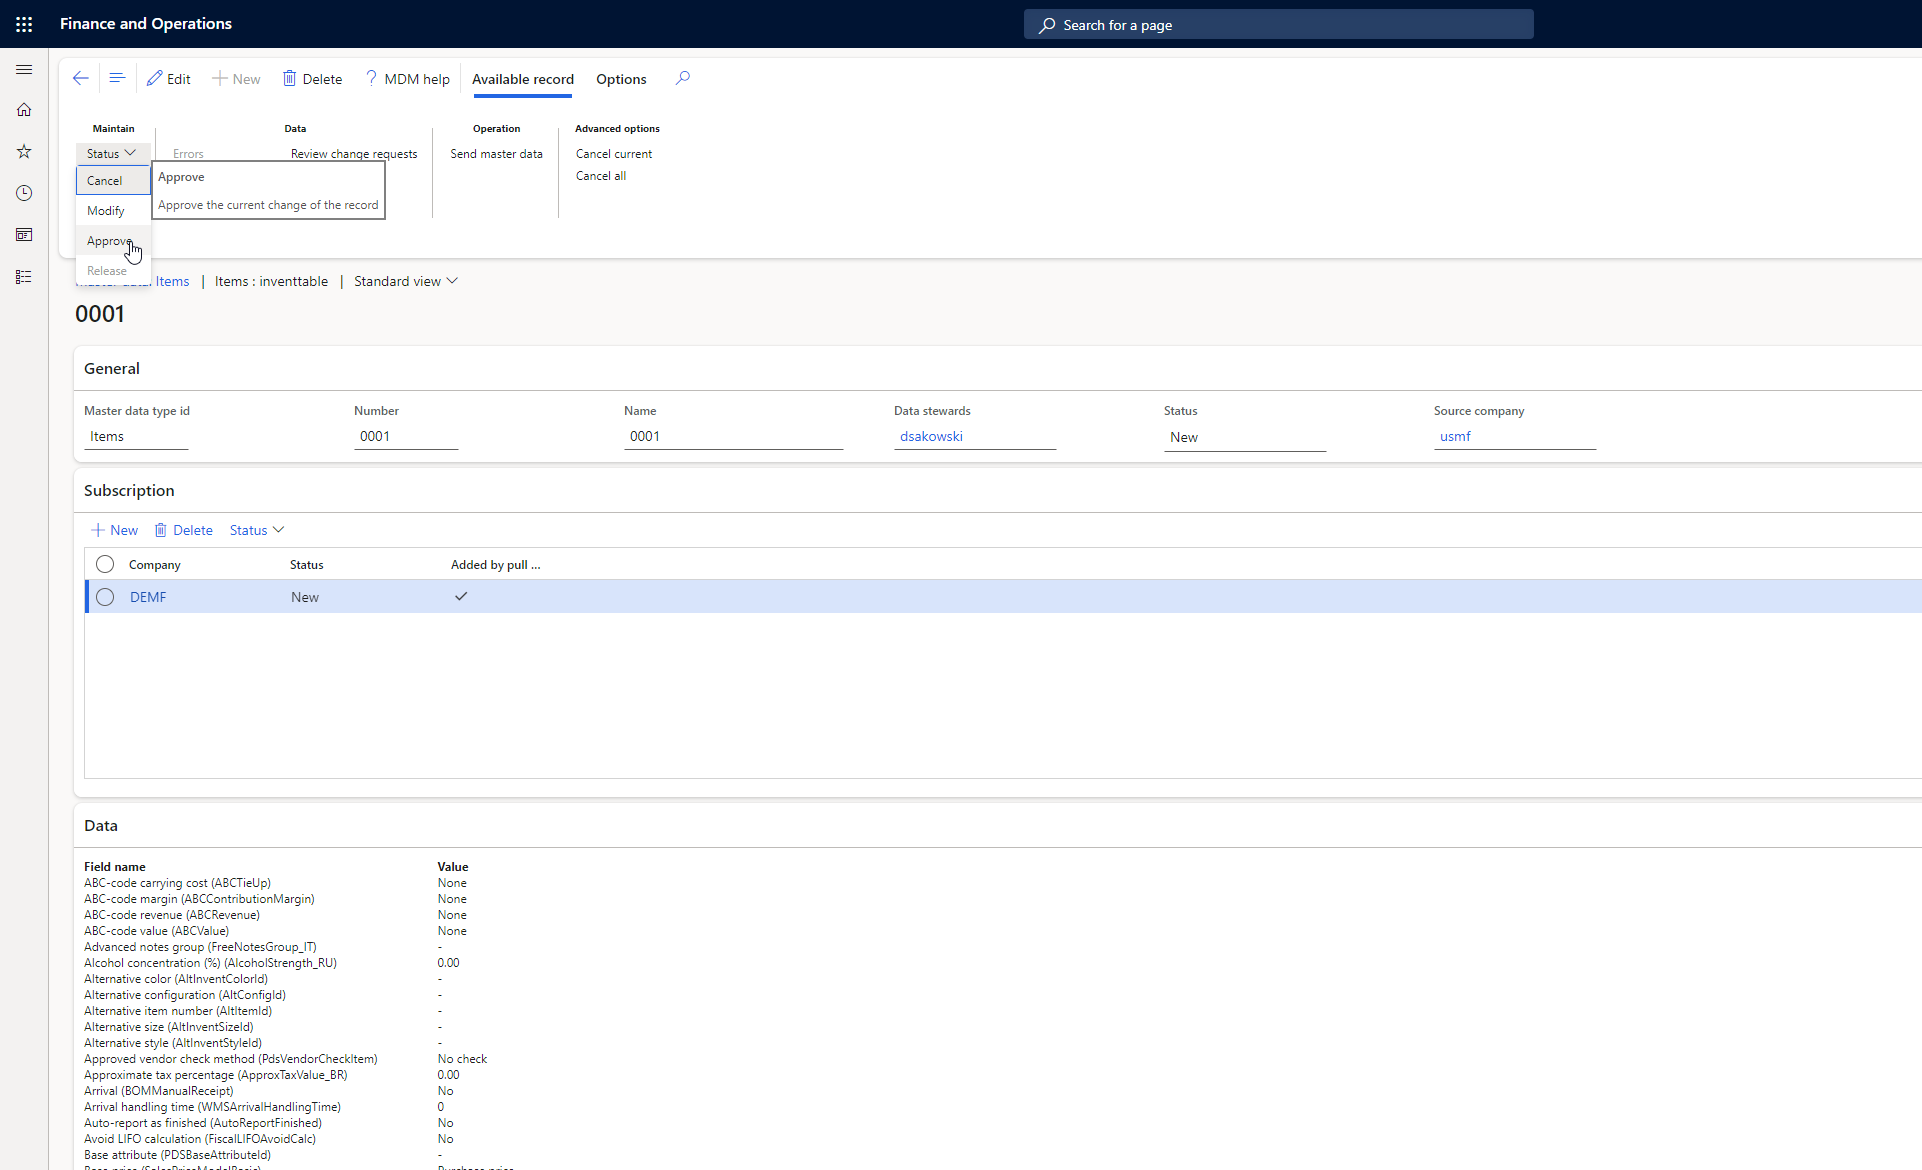
Next, the data steward needs to send the master data. You can also do this manually. You click on Send master data under the Operations top navigation tab.
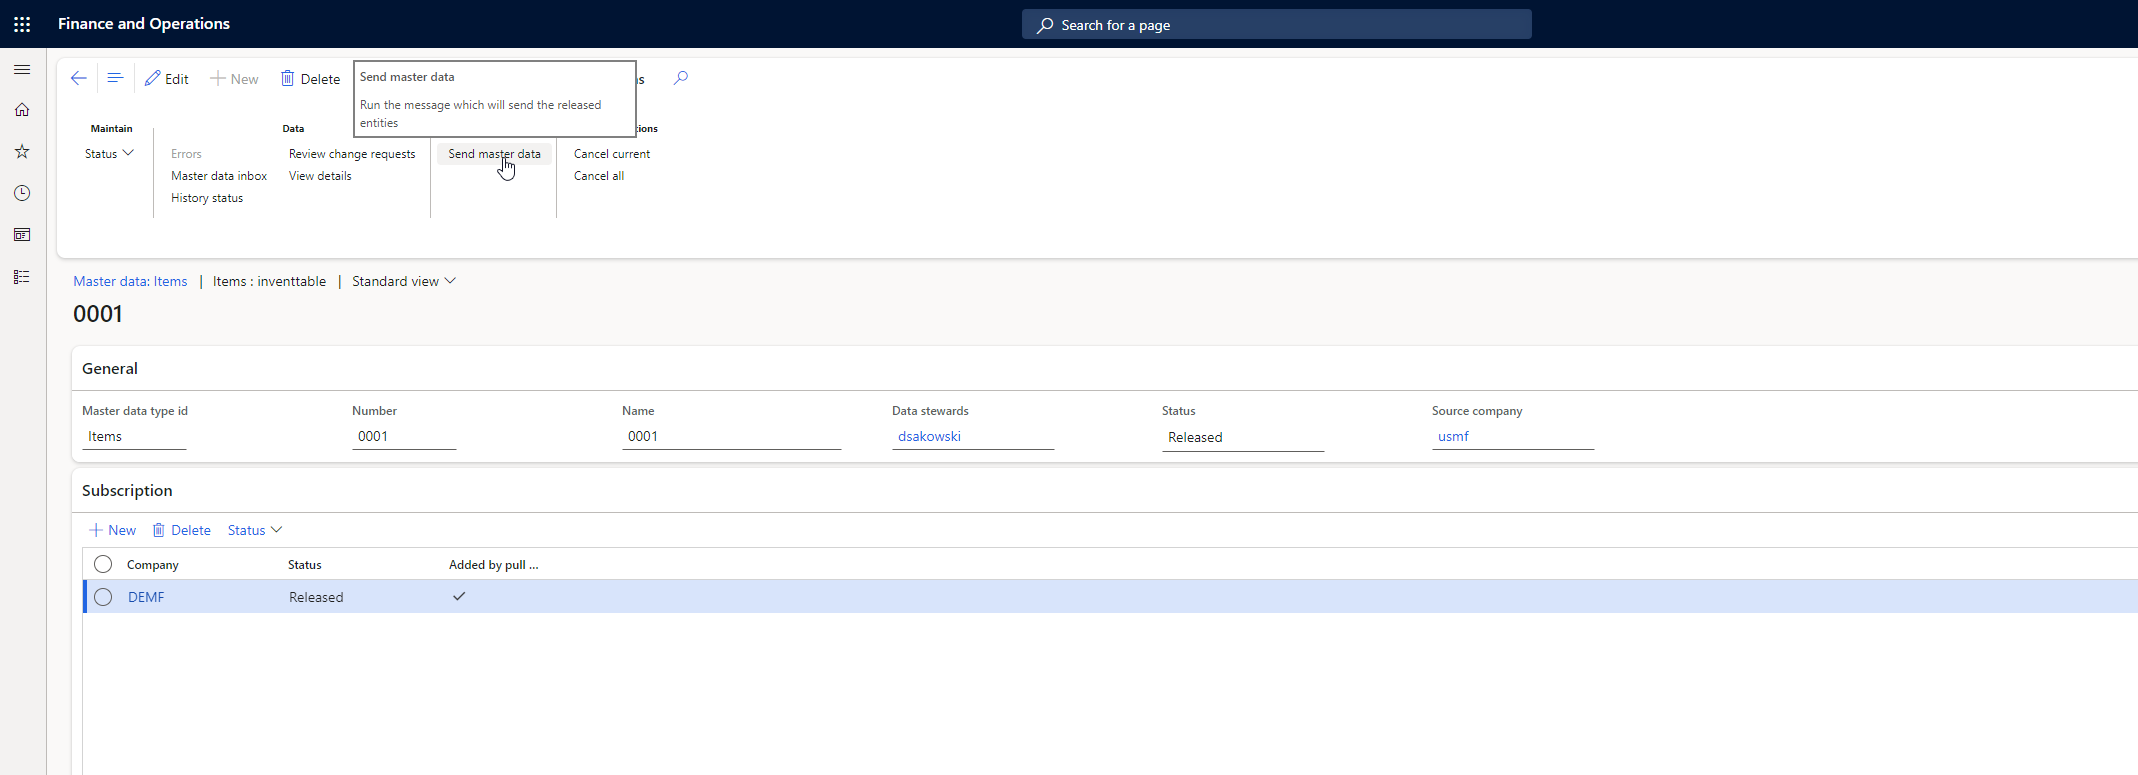
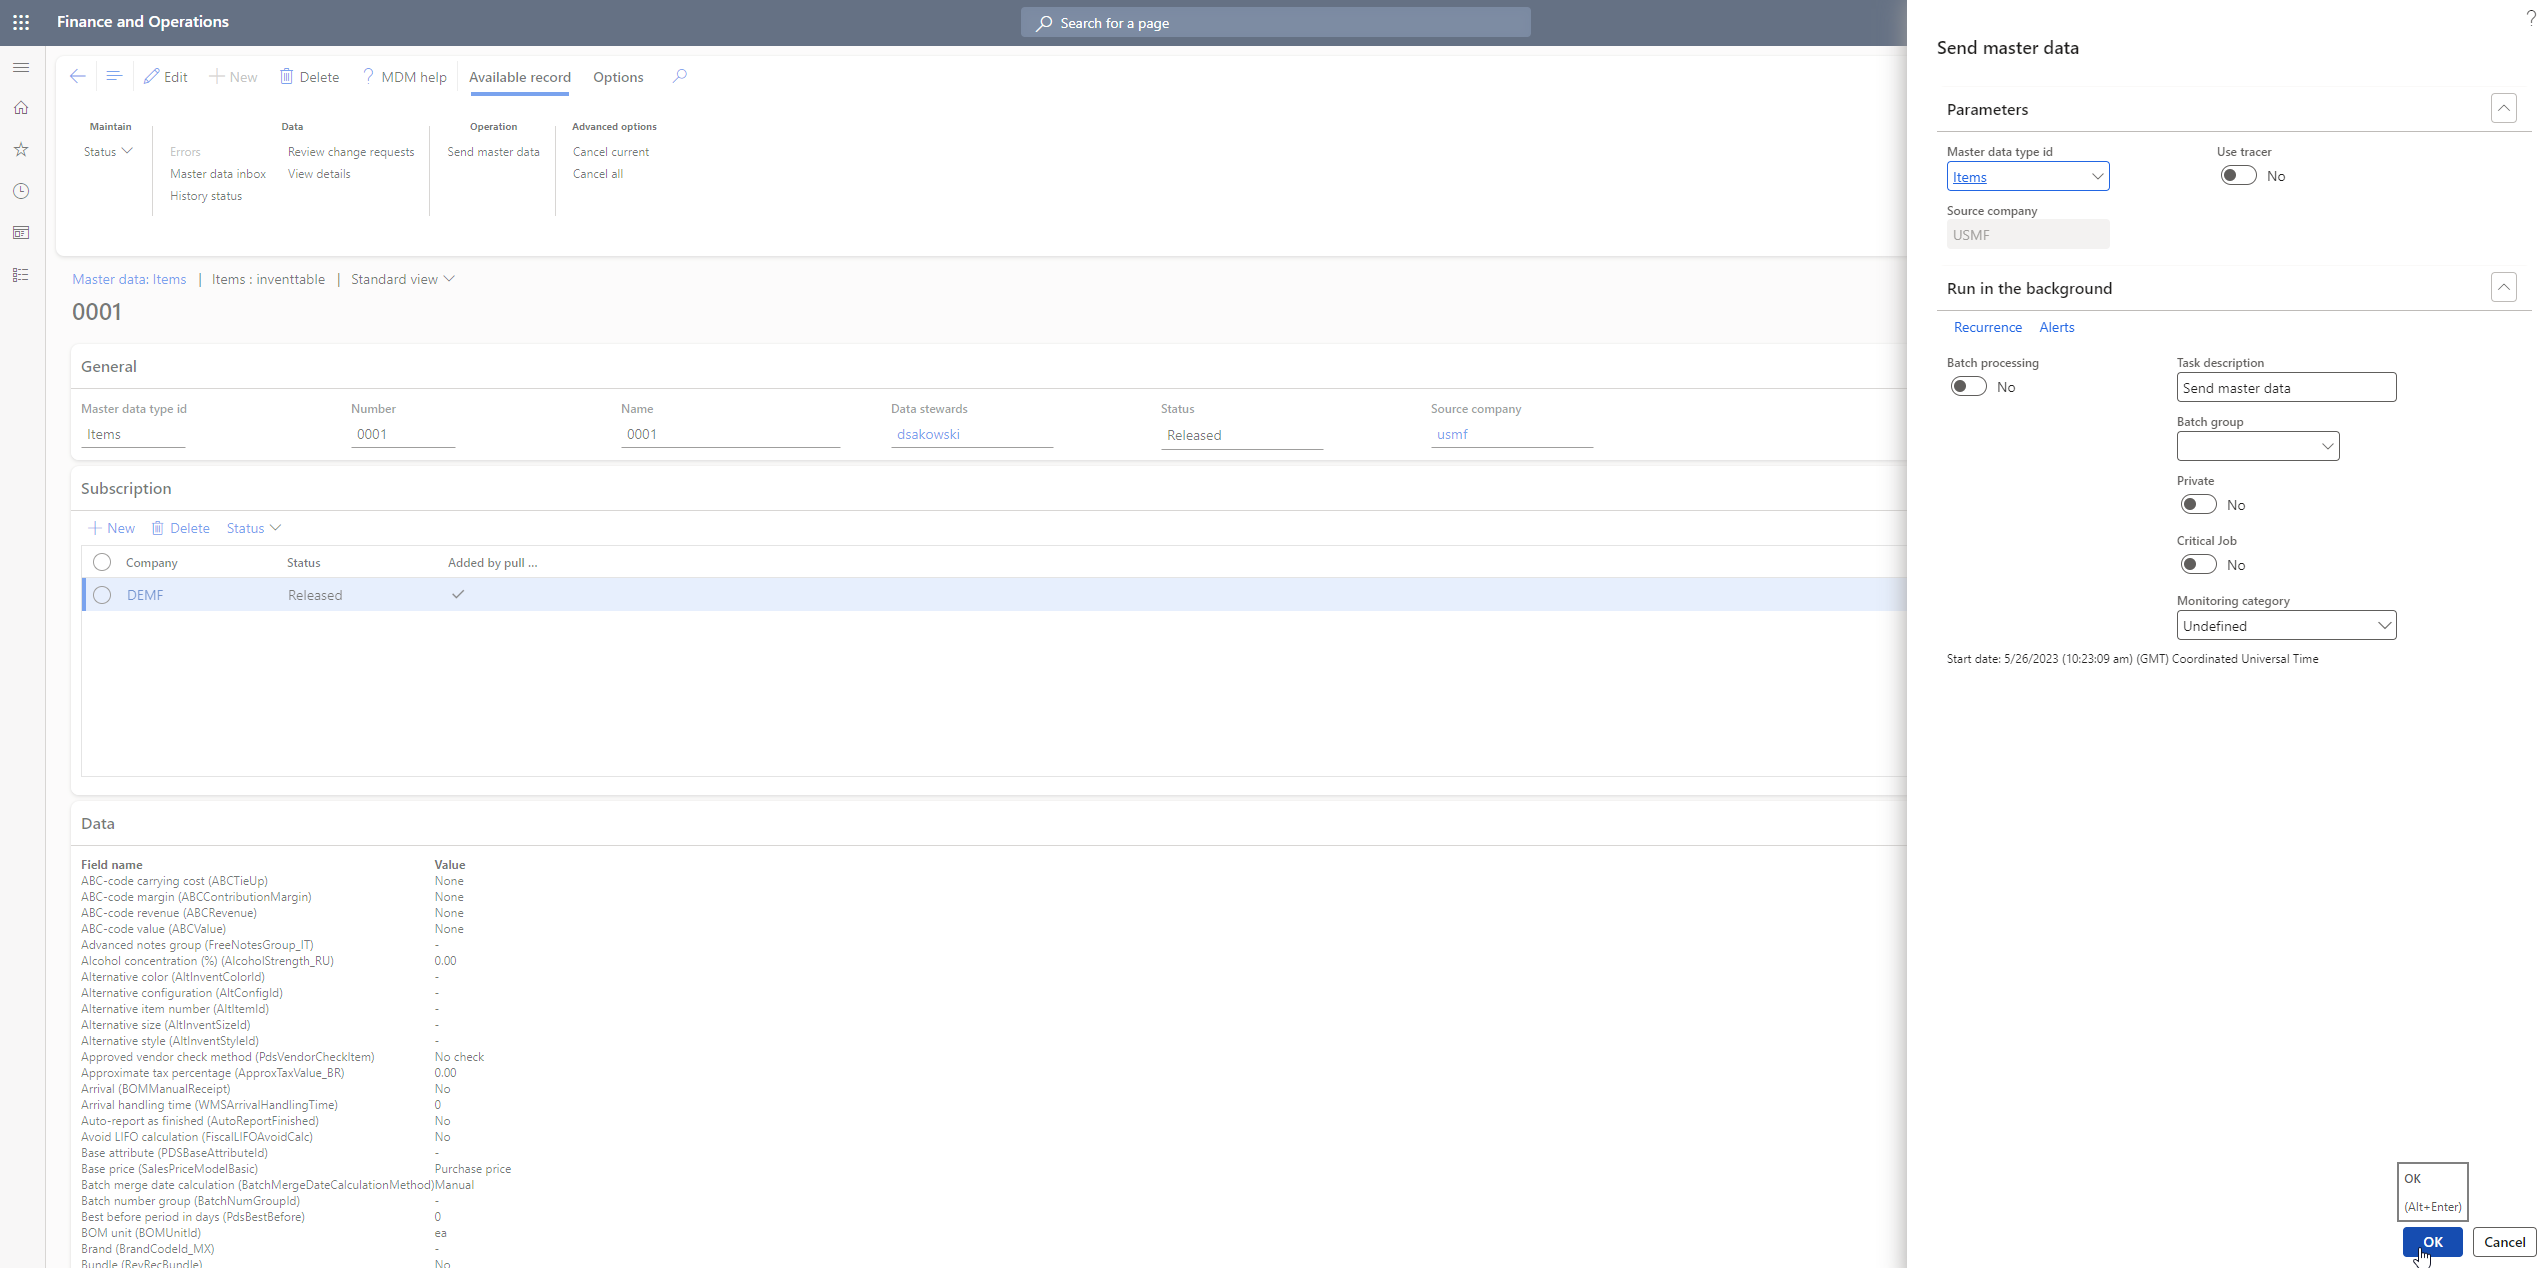
This will open up a form where you can click on OK after checking it. You can also select batch processing for this request.
After this step, if you check the local company, you will see the record in the master data inbox in the Master data management tool.
We hope this demo blog explained how easy it is to create a record and manage data quality, streamline data entry, and control and manage master data after the record has been created.
Want to explore the Master Data Management Suite?
Through this demo we have explained how you can
- create a product record in a streamlined manner using a step-wise approach with data quality checks.
- review that record and release to master data which can then be released to selected local companies.
- ensure security and control of the data by limiting editing in local companies.
- initiate a pull request from the local company which can be released by the data steward from the master data company.
If you want to explore our MDM suite further you can download our factsheet and sign up for our on-demand webinar using the link below. In this webinar, we demo how you can configure these steps using our Data Quality Studio, Data Entry Workflow, and Master Data Management Studio solutions.
-1.png)


