 Eric Van Hofwegen

Using the standard functionality within Microsoft Dynamics 365 Finance and Supply Chain Management (D365 F&SCM), you can share master data within companies, but there are limitations. You cannot distribute a subset of the master data to your entities and you cannot share master data from D365 with external sources. Additionally, adding rules for data quality or a workflow for data entry is not a functionality that D365 offers.
We have spoken to several customers over the years before building our master data management offering for Dynamics 365 and they shared a wish list. They were looking for solutions to help them with data integration, data quality, and data entry management for master data. Based on this feedback, we have built the Data Governance Solution for Microsoft Dynamics. Our solution can help you manage integrations and data movement, add data quality rules, simplify data entry, and control master data management distribution in D365 F&SCM.
Therefore, in this blog, we would like to showcase our solutions in action. We will take you through the creation and distribution of a new customer in the system and also an imported customer record. In both these scenarios, we can showcase the data entry workflow functionality, the rules we added to ensure that data quality is improved, and how that master data can be distributed to the correct companies after approval.
We will explain this using a demo from our on-demand webinar, ‘Control Your Master Data Inside D365’.
Scenario 1: Using STAEDEAN's Data Governance Solution to create and distribute a new master data record
In this scenario, we will create a new customer record and distribute it using our master data management solution for Dynamics 365.
Step 1: Filling in customer details
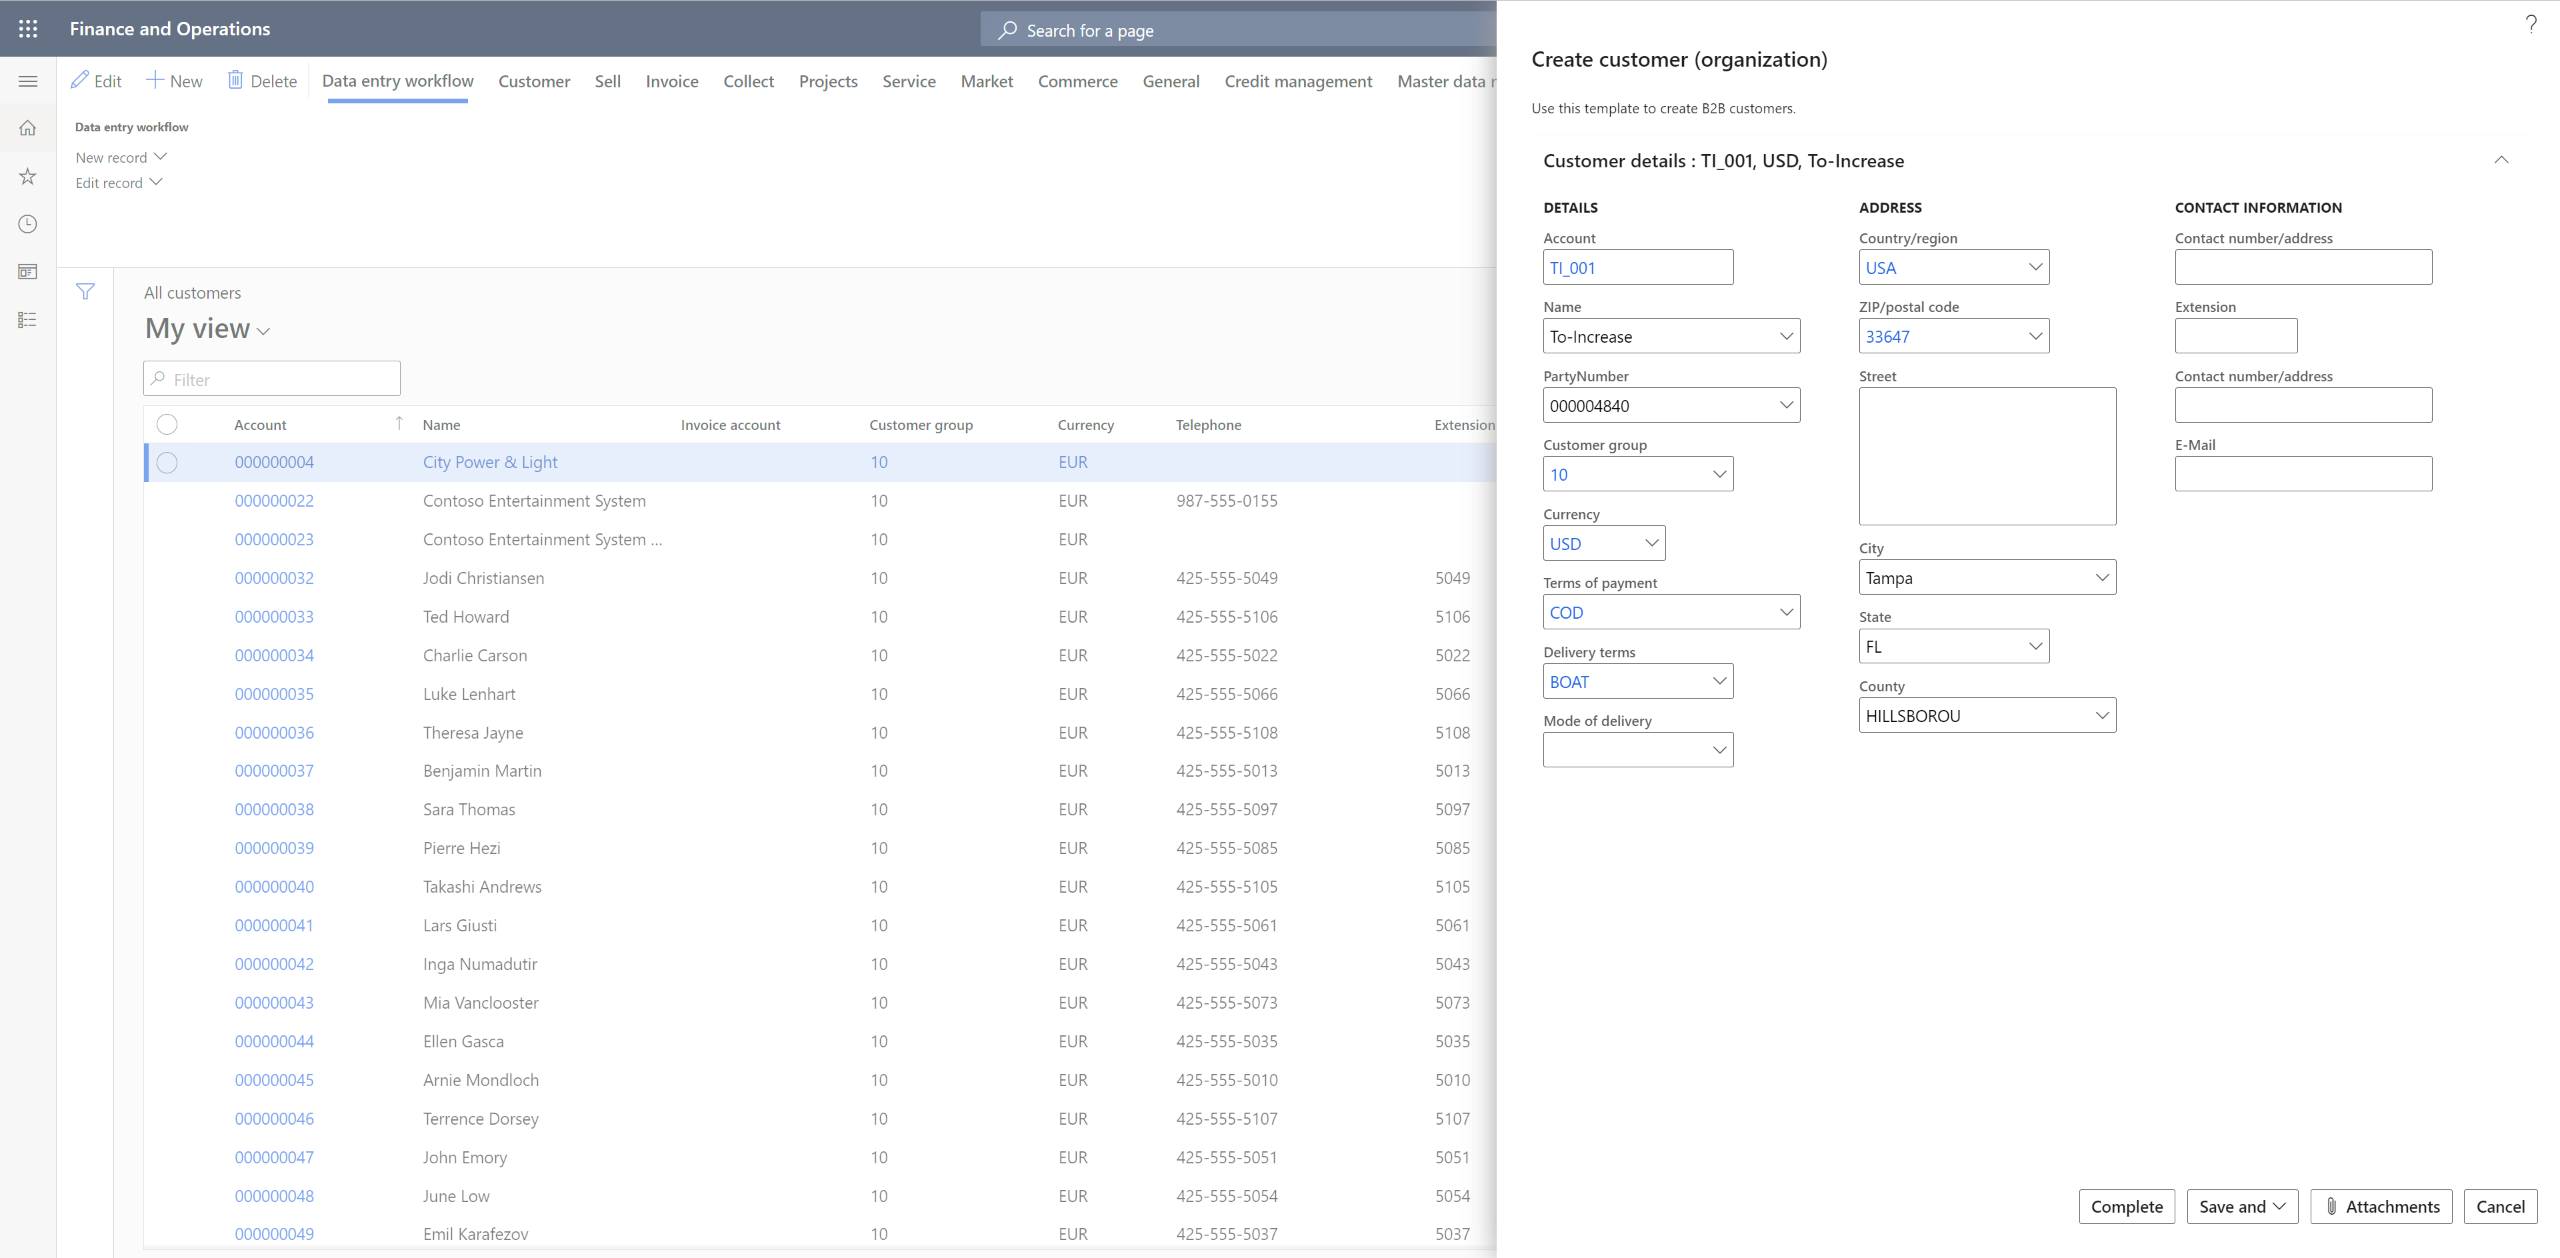
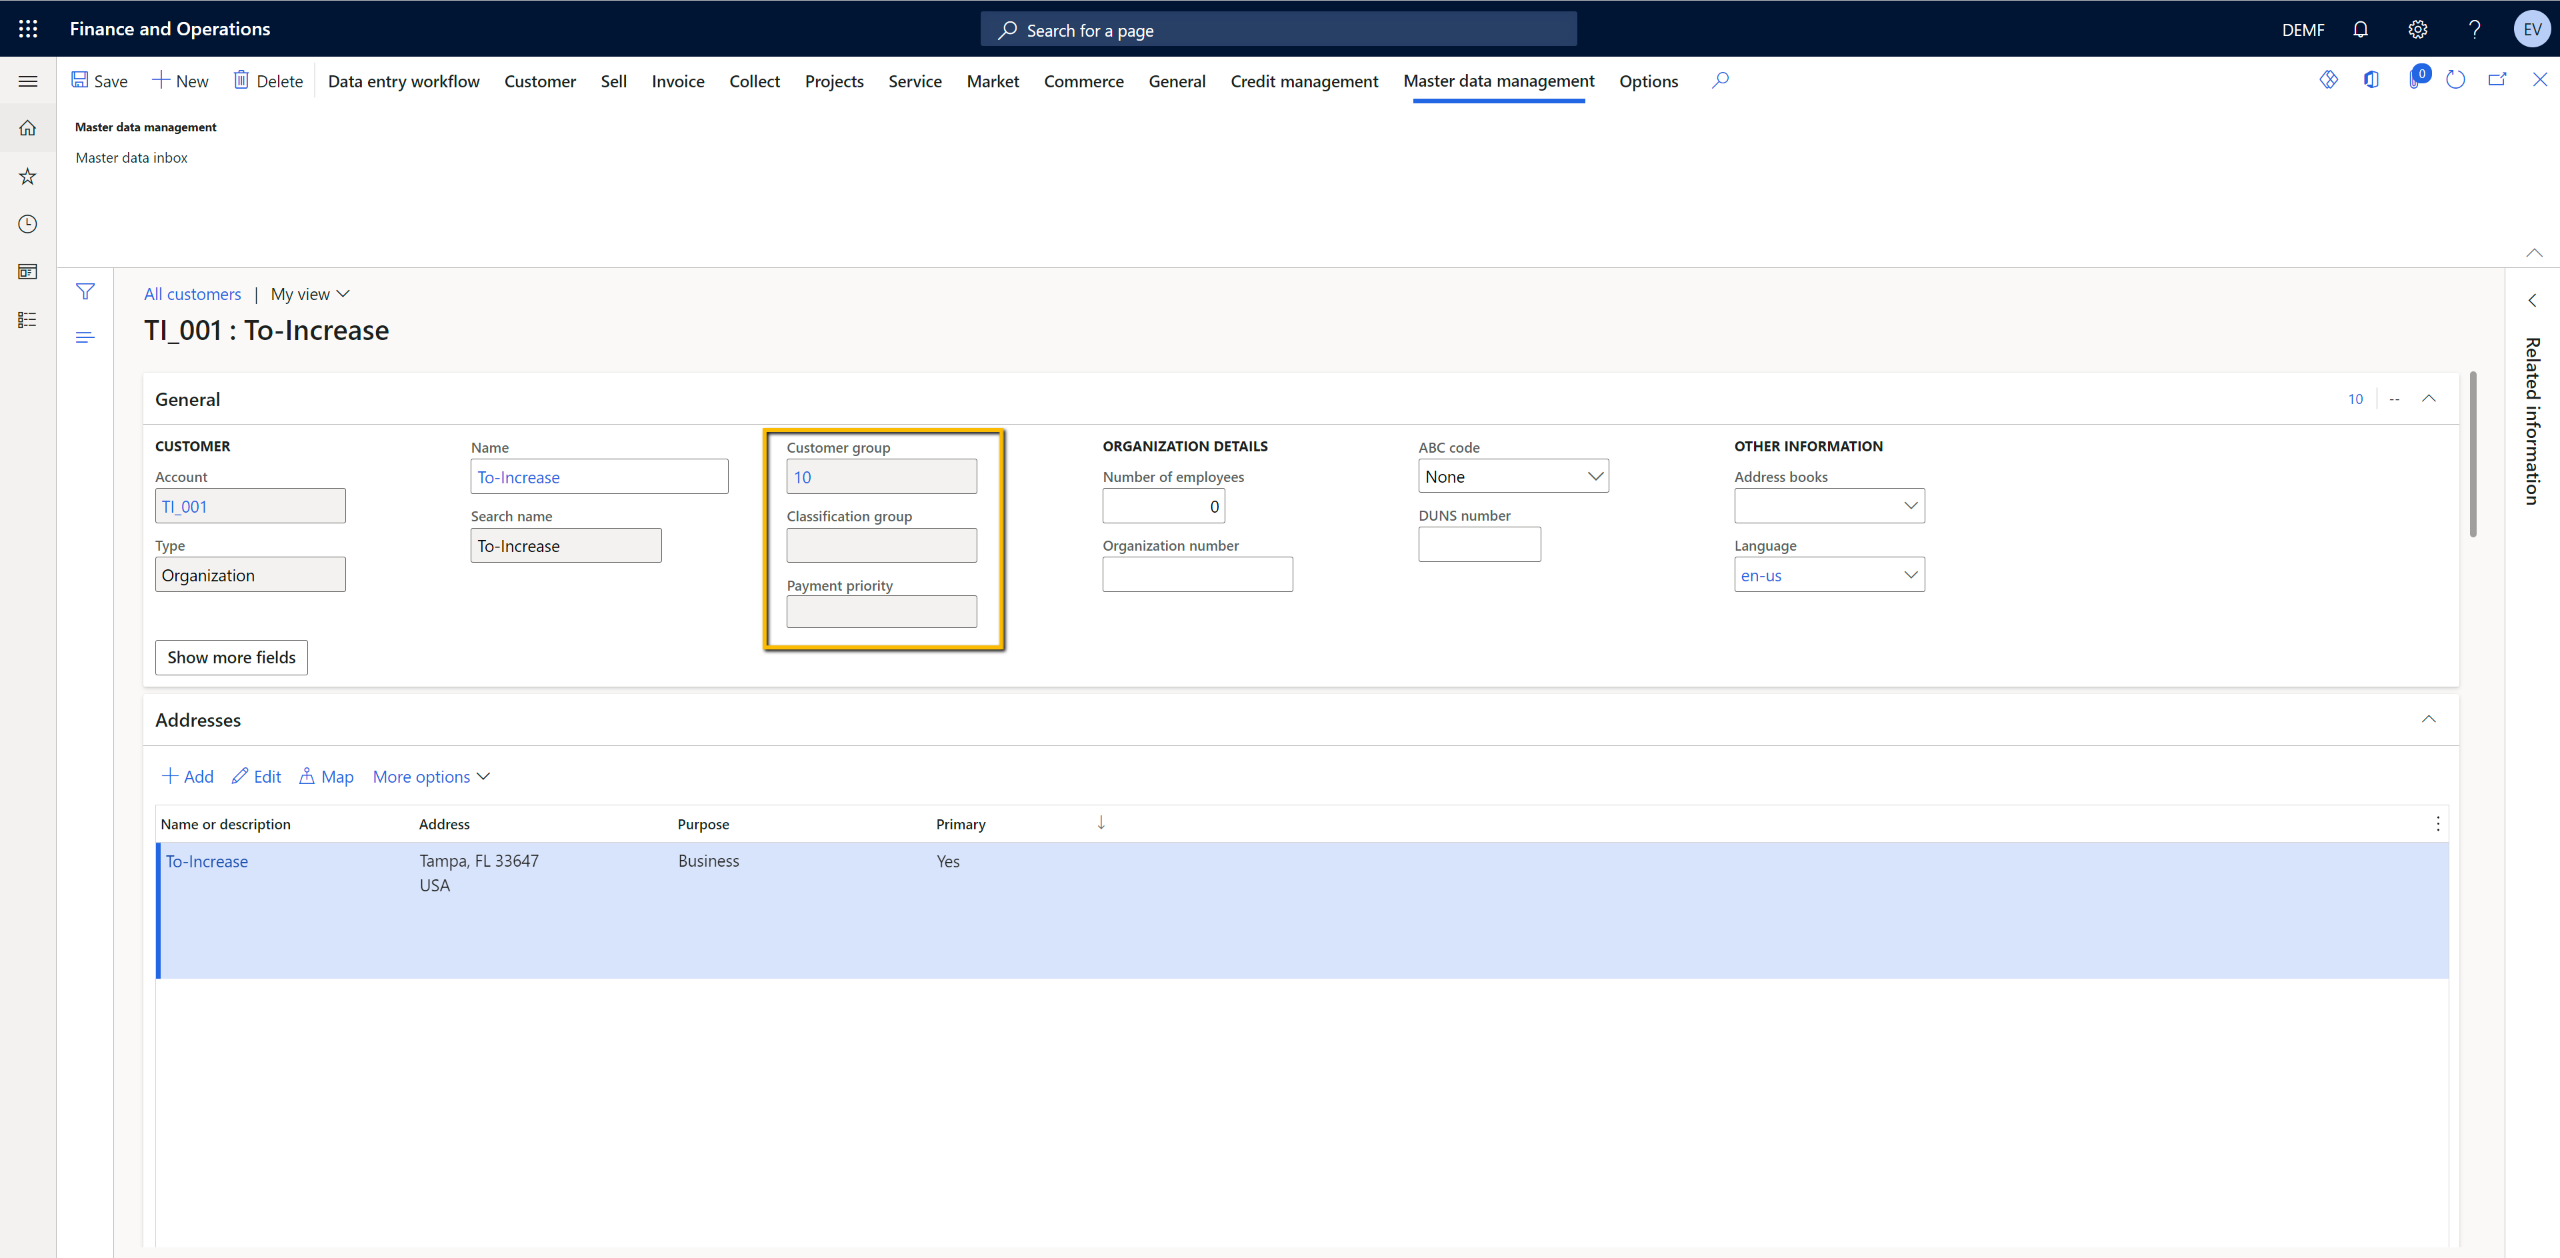
Once you log into D365, click on All Customers from the Home screen. You have to click on the New Record tab under Data Entry Workflow. Once you do that, you click on the template for customers. This is a template that we have created using the most commonly used field groups on customer records for the sake of this demo.
See the example form below with only the fields assigned to the user in this step. The mandatory fields will be marked with an asterisk and highlighted in red. You can also add action rules that will help you auto-populate certain fields based on values in other fields.
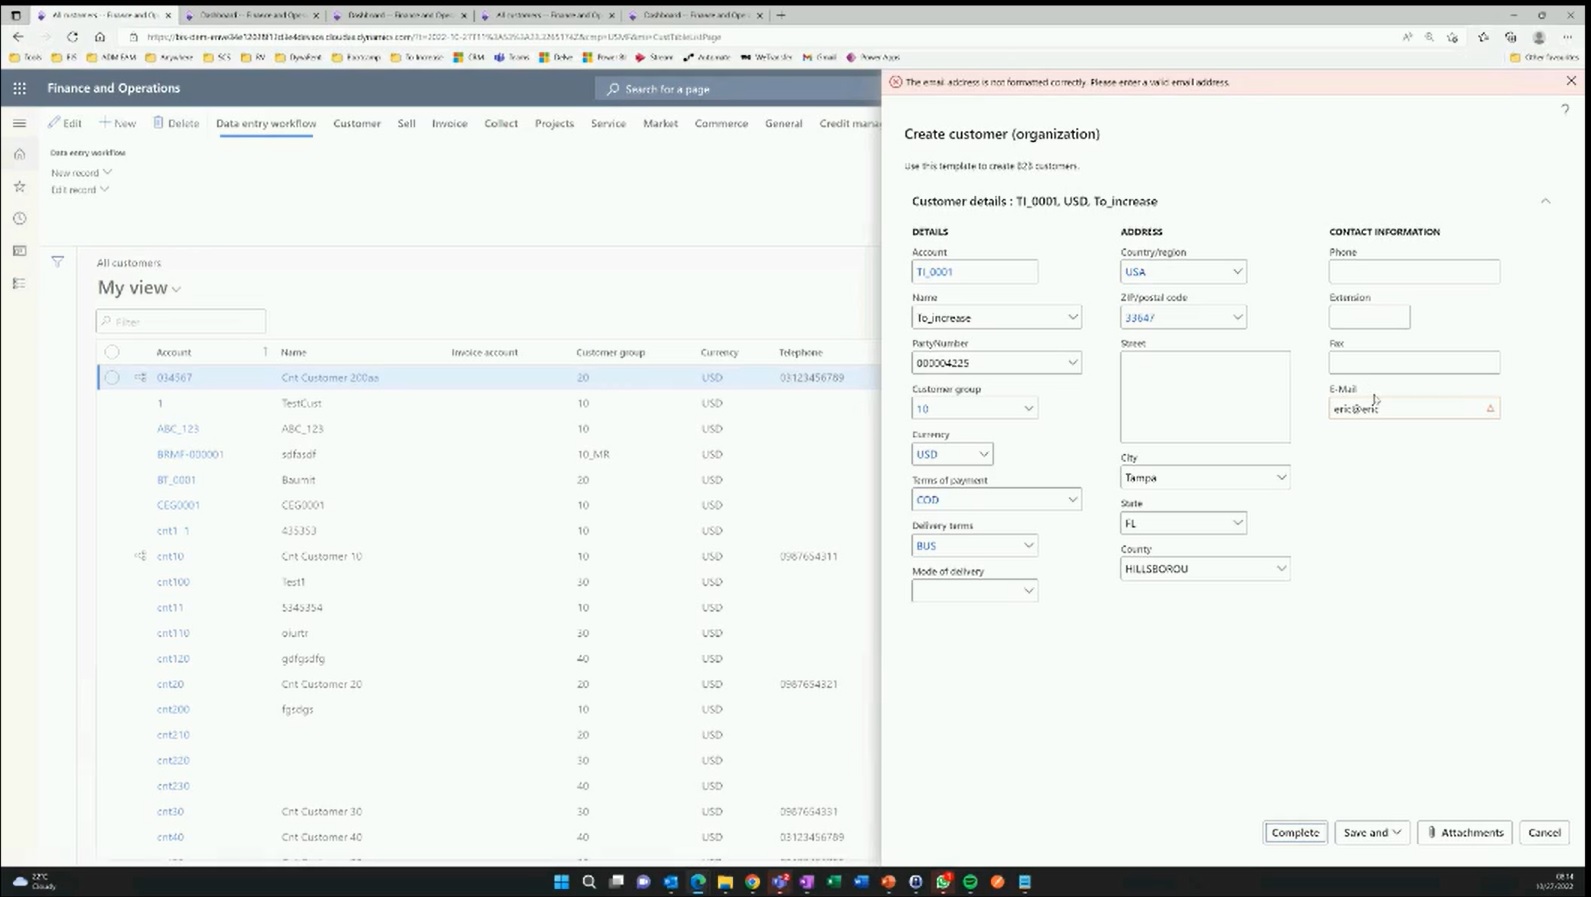
 If you type an incorrect email address, you will get an error message, as seen below.
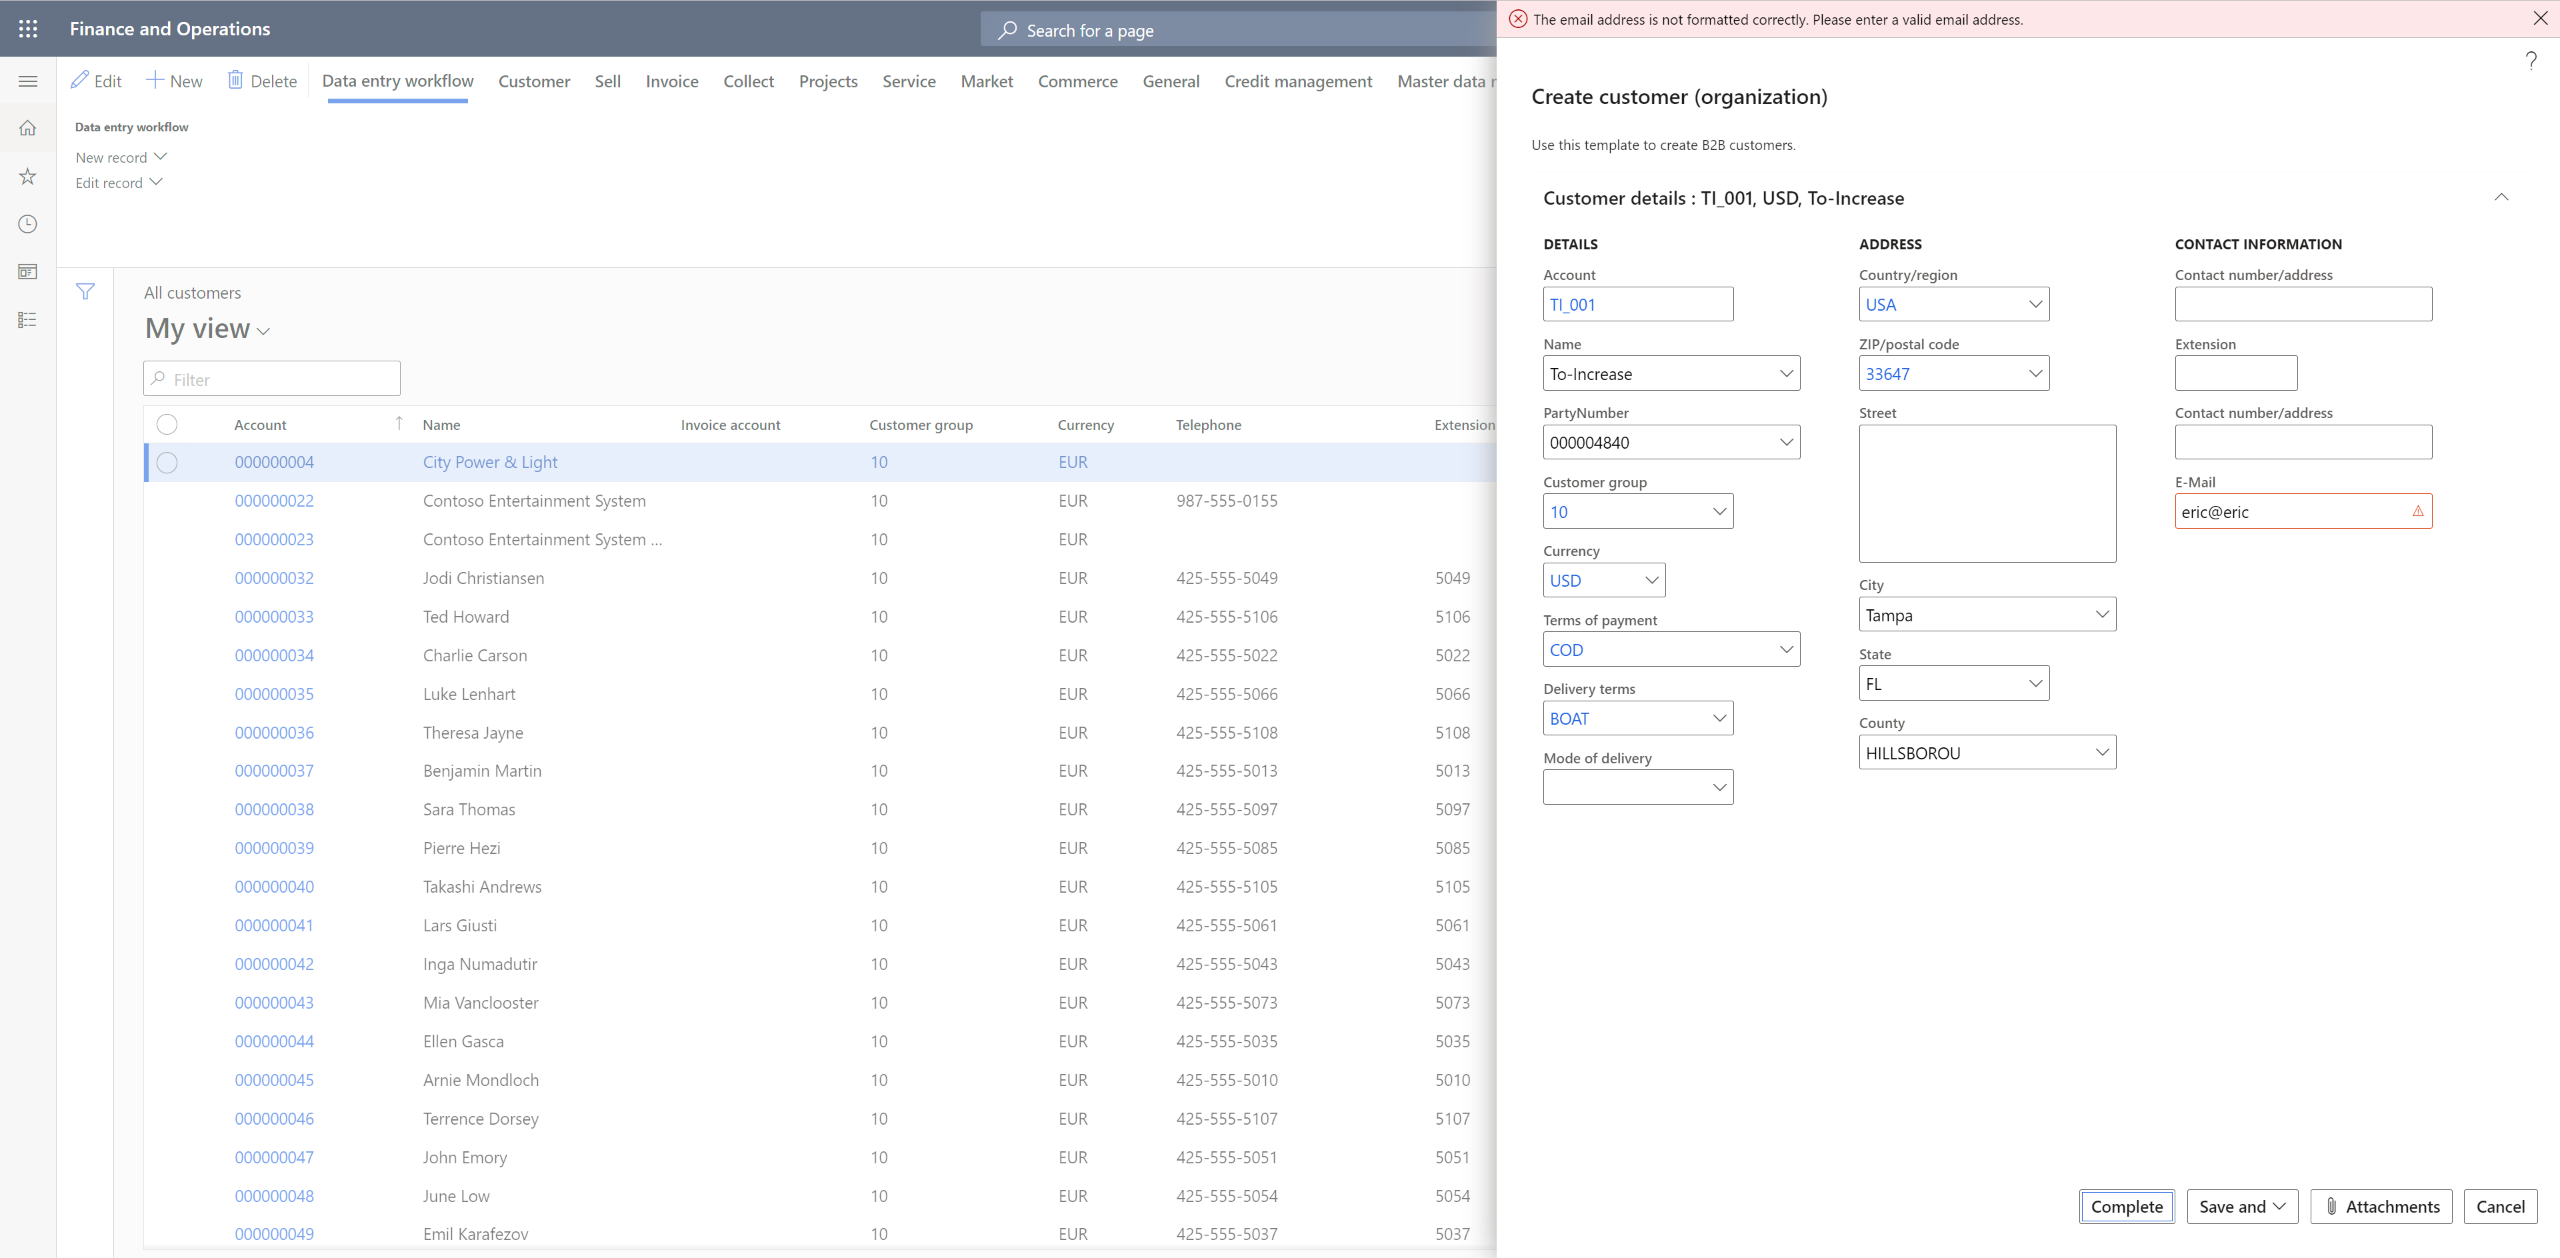
Using our MDM solution, we can also connect to web services to validate certain fields such as email addresses, where, with the web service, a domain can be checked.
After you fill in all the fields, you can click on Complete, which will trigger the next step in the workflow. The next step in the workflow is assigned to the finance team to enter details related to the customer’s financial information.
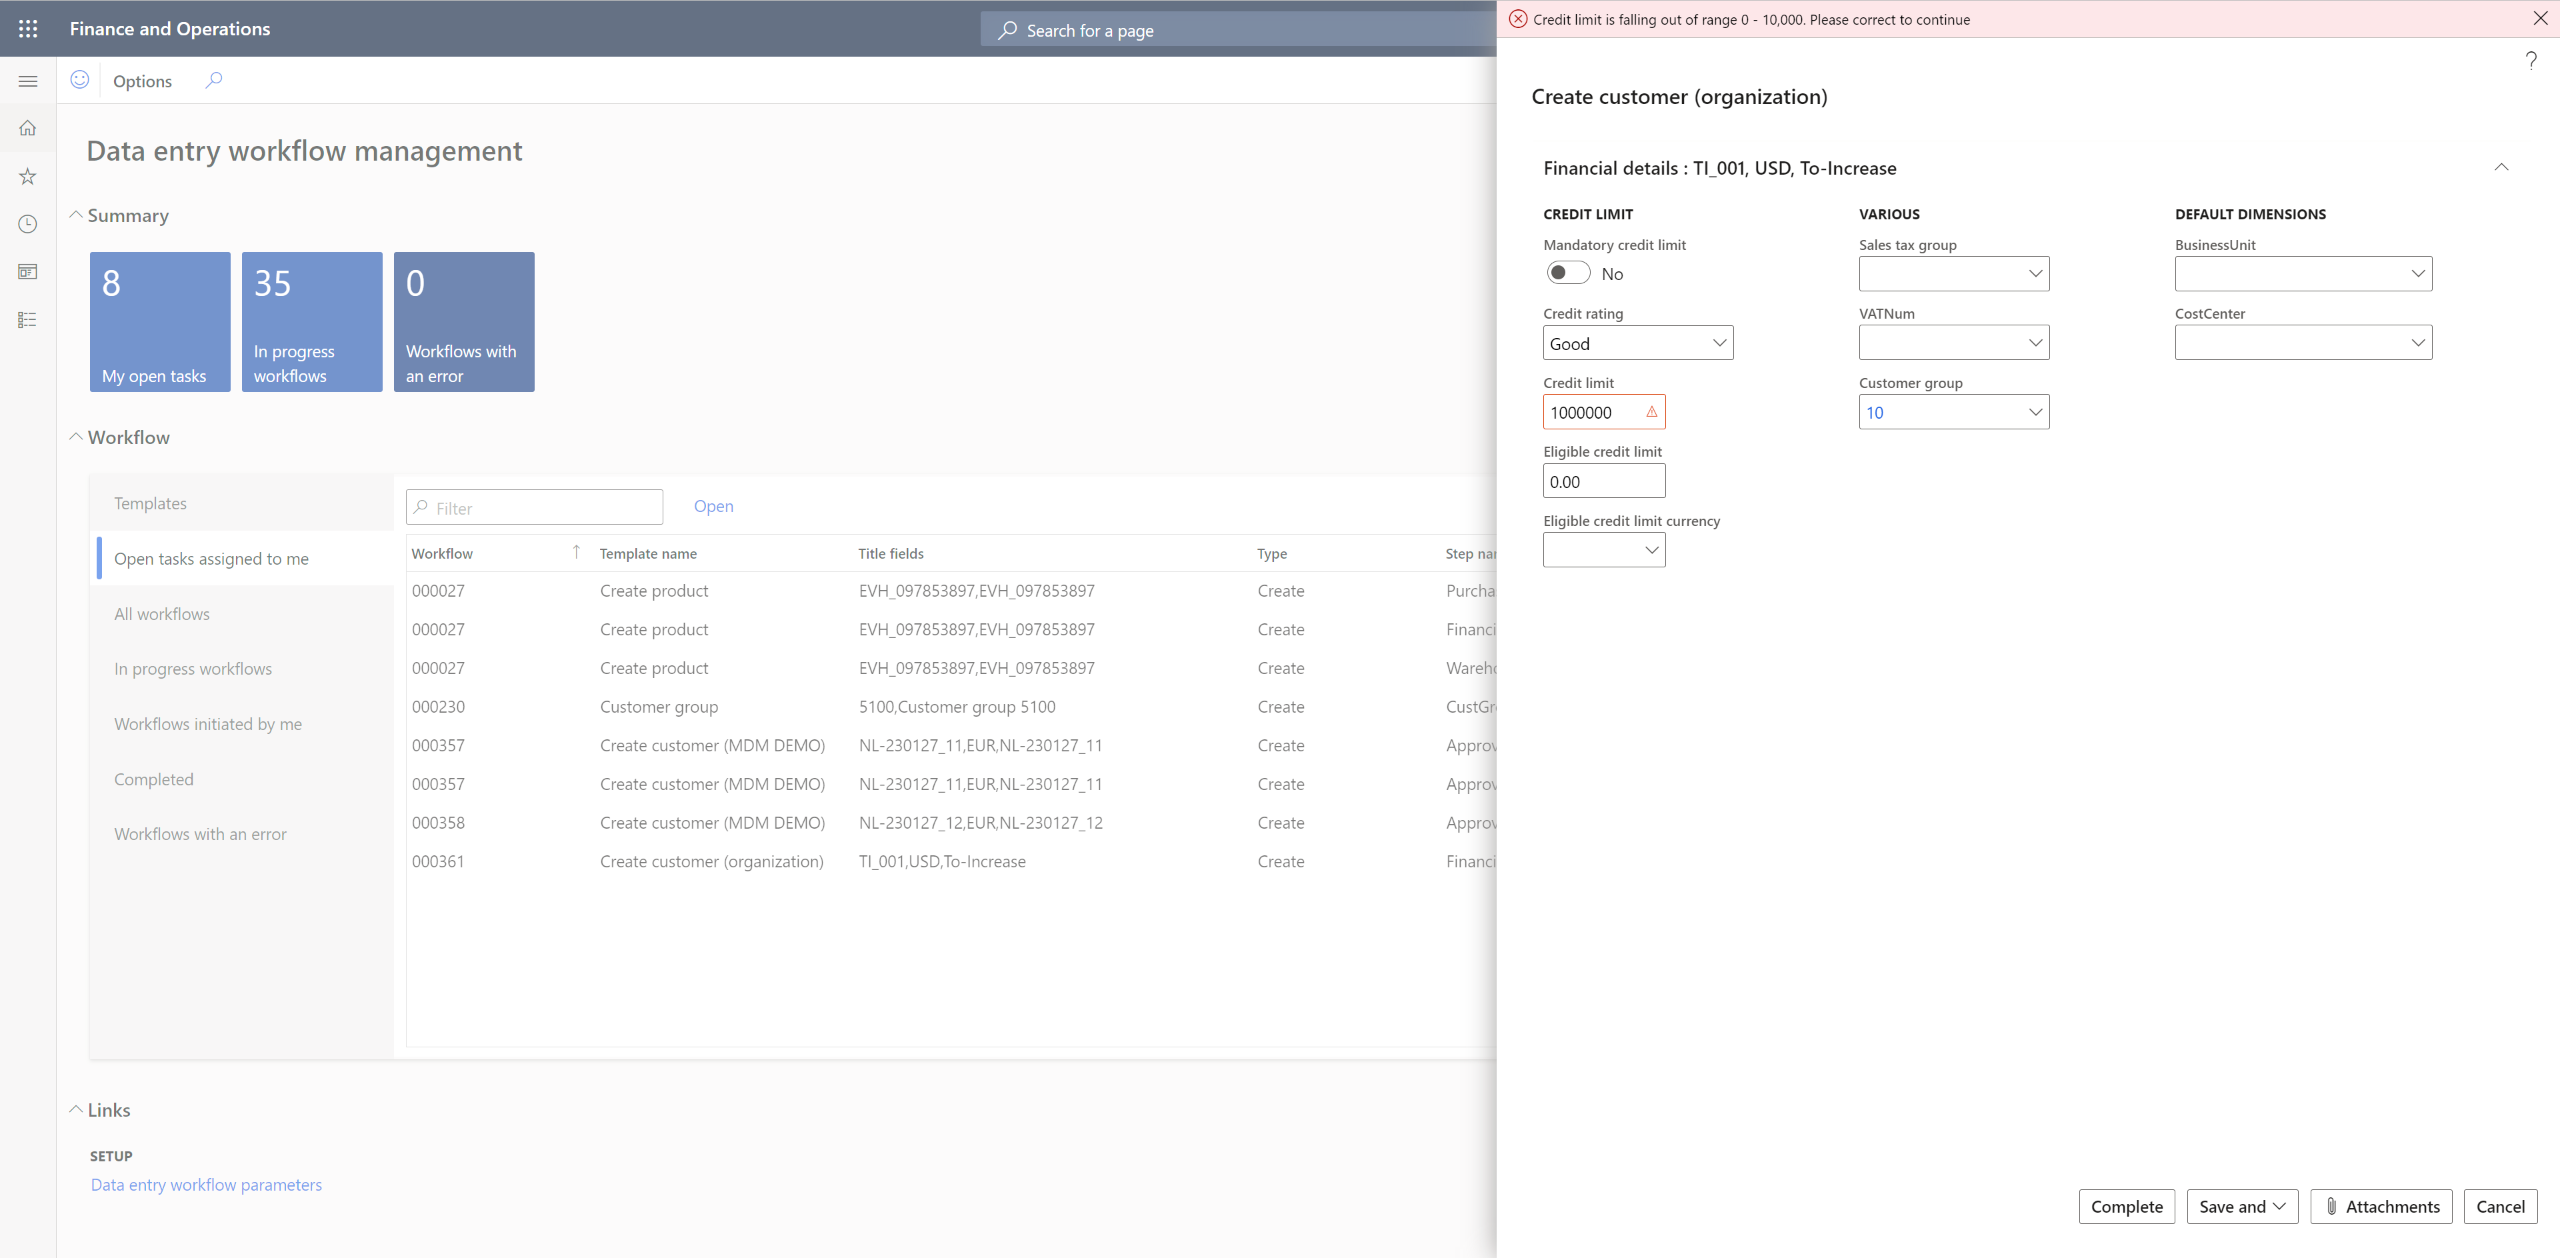
Step 2: Filling in the financial details
The team member from the finance team that has been assigned the task will log into Data Entry Workflow Management which will show up on the F&O dashboard. Then click on Open tasks assigned to me. Fields such as credit rating, credit limit, tax group, VAT number, etc., are assigned to the team. There is a transformation list set up for the credit limit using our solution. For example, for an eligible credit limit of ‘Good’. The credit limit has a range setup between 1-50,000. So, any number entered outside the range will show up as an error.
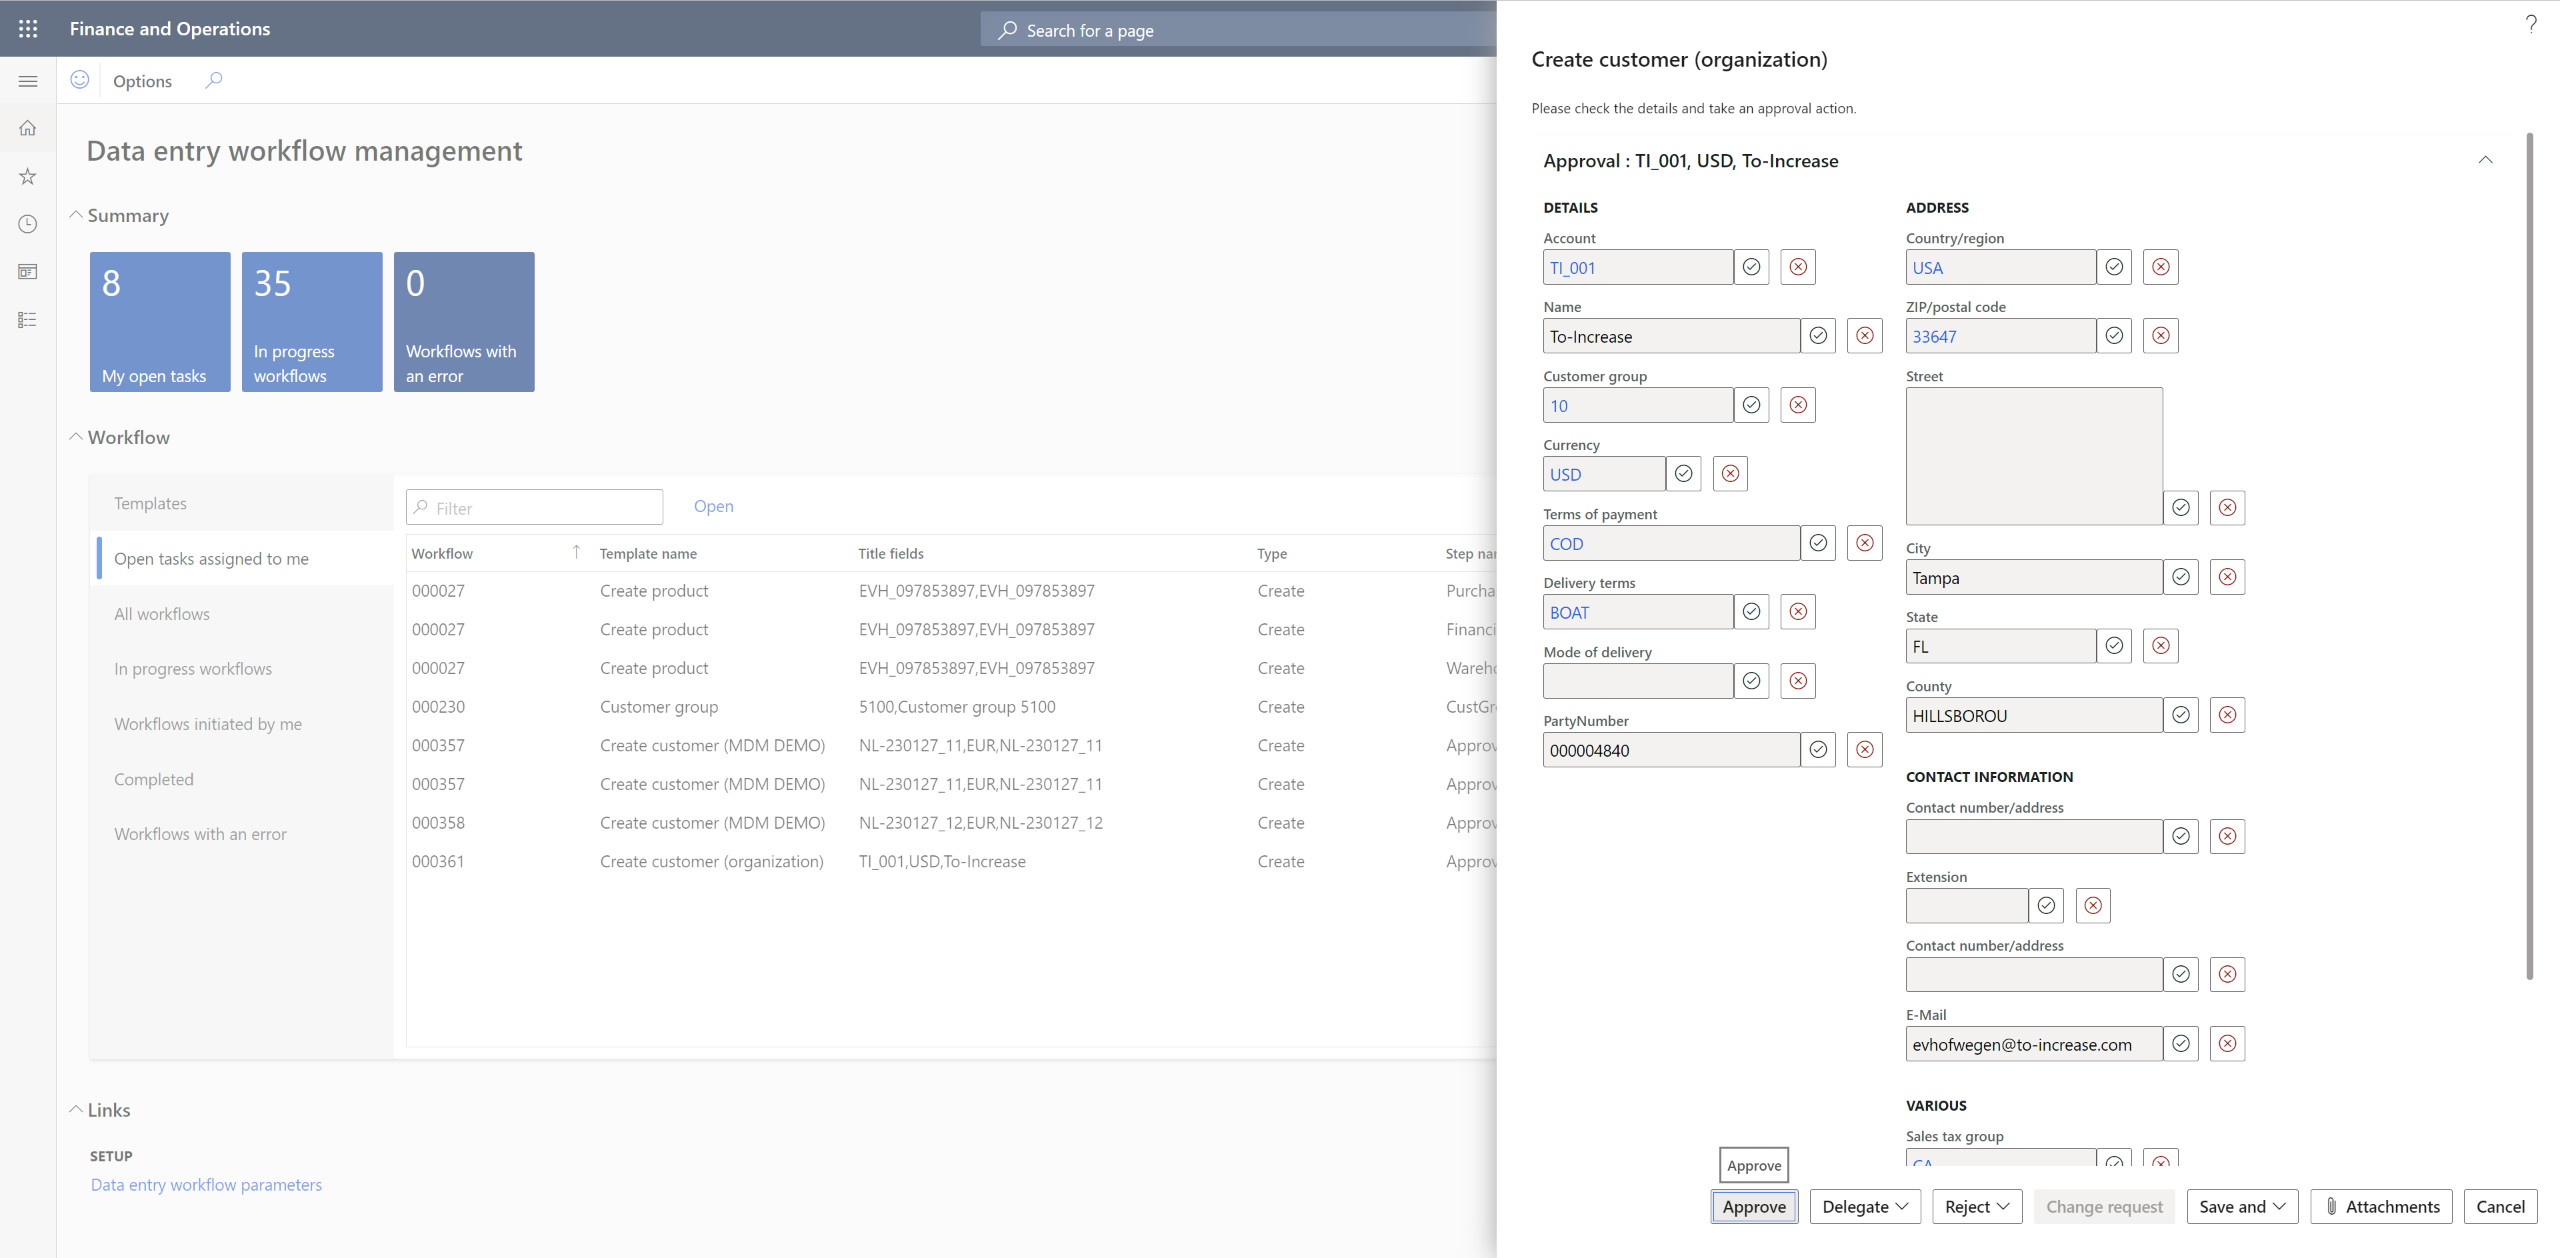
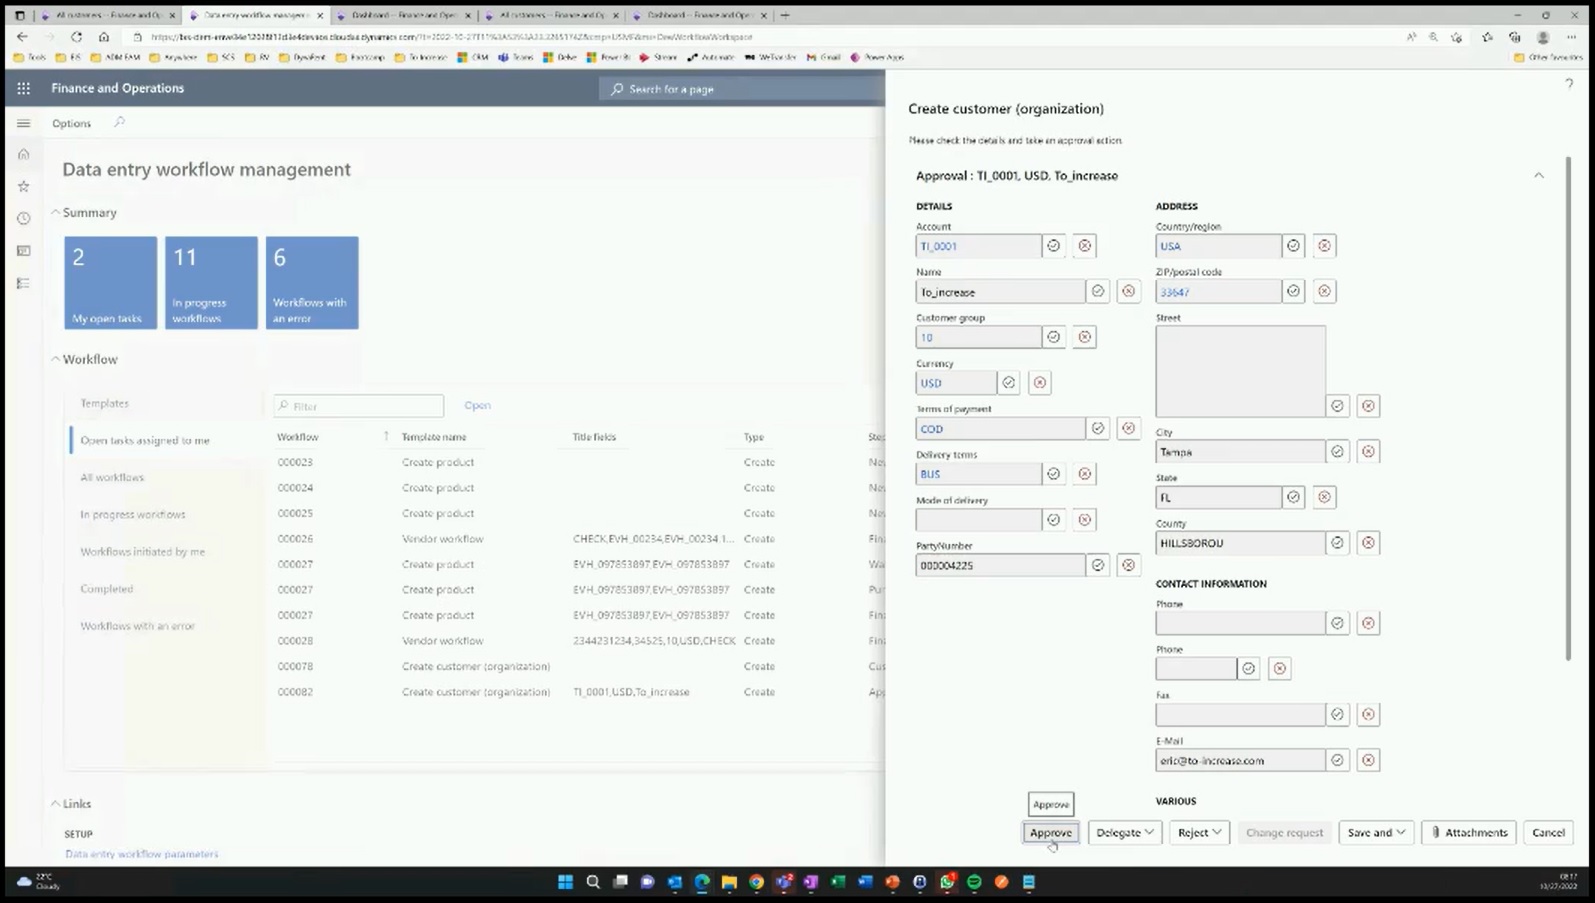
Step 3: Approval
Since these were subsequent steps, after both the steps are completed the next step for approval is triggered and the Manager will be able to see the assigned step for this new customer in the Open tasks section.
The user can either approve or reject each field and leave a note or use the buttons at the bottom and either approve or reject in one go. The manager can also check if there are any attachments added to the form using the button at the bottom right of the form.
After approval, there can be other validations done. See below the error notification under the bell icon on the top right of his screen as the mandatory field – Mode of delivery, has not been filled in.

The workflow will then show under Workflows with an error tab. So, the Manager can go to that workflow and click on Restart the field step, and it will trigger the approval step again.
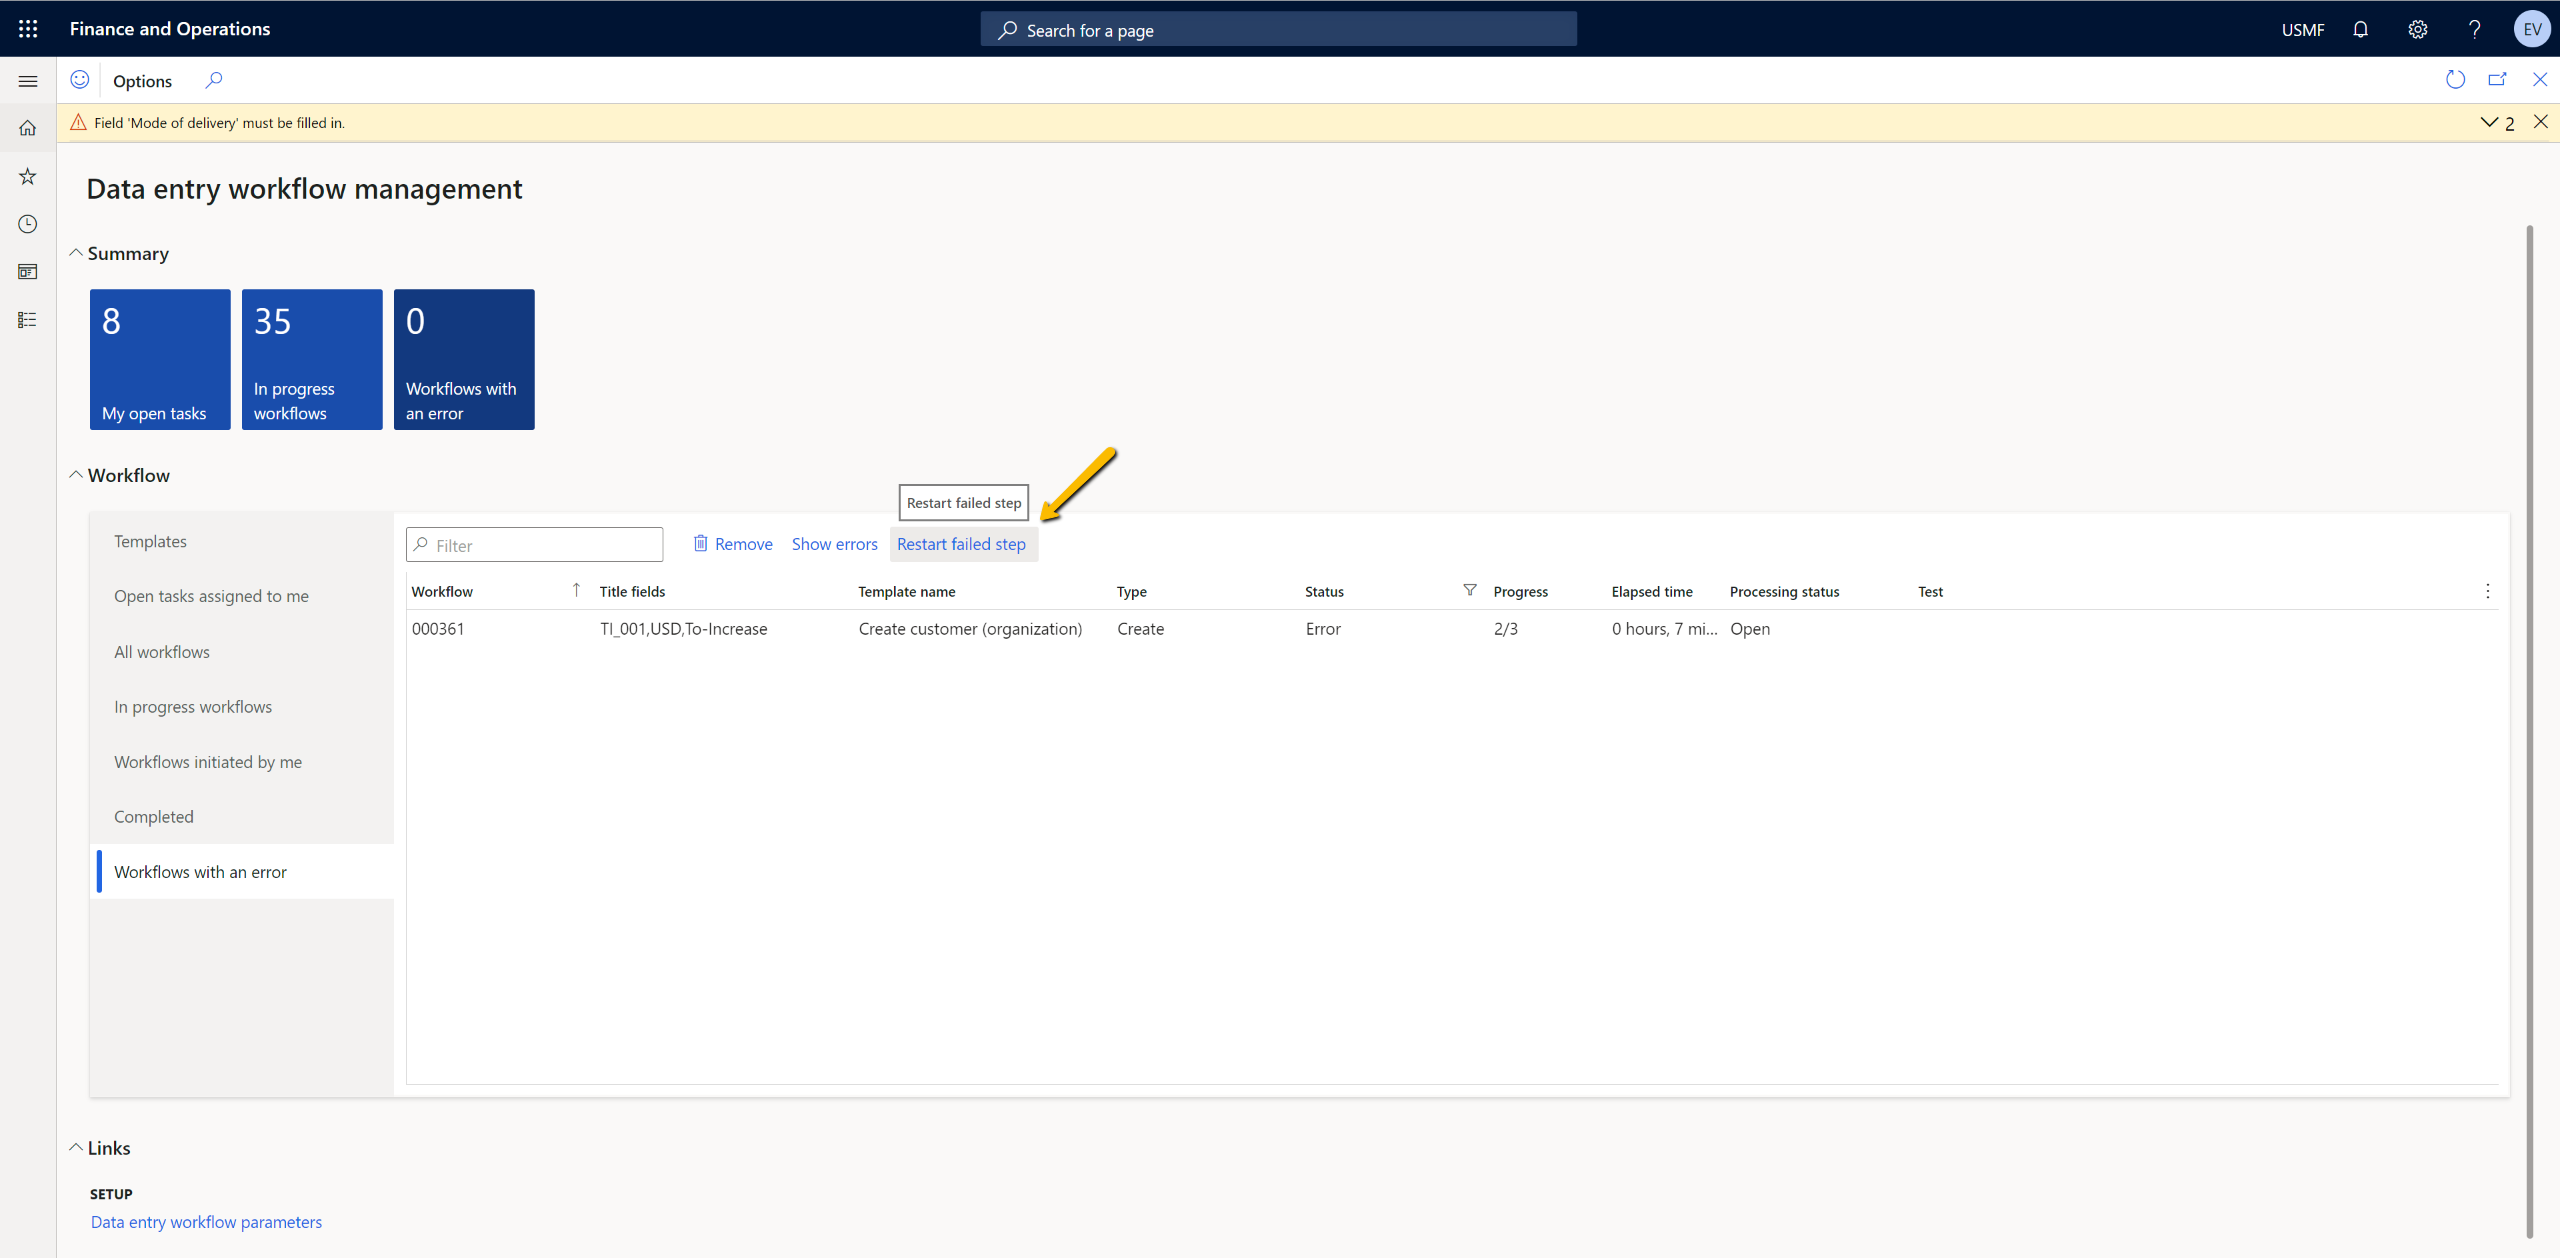
Then the Manager can open the form, reject the field that has not been filled in and leave a note about the field being mandatory. After that, the Manager has to click on Change Request and the workflow will be sent back to the team responsible for the customer detail fields.

Step 4: Change request
The team member responsible for the customer details will see it assigned in the workflow list. After updating the details, the workflow is triggered back to the Approval step again. After the Manager approves the form from the workflows assigned, the customer record is created and can be distributed using MDM Studio.
Step 5: Master data distribution
After the master data record has been created it can be distributed by the data steward. In this scenario, we share the record with only one company.

As a data steward, you can approve this record in the master data company and release it. You can schedule the release for a later date and time or release it immediately. In the screenshot above, you can see that we share it with the DEMF company.
If you go to the master data inbox in the DEMF company, you will see the new record there. The customer will be created in DEMF, but when a user from DEMF clicks on edit, the user will see that some fields are not editable as that has been blocked using the Data Field security feature. Critical fields such as these can be controlled by the master data company, so they cannot be edited regionally or by a certain entity.
Scenario 2: Using Master Data Management Suite for data imports
In this scenario, we will explore how you can use our solutions to enrich data after importing it into D365.
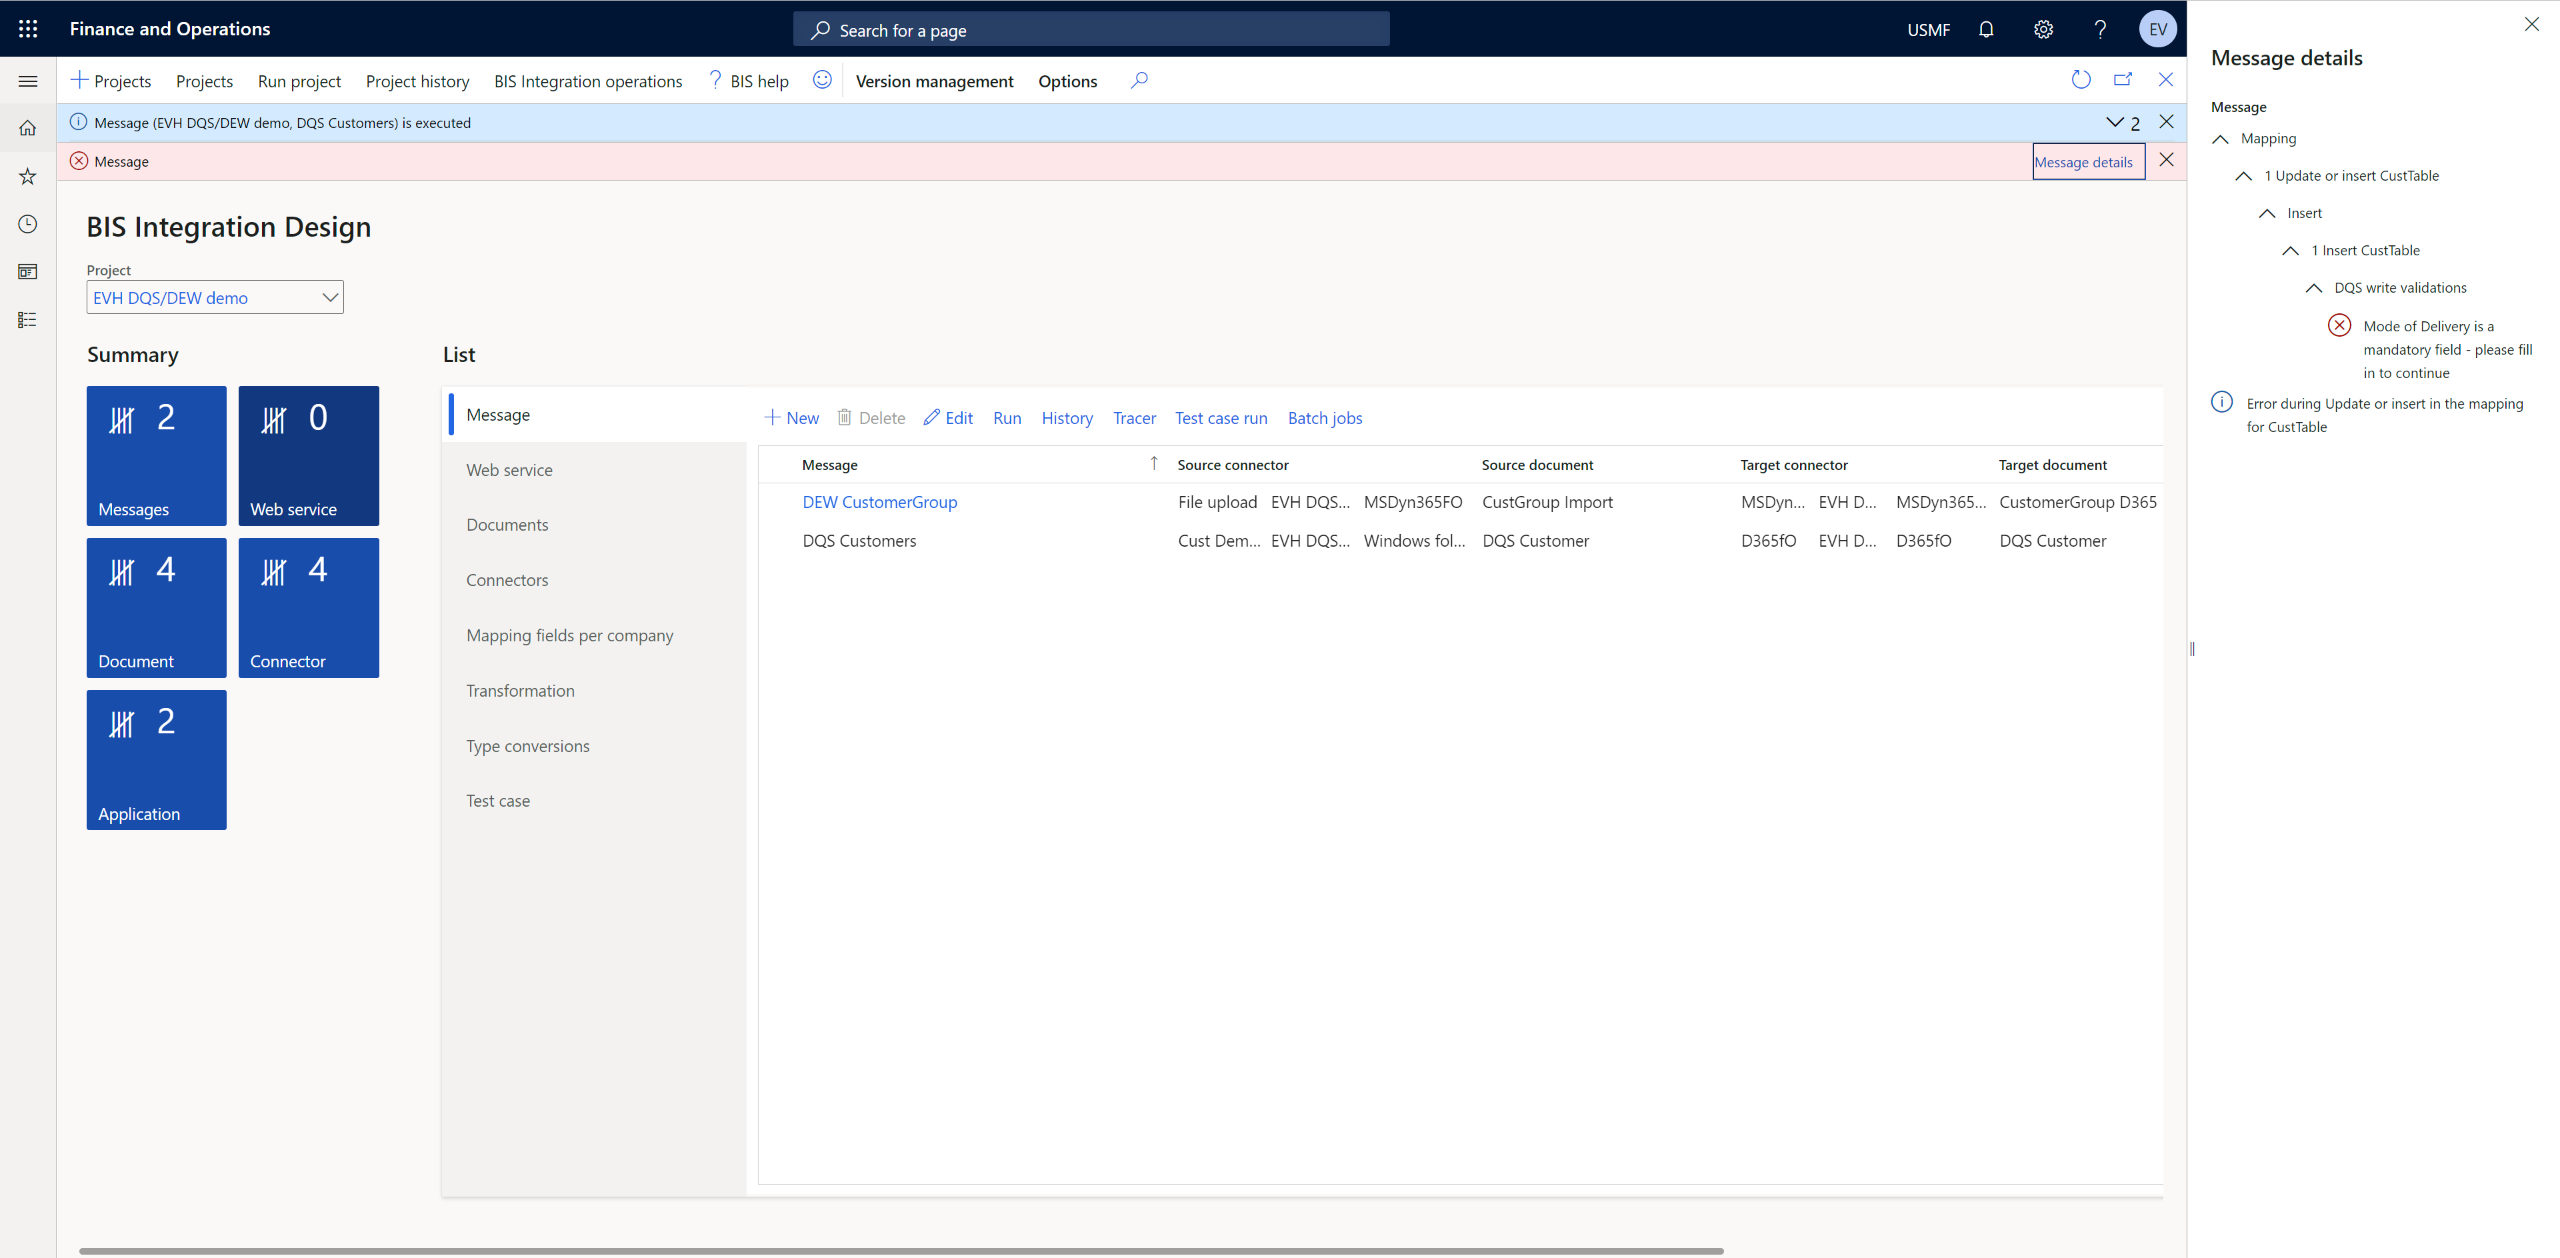
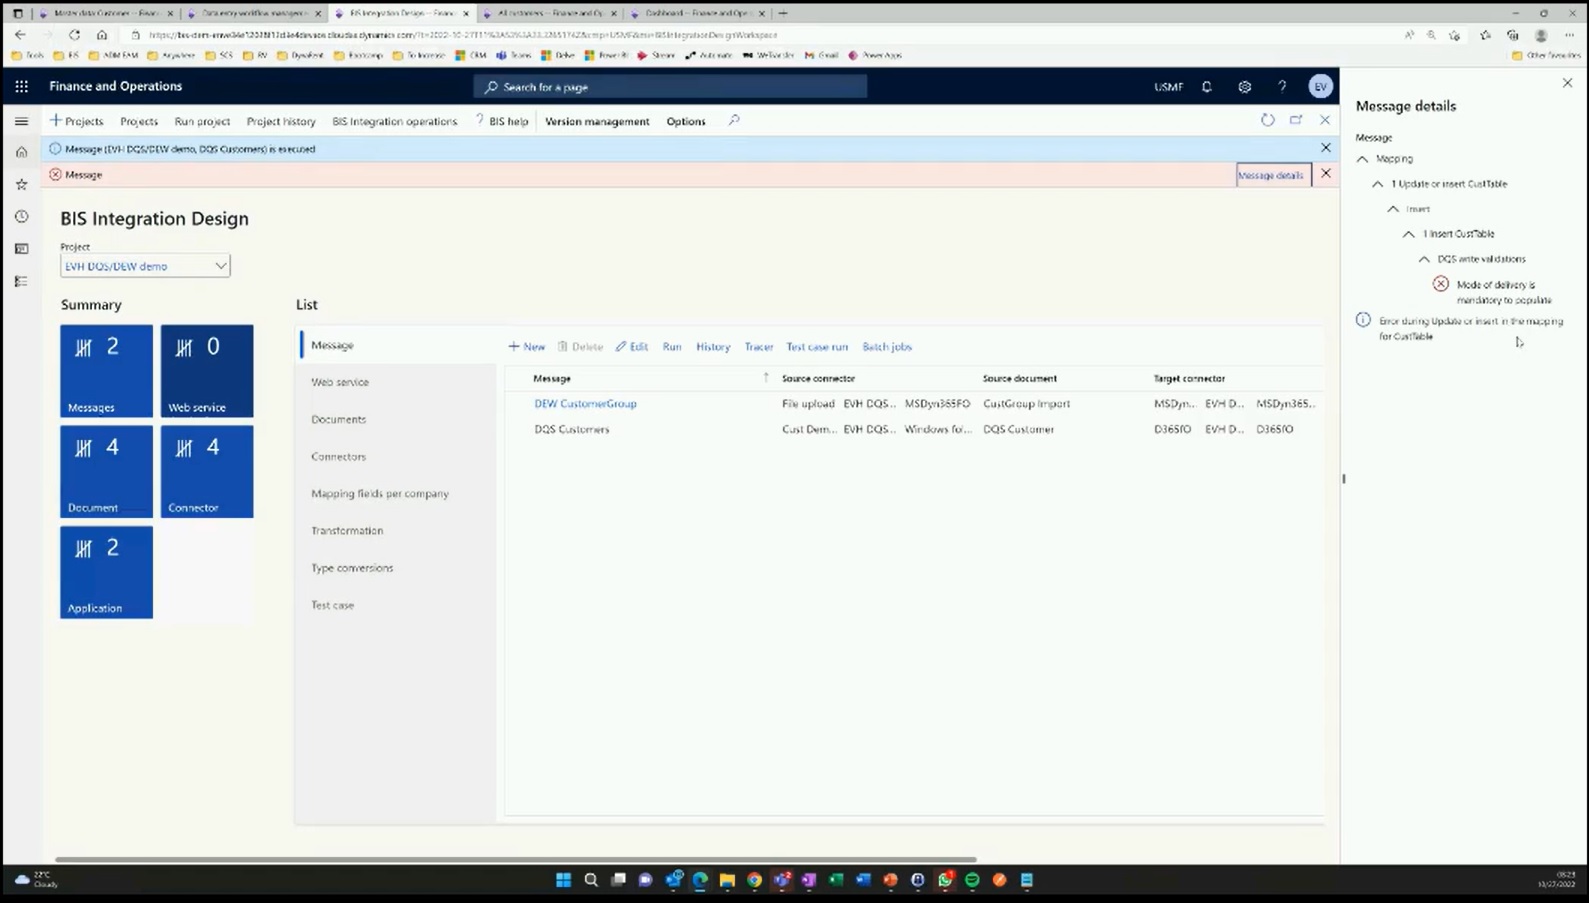
Step 1: Importing the file
You go to Business Integration Design from the F&SCM dashboard and then import a new customer. When you import that information, you see an error message as the mode of delivery has not been populated. The same rules and validations can be applied for integrations and data migrations. And if you are importing information from an external system, there could be many fields that need to be populated in D365 for that record to be distributed to team members or legal entities.
We next click on the Run tab after selecting the customer group we want to import. Instead of importing directly in the table in D365 F&SCM, it will be imported in the Data Entry Workflow management space where the workflow will be triggered using the designed template.
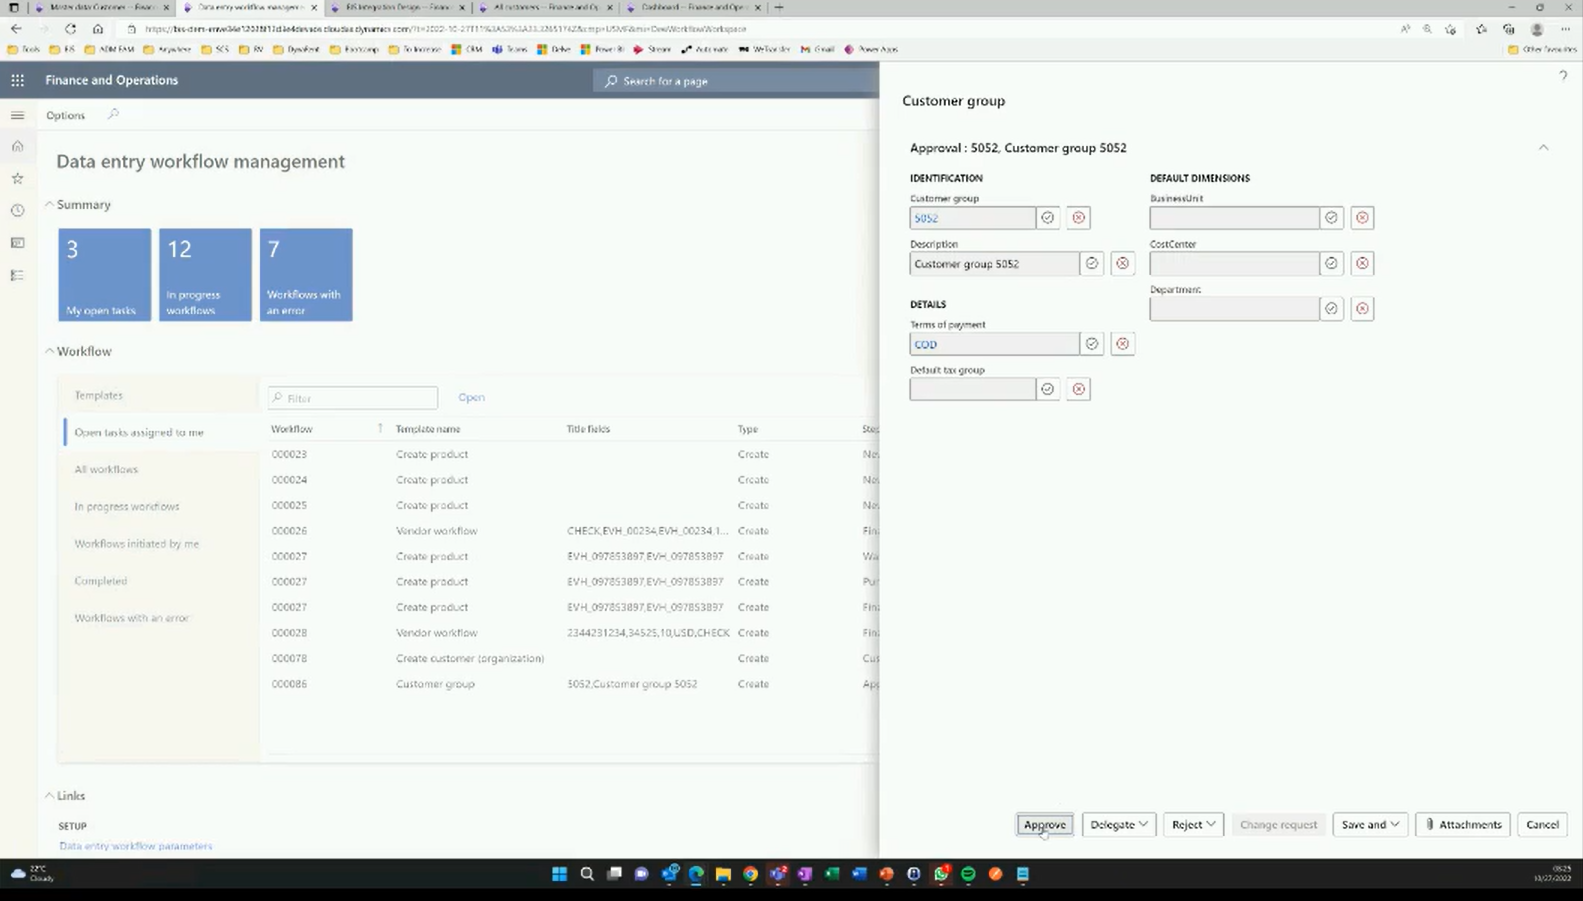
Step 2: Populating and approving the imported data
The team responsible for populating the data that is missing will be assigned the task and they need to key in the information. After they complete that step, the workflow will be sent for approval. When the form is approved, the record is created and optionally can be shared with other companies/systems using the MDM functionality.
Is the Data Governance Solution the right fit for you?
While D365 ERP might not be the core of your master data, through our demo we also showcased how you can import data and use our solutions to complete and enrich that data within D365. Using STAEDEAN’s MDM solution for Dynamics 365, you can assign just the required fields to the responsible people/teams in subsequent or parallel steps and also add an approval step for internal validation. Additionally, you can add rules, and connect to web services which can help you validate that data from an external service. And you can distribute that data to only the required legal entities.
There are several other features of our Data Governance Solution that have not been showcased in this demo. You can download the factsheet to learn about all the features of our master data management solution for Dynamics 365.
If you use D365 F&SCM, whether your master data is inside D365 or needs to be imported, our solutions can help you improve data quality, simplify data entry, and ensure accuracy through validation. However, if you do not use Dynamics 365 F&SCM or use an older version of the ERP, our Data Governance Solution will not be the right fit for you. If you do plan on migrating from AX2012 to D365 F&SCM though, you can consider our Data Migration Solution, which can also help you manage data quality during the move.
If our solutions interest you, and you would like to schedule a demo you can fill out the form below.


Schedule a demo of STAEDEAN's Data Governance Solution.
Eric Van Hofwegen