In a previous blog post we introduced ACME Metal Stairs, a company that uses our Business Integration Solutions for Microsoft Dynamics NAV 2013. In this post we show you how ACME Metal Stairs uses Connectivity Studio to realize the export part of its e-commerce integration. The next blog article will describe how ACME will handle the import of sales orders that are created on their website.
ERP System and Web Shop Data Export Needs
Acme decided to build an e-commerce web shop to sell its metal stairs to existing resellers online, and wanted to integrate it with their ERP systems. In the web shop, the product catalog is filled and updated with items from the Microsoft Dynamics NAV database. New items that are added to the database are synchronized automatically in hourly batches.
To accomplish this integration ACME used To-Increase Connectivity Studio. Now, data is exported from the Microsoft Dynamics NAV database to an FTP server. For example, when an item is exported to the FTP server, the web shop is able to import this newly added item.
Building the Connection for Integration
The administrator uses the Role Center in Microsoft Dynamics NAV and Business Integration Solutions to easily create, build, and monitor connections with ERP systems. The first connection to be created is an outbound connection for exporting the items which are added to the database. To realize this export, you will need to follow these steps:
- Create an internal document which includes the Item Table and some fields.
- Create a new Connectivity Studio connection.
- Add the internal document to the connection by using the document checkbox at the right of the Connection Card.
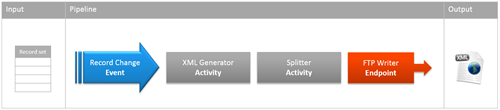
- Add the Elements to the connection. A basic flow for exporting data in Connectivity Studio is as follows:
- Record Change Event – detects new items and triggers the Pipeline
- XML Generator Activity – generates an XML file based on the internal document
- Splitter Activity – splits the XML file into several smaller XML files, one file per item
- FTP Writer Endpoint – writes the XML files to the FTP server location
- Configure each Element separately.
- Define a pipeline. Now you can define the sequence of the Elements as shown in step 4.
- Check the configuration by pressing the Check Configuration button.
- Test the connection by creating some new items and then process the connection.
In this connection, the administrator uses the Record Change Event to trigger the pipeline. There are other ways of triggering the Pipeline, for example by a user who is pressing a button, a timer which expires, or an application function which is executed.
The item is now exported as an XML file, but Connectivity Studio provides the exported files as CSV files as well. The standard set of Elements is extensible, so you can create your own Translator Activity, add it to the set of Elements, and use it in your connection.
The XML is written to an FTP server. The administrator could also have chosen to write the file to a file system, because Connectivity Studio also provides that option. Just like the Activities, the number of Endpoints is also extensible.
To learn how ACME Metal Stairs got started using Business Integration Solutions for Microsoft Dynamics NAV, read our previous blog post.
This blog post is based on real-life customer experiences. 'ACME Metal Stairs' is a fictional name that we use for the sake of privacy and simplicity in story-telling.